
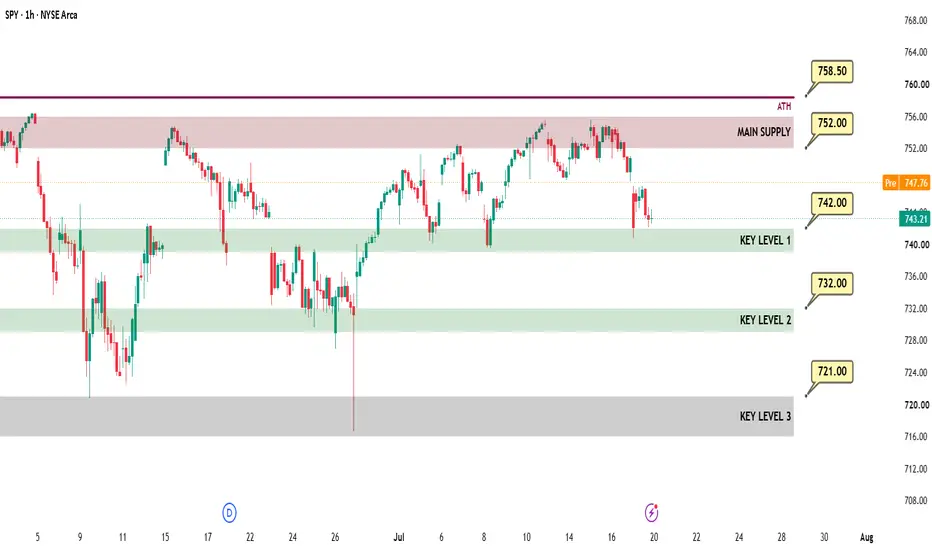
SPY / SPX WEEKLY MARKET OUTLOOK
UA CAPITAL RECAP 19.07 | WEEK 13–17 JUL
The execution throughout the week closely followed our published trading plans.
Monday and Tuesday, both SPY and QQQ Long Scenario 1 trades from the Weekly Market Outlook reached profitable outcomes.
Wednesday's updated Tactical Playbook generated new long opportunities in both SPY and QQQ, with both trades closing profitably.
No new trades were taken on Thursday.
Friday's Tactical Playbook successfully identified short opportunities in both SPY and QQQ. Both positions generated multiple partial profit targets and continue to hold small runner positions into next week.
Ahead of Tuesday's CPI release, we also opened VIX hedge positions on Monday afternoon and closed them Tuesday morning for approximately a 36% gain.
In total, seven options trades were executed throughout the week, and all seven finished as winners.
It was an exceptional week from both an execution and risk management perspective, resulting in a 100% winning record across every completed options trade.
(For reference, I have included last week's outlook on the right.)
Equities Play
Throughout the week we also continued building medium-term spot positions in selected companies through the UA CAPITAL Trading Desk.
To maintain disciplined risk management, new purchases were limited to only one-quarter of our available buying power, bringing our total deployed capital to approximately 50% of our intended allocation.
Our plan remains unchanged. We intend to continue gradually building these medium-term positions from attractive technical levels with an investment horizon extending into November and December 2026.
The specific names remain exclusive to the private Trading Desk, although our primary focus continues to be concentrated in the technology and semiconductor sectors.
This Week's Scenarios / Prediction
Risk Index
This oscillator reads macro conditions and converts them into a technical risk framework. It was developed internally at UA CAPITAL and remains the primary indicator I use for both short-term and long-term positioning decisions.
The Risk Index is currently signaling the potential for a short-term bounce. However, the broader short to medium-term environment continues to price in the possibility of another meaningful downside flush.
The long-term model remains firmly risk on, while the medium-term outlook continues to lean slightly bearish.
This combination typically creates elevated volatility, with both bulls and bears competing aggressively for control before a larger directional move eventually develops.
Given the potential for rapid acceleration in either direction and increasingly violent reversals, our focus this week will remain on aggressive profit-taking and disciplined risk management.
Scenarios / Strategies
Long Scenario 1
KEY Level 1 (742) This is the first major demand zone. If price reclaims this level with a confirmed 1-hour bullish candle close, long exposure can be considered.
Trigger: Price must test the level and produce a bullish 1-hour candle close back above the zone.
Targets: Take partial profits after every $1 advance.
Invalidation: 4-hour candle close below 739.
Long Scenario 2
KEY Level 2 (732)
This is the second major demand zone. If price reclaims this level with a confirmed 1-hour bullish candle close, long exposure can be considered.
Trigger: Price must test the level and produce a bullish 1-hour candle close back above the zone.
Targets: Take partial profits after every $1 advance.
Invalidation: 4-hour candle close below 729.
Long Scenario 3
KEY Level 3 (724) This is the third major demand zone. If price reclaims this level with a confirmed 1-hour bullish candle close, long exposure can be considered.
Trigger: Price must test the level and produce a bullish 1-hour candle close back above the zone.
Targets: Take partial profits after every $1 advance.
Invalidation: Daily candle close below 721.
Short Scenario
Main Supply (752) This area represents the primary supply zone and the upper boundary of the current trading range. A confirmed rejection from this level could provide a tactical short opportunity.
Trigger: Retest of the zone followed by a 1-hour bearish rejection candle.
Targets: Take partial profits after every $1 decline.
Invalidation: 4-hour candle close above 757.
Position Management Rules
1. Entry model: 1-hour candle close above/below the designated level.
2. Take profits in stages because market reversals can happen quickly.
3. After the first profit target is reached, move all remaining stop losses to breakeven and convert the trade into a risk-free position.
4. A reaction from the level must be confirmed. We do not predict price. We react to price.
5. Every scenario has its own invalidation level. Read them carefully before entering a trade.
6. All charts use RTH (Regular Trading Hours). ETH candles may produce inaccurate confirmation signals.
Notice: Starting a fresh, fully transparent track record for SPY, QQQ, and core equities here on TradingView. Going forward, all daily market updates, Tactical SPY/SPX - QQQ outlooks, institutional research, weekly outlooks, and mid-week market updates will be documented and tracked consistently.
This analysis is for educational purposes only and reflects my personal opinion. It is not financial advice.
UA CAPITAL RECAP 19.07 | WEEK 13–17 JUL
The execution throughout the week closely followed our published trading plans.
Monday and Tuesday, both SPY and QQQ Long Scenario 1 trades from the Weekly Market Outlook reached profitable outcomes.
Wednesday's updated Tactical Playbook generated new long opportunities in both SPY and QQQ, with both trades closing profitably.
No new trades were taken on Thursday.
Friday's Tactical Playbook successfully identified short opportunities in both SPY and QQQ. Both positions generated multiple partial profit targets and continue to hold small runner positions into next week.
Ahead of Tuesday's CPI release, we also opened VIX hedge positions on Monday afternoon and closed them Tuesday morning for approximately a 36% gain.
In total, seven options trades were executed throughout the week, and all seven finished as winners.
It was an exceptional week from both an execution and risk management perspective, resulting in a 100% winning record across every completed options trade.
(For reference, I have included last week's outlook on the right.)
Equities Play
Throughout the week we also continued building medium-term spot positions in selected companies through the UA CAPITAL Trading Desk.
To maintain disciplined risk management, new purchases were limited to only one-quarter of our available buying power, bringing our total deployed capital to approximately 50% of our intended allocation.
Our plan remains unchanged. We intend to continue gradually building these medium-term positions from attractive technical levels with an investment horizon extending into November and December 2026.
The specific names remain exclusive to the private Trading Desk, although our primary focus continues to be concentrated in the technology and semiconductor sectors.
This Week's Scenarios / Prediction
Risk Index
This oscillator reads macro conditions and converts them into a technical risk framework. It was developed internally at UA CAPITAL and remains the primary indicator I use for both short-term and long-term positioning decisions.
The Risk Index is currently signaling the potential for a short-term bounce. However, the broader short to medium-term environment continues to price in the possibility of another meaningful downside flush.
The long-term model remains firmly risk on, while the medium-term outlook continues to lean slightly bearish.
This combination typically creates elevated volatility, with both bulls and bears competing aggressively for control before a larger directional move eventually develops.
Given the potential for rapid acceleration in either direction and increasingly violent reversals, our focus this week will remain on aggressive profit-taking and disciplined risk management.
Scenarios / Strategies
Long Scenario 1
KEY Level 1 (742) This is the first major demand zone. If price reclaims this level with a confirmed 1-hour bullish candle close, long exposure can be considered.
Trigger: Price must test the level and produce a bullish 1-hour candle close back above the zone.
Targets: Take partial profits after every $1 advance.
Invalidation: 4-hour candle close below 739.
Long Scenario 2
KEY Level 2 (732)
This is the second major demand zone. If price reclaims this level with a confirmed 1-hour bullish candle close, long exposure can be considered.
Trigger: Price must test the level and produce a bullish 1-hour candle close back above the zone.
Targets: Take partial profits after every $1 advance.
Invalidation: 4-hour candle close below 729.
Long Scenario 3
KEY Level 3 (724) This is the third major demand zone. If price reclaims this level with a confirmed 1-hour bullish candle close, long exposure can be considered.
Trigger: Price must test the level and produce a bullish 1-hour candle close back above the zone.
Targets: Take partial profits after every $1 advance.
Invalidation: Daily candle close below 721.
Short Scenario
Main Supply (752) This area represents the primary supply zone and the upper boundary of the current trading range. A confirmed rejection from this level could provide a tactical short opportunity.
Trigger: Retest of the zone followed by a 1-hour bearish rejection candle.
Targets: Take partial profits after every $1 decline.
Invalidation: 4-hour candle close above 757.
Position Management Rules
1. Entry model: 1-hour candle close above/below the designated level.
2. Take profits in stages because market reversals can happen quickly.
3. After the first profit target is reached, move all remaining stop losses to breakeven and convert the trade into a risk-free position.
4. A reaction from the level must be confirmed. We do not predict price. We react to price.
5. Every scenario has its own invalidation level. Read them carefully before entering a trade.
6. All charts use RTH (Regular Trading Hours). ETH candles may produce inaccurate confirmation signals.
Notice: Starting a fresh, fully transparent track record for SPY, QQQ, and core equities here on TradingView. Going forward, all daily market updates, Tactical SPY/SPX - QQQ outlooks, institutional research, weekly outlooks, and mid-week market updates will be documented and tracked consistently.
This analysis is for educational purposes only and reflects my personal opinion. It is not financial advice.

Powiązane publikacje
Wyłączenie odpowiedzialności
Informacje i publikacje nie stanowią i nie powinny być traktowane jako porady finansowe, inwestycyjne, tradingowe ani jakiekolwiek inne rekomendacje dostarczane lub zatwierdzone przez TradingView. Więcej informacji znajduje się w Warunkach użytkowania.
Powiązane publikacje
Wyłączenie odpowiedzialności
Informacje i publikacje nie stanowią i nie powinny być traktowane jako porady finansowe, inwestycyjne, tradingowe ani jakiekolwiek inne rekomendacje dostarczane lub zatwierdzone przez TradingView. Więcej informacji znajduje się w Warunkach użytkowania.