Viprasol Absorption Radar Pro for Smart Money
🔵 OVERVIEW
🔵 WHY VOLUME AND REJECTION ARE COMBINED
🔵 WHAT IS ORIGINAL
🔵 HOW IT WORKS
🔵 KEY FEATURES
🔵 HOW TO USE
🔵 SETTINGS
🔵 ALERTS
🔵 LIMITATIONS & DISCLAIMER
🔵 HOUSE RULES & PURPOSE
Published open-source by Viprasol.
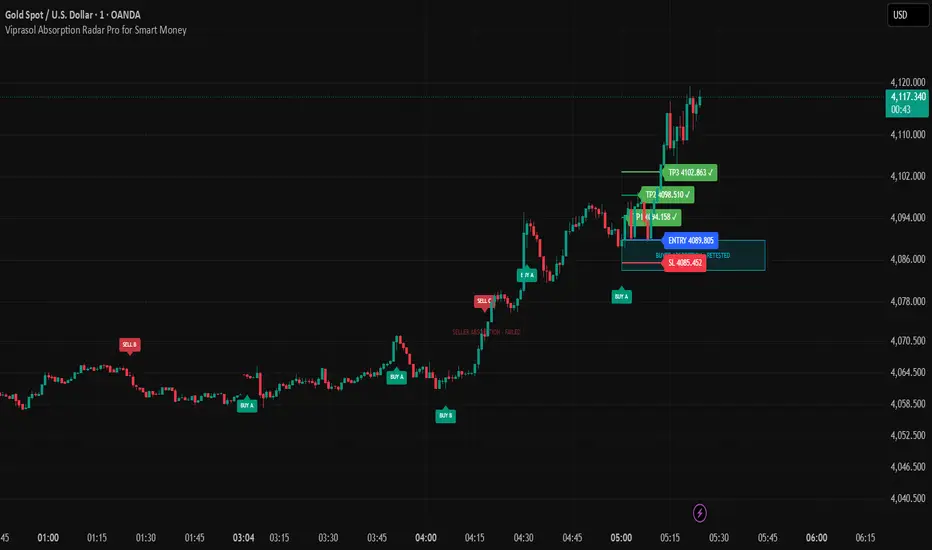
Viprasol Absorption Radar Pro for Smart Money marks candles where heavy volume meets a strong rejection: a volume spike on a candle with a long wick and a close back near the opposite end of its range. This pattern is often read as one side absorbing the other's orders at that price. Each such candle becomes a BUY or SELL with an A / B / C strength grade, and its absorption zone is tracked as live, retested or failed. Entry, stop and three targets are drawn for the latest signal and end where that trade ends. A radar dashboard shows the live volume, buyer and seller absorption, pressure, trend, last event and the state of the latest zone.
It is built for traders who read volume at the candle level and want absorption candles found, graded and followed up on one chart. "Smart Money" names the idea the indicator looks for. It is measured only through volume and candle shape, not through order-flow data.
🔵 WHY VOLUME AND REJECTION ARE COMBINED
- Volume alone does not show who won. A volume spike only says many contracts traded. A long wick with the close back near the other end of the candle shows that the push in one direction was met and reversed within the bar.
- A wick alone does not show effort. Long wicks on thin volume are common and say little. Requiring the volume spike keeps only rejections where a lot of volume traded at the rejected prices.
- The zone is where the test happened. The absorption candle's wick and body mark the prices where the opposite side was absorbed. Watching whether price respects that zone, comes back to it or closes through it is the follow-up a trader needs, so the zone tracks its own state.
- Filters are optional context. The EMA filter limits signals to the trend direction, and the sweep filter keeps only absorptions that also took out the prior high or low. Both are off by default, so the base rule stays a pure volume-and-rejection test.
🔵 WHAT IS ORIGINAL
- Absorption zones with a lifecycle: instead of a fixed box, each zone stays live until a candle closes beyond its far edge, which marks it FAILED (the box stops there and fades). Price that leaves a live zone and comes back into it marks it RETESTED. Both events have alerts, and the dashboard shows the latest zone's state.
- One strength score per absorption: relative volume, rejection-wick share and close location are combined into a 0-100 score and an A / B / C grade. The grade is shown on every signal and can filter the weaker ones.
- Trade levels that end with the trade: each target line stops with a ✓ when reached, and all lines stop on the bar the stop (✗) or the last target is hit.
🔵 HOW IT WORKS
Volume spike, then rejection candle, then optional filters, then grade, cooldown, zone and levels. Signals and zone states are decided on closed bars only; the dashboard also reads the live bar.
1 — Volume SpikePine Script®
2 — Rejection Candle and AbsorptionPine Script®
3 — Optional Filters and SignalPine Script®
4 — Strength Score and GradePine Script®
- Reading the grade: every signal already passes the absorption rule, so scores start around 50. The grade ranks signals against each other; it is not a probability of success.
- Tooltip: hover a signal label to see its score, relative volume, wick share, close location, and whether it also swept the prior high or low.
5 — Absorption Zone LifecyclePine Script®
- Drawing: live and retested zones keep reaching past the current bar. A failed zone stops on the failing bar, turns dotted and fades. The latest buyer and seller zone are kept; a new signal replaces the previous zone on its side.
- Fixed length: the classic mode draws each zone for a set number of bars without tracking.
6 — Auto TargetsPine Script®
- Drawing: lines start at the signal bar. Each target line stops with a ✓ on the bar price first reaches it, and every line stops on the bar the stop (✗) or TP3 is hit. A bar that touches both the stop and a target counts as the stop. While the trade is open, the lines reach past the current bar. Only the latest signal's plan is drawn.
7 — Radar Dashboard
- Volume: high volume, normal or no volume data, with relative volume.
- Buy / Sell Pressure: DETECTED when the current candle is an absorption candle, otherwise when the last one was.
- Pressure: the live read of the current candle.
- EMA Trend: close above or below the EMA.
- Last Event: the last signal with its grade and age.
- Zone: the state of the latest signal's zone: live, retested or failed.
🔵 KEY FEATURES
- Absorption signals: volume spike plus rejection candle, closed bars only, at least 10 candles apart
- Strength grade: 0-100 score and A / B / C grade on every signal, with an optional minimum-grade filter
- Zone lifecycle: live, retested and failed absorption zones, with alerts for retests and failures
- Optional filters: EMA trend filter and liquidity-sweep filter
- Auto targets: ATR stop and three R-multiple targets whose lines end where the trade ends
- Radar dashboard: volume, absorption, pressure, trend, last event and zone state
- Alerts: nine alert conditions plus BUY / SELL alerts that carry grade, entry, stop and all three targets as text or JSON
🔵 HOW TO USE
Setup
- Chart: symbols with real volume (stocks, futures, crypto), standard candlesticks, 1m to 1D.
- Defaults: volume average 20, spike 1.5x, wick 0.40, lookback 20, filters off, cooldown 10, all grades shown, zones tracked, stop 1.5 ATR, targets 1R / 2R / 3R.
Reading the Chart
- BUY / SELL label with a letter: an absorption signal and its strength grade. Hover it for the breakdown.
- Aqua / red box: the buyer / seller absorption zone. RETESTED means price came back to it; FAILED (dotted and faded) means a candle closed through it.
- Level lines: entry, stop and targets of the latest signal. A ✓ or ✗ marks the level that was hit.
- SW triangle (off by default): a liquidity sweep of the prior 20-bar high or low.
Recommended Starting Points
- Scalping (1m-5m): spike multiplier 1.8-2.0, cooldown 10-15
- Intraday (15m-1H): defaults
- Swing (4H-1D): lookback 20-30, EMA trend filter on
These are starting points only. Test on historical data and adjust before trading live.
🔵 SETTINGS
- Absorption Engine: volume average length, volume spike multiplier, minimum rejection wick ratio, liquidity lookback.
- Signal Filters: use EMA trend filter, EMA length, require liquidity sweep, signal cooldown bars, minimum signal grade.
- Chart Visuals: show absorption zones, zone mode, zone extension bars, show liquidity sweeps, show EMA, show BUY / SELL signals, signal labels.
- Radar Dashboard: show dashboard, dashboard position.
- Auto Targets: show auto targets, stop loss ATR multiplier, TP1 / TP2 / TP3 risk reward, target line extension, end levels at stop / target.
- Alerts: BUY / SELL alerts with levels, alert message format (Text or JSON).
🔵 ALERTS
- Buyer / Seller Absorption: a BUY / SELL signal on the closed candle
- Bullish / Bearish Sweep: a sweep of the prior 20-bar low / high
- Volume Spike: a closed candle with volume at or above the spike threshold
- Buyer / Seller Zone Retest: price came back into the latest absorption zone after leaving it
- Buyer / Seller Zone Failed: a candle closed beyond the far edge of the latest absorption zone
- Any alert() function call: each BUY / SELL with grade, ticker, timeframe, entry, stop, TP1, TP2 and TP3, as text or as JSON for webhooks
All alert conditions include {{ticker}}, {{interval}} and {{close}} placeholders and are evaluated on closed bars.
🔵 LIMITATIONS & DISCLAIMER
- A proxy, not order flow: absorption is estimated from each candle's volume and shape. The indicator does not read bid / ask, footprint or tick data, so it cannot show who actually traded.
- Volume quality varies: spot forex and many CFD feeds report tick volume, and some indices report none. Without volume data no signal can fire, and the dashboard says NO VOLUME DATA.
- Zones can fail quickly: many absorption zones are closed through within a few bars. A FAILED zone is information too, not an error.
- The grade is a heuristic: the weights and cut-offs are fixed design choices that describe the signal candle. They do not predict outcomes.
- Visual only: entry, stop and target lines are references for the latest signal, and where they end is judged from bar highs and lows, not real fills. The indicator does not place or manage trades.
- No guarantees: past behaviour of any signal does not guarantee future results. Always use proper risk management and do your own analysis before trading.
🔵 HOUSE RULES & PURPOSE
- Educational purpose only: this indicator is published for educational and analytical purposes. It is not financial advice, not a trading recommendation and not a solicitation to buy or sell any asset. Nothing on the chart, in the dashboard or in the alerts should be taken as a promise of results.
- TradingView House Rules: this script is published open-source and in line with the TradingView House Rules. The description explains how every signal, grade, zone state and read-out is calculated, makes no performance or win-rate claims, uses standard candlestick charts only, and the chart shown is clean with the symbol and timeframe visible.
- Your responsibility: test the indicator on historical data, understand each setting before changing it, and never risk more than you can afford to lose.
Published open-source by Viprasol.

Trading-systems engineers. We build custom MT4/MT5 expert advisors, prop-firm-compliant EAs, TradingView indicators, Pine-to-MQL5 ports and webhook-to-broker bridges. Backtested, forward-tested, source code yours. viprasol.com · WhatsApp +91 96336 52112
Wyłączenie odpowiedzialności
Informacje i publikacje nie stanowią i nie powinny być traktowane jako porady finansowe, inwestycyjne, tradingowe ani jakiekolwiek inne rekomendacje dostarczane lub zatwierdzone przez TradingView. Więcej informacji znajduje się w Warunkach użytkowania.
Trading-systems engineers. We build custom MT4/MT5 expert advisors, prop-firm-compliant EAs, TradingView indicators, Pine-to-MQL5 ports and webhook-to-broker bridges. Backtested, forward-tested, source code yours. viprasol.com · WhatsApp +91 96336 52112
Wyłączenie odpowiedzialności
Informacje i publikacje nie stanowią i nie powinny być traktowane jako porady finansowe, inwestycyjne, tradingowe ani jakiekolwiek inne rekomendacje dostarczane lub zatwierdzone przez TradingView. Więcej informacji znajduje się w Warunkach użytkowania.