AMD Range+
AMD Range+
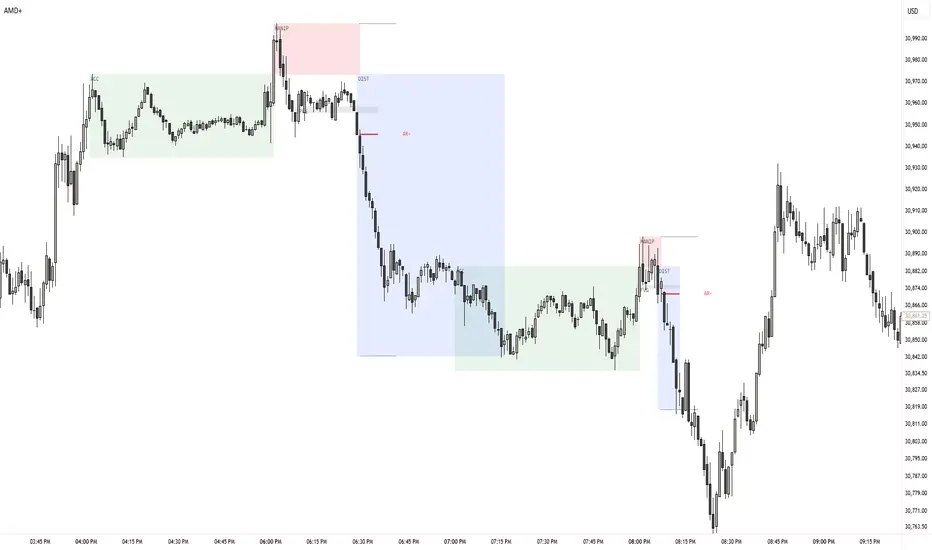
AMD Range+ marks an accumulation, manipulation, distribution (Power of Three) sequence on the chart timeframe. Price builds a range, runs out of it and sweeps an extreme, then closes aggressively back inside. An entry fires on a reversal pattern after that return, with the stop at the sweep extreme. The rest of the chart shows the three stages as boxes, the open of a selectable PO3 candle, any setup still waiting, and the trade plan.
This is an overlay indicator. It does not place orders, manage risk, or produce a strategy report. AR+ and AR- mark that the sequence completed on that bar. They are not buy or sell recommendations and do not imply future results. No backtest is included.
How It Works
Range, sweep, return and entry are combined because the model reads them in a fixed order. A sweep with no range behind it is not traded, and a return without a sweep is not a setup. The original piece is the gated sequence, not any single drawing.
1. Accumulation (range)
- On each confirmed bar the script looks back for the longest run of bars whose height stays within a set number of ATRs (default 5, 14-bar ATR).
- The run counts if it has at least 8 bars and its net drift is under 50% of its height. The drift test keeps trending runs from counting as accumulation.
- If the current bar's high or low goes beyond the run, a sweep starts. A break of both sides in one bar skips the range.
2. Manipulation (sweep and return)
- The sweep extreme updates while price stays out. It is the stop level.
- The return is the first confirmed bar that closes back inside the range, closes in the reversal direction, and has a body of at least 0.8 ATR.
- A close beyond the far side drops the setup. So does no return within 30 minutes.
- A swept low expects distribution up. A swept high expects distribution down. No cross-wiring.
3. Entry
- Inversion: a gap formed since the sweep began, in the manipulation direction. The first confirmed close through its far edge is the entry.
- Retest: after the return, a bar trades back to the swept edge and closes holding it.
- Either: whichever comes first.
- Entry is the close of that bar. One entry per setup.
- An armed setup is dropped if the stop level trades through, if a close runs through the far side of the range, or after 60 minutes.
4. Targets
- 2R: a multiple of the stop distance.
- Prior liquidity: the nearest untaken swing beyond the entry.
- SD projection: TP1 at 2 SD and TP2 at 4 SD of the manipulation leg.
- There is no time exit. Optional stop-to-entry after TP1 applies to the SD target.
5. PO3 timeframe
- Pick 30m, 1H, 4H, Daily or Weekly. The open of the current candle is drawn as a dotted line, and the panel says whether a sweep passed it.
- Candles follow the New York clock and are built from chart bars, so no higher-timeframe data is requested.
- An optional filter requires the sweep to pass the PO3 open and drops a setup when its PO3 candle ends before an entry.
Key Features
- Ordered sequence: range, sweep, aggressive return, entry.
- Accumulation, manipulation and distribution boxes tagged ACC, MANIP and DIST.
- Inversion and retest entries as separate modes.
- 2R, prior liquidity and SD projection targets as separate modes.
- Optional 2-2.5 and 4-4.5 SD zones of the manipulation leg.
- Pending gaps, retest edge and stop level shown before an entry.
- Solid blue / red entry, black dotted SL / TP, orange dotted BE.
- PO3 timeframe selector with open line and panel read.
- Minimal and Full views and a cap on finished setups shown.
- Borderless panel: Stage, Range, Entry, PO3, Blocked, Last.
- Toggles for boxes, projection, PO3 open, pending setups, prices and labels.
- Alerts for long and short entries.
How to Use
Use index futures such as NQ or ES on a 1m to 15m chart. The chart must be at most half of the PO3 timeframe. Leave the defaults first, check the boxes against what you would mark by hand, then tune the range height and return body size.
The read is always the same:
- A green box and a red MANIP? box mean price is out of a range and has not come back.
- A blue DIST? box with a dotted SL? means the return happened. Wait for the entry trigger.
- A solid entry line means the trigger closed. SL and TP are the dotted lines.
Settings
- Setup: Entry, Target, R multiple.
- PO3: PO3 timeframe, PO3 open, Sweep must pass the PO3 open.
- Range: Range min bars, Range max bars, Range height max (ATR), Range max drift %, Return body min (ATR), Manipulation expiry, Entry window, Swing bars each side.
- Risk: Stop to entry after TP1, Risk per trade $.
- Display: Timeframe limit, View, Stage boxes, SD projection, Pending setups, Prices, Labels, Setups kept, Text, Table and position.
- Style: Long, Short, BE, Accumulation, Manipulation, Distribution, Gaps and SD.
Alerts
- AMD Range Model+ - Long: an entry fired on a confirmed bar.
- AMD Range Model+ - Short: same, short.
- A dynamic alert fires once per bar close with the symbol, entry, stop and target.
Pending states have no alerts.
Limitations
- Range detection is a rule-based approximation. A trader marking ranges by eye will mark some it misses and skip some it marks.
- A new range that overlaps a live setup's range is skipped. After a setup is dropped, a later sweep of nearly the same price can start a new one.
- Setups kept and View limit what is drawn, not what is tracked.
- Entry is on the close of the confirmed bar. Limit fills are not modelled.
- Intraday charts only, within the Timeframe limit and at most half of the PO3 timeframe.
- 4H and Weekly candle boundaries are inferred from the New York clock. Daylight-saving transition days can shift a boundary by an hour.
- Do not use Heikin Ashi, Renko, Kagi, Point & Figure, Line Break or Range charts.
- Defaults are starting points, not optimised values.
Tips
- Compare Inversion with the 2R target against the other modes on the same session.
- If too many ranges appear, lower the range height or raise the minimum bars.
- If real sweeps are missed, raise the drift limit or lower the return body size.
- Use Retest or Either when inversions are rare.
- Full view shows setups that died before an entry, with the reason in the Blocked row.
- Turn off Labels on crowded charts. Boxes and lines stay.
- Check the SD zones against equal highs and lows and session extremes.
AMD Range+ marks an accumulation, manipulation, distribution (Power of Three) sequence on the chart timeframe. Price builds a range, runs out of it and sweeps an extreme, then closes aggressively back inside. An entry fires on a reversal pattern after that return, with the stop at the sweep extreme. The rest of the chart shows the three stages as boxes, the open of a selectable PO3 candle, any setup still waiting, and the trade plan.
This is an overlay indicator. It does not place orders, manage risk, or produce a strategy report. AR+ and AR- mark that the sequence completed on that bar. They are not buy or sell recommendations and do not imply future results. No backtest is included.
How It Works
Range, sweep, return and entry are combined because the model reads them in a fixed order. A sweep with no range behind it is not traded, and a return without a sweep is not a setup. The original piece is the gated sequence, not any single drawing.
1. Accumulation (range)
- On each confirmed bar the script looks back for the longest run of bars whose height stays within a set number of ATRs (default 5, 14-bar ATR).
- The run counts if it has at least 8 bars and its net drift is under 50% of its height. The drift test keeps trending runs from counting as accumulation.
- If the current bar's high or low goes beyond the run, a sweep starts. A break of both sides in one bar skips the range.
2. Manipulation (sweep and return)
- The sweep extreme updates while price stays out. It is the stop level.
- The return is the first confirmed bar that closes back inside the range, closes in the reversal direction, and has a body of at least 0.8 ATR.
- A close beyond the far side drops the setup. So does no return within 30 minutes.
- A swept low expects distribution up. A swept high expects distribution down. No cross-wiring.
3. Entry
- Inversion: a gap formed since the sweep began, in the manipulation direction. The first confirmed close through its far edge is the entry.
- Retest: after the return, a bar trades back to the swept edge and closes holding it.
- Either: whichever comes first.
- Entry is the close of that bar. One entry per setup.
- An armed setup is dropped if the stop level trades through, if a close runs through the far side of the range, or after 60 minutes.
4. Targets
- 2R: a multiple of the stop distance.
- Prior liquidity: the nearest untaken swing beyond the entry.
- SD projection: TP1 at 2 SD and TP2 at 4 SD of the manipulation leg.
- There is no time exit. Optional stop-to-entry after TP1 applies to the SD target.
5. PO3 timeframe
- Pick 30m, 1H, 4H, Daily or Weekly. The open of the current candle is drawn as a dotted line, and the panel says whether a sweep passed it.
- Candles follow the New York clock and are built from chart bars, so no higher-timeframe data is requested.
- An optional filter requires the sweep to pass the PO3 open and drops a setup when its PO3 candle ends before an entry.
Key Features
- Ordered sequence: range, sweep, aggressive return, entry.
- Accumulation, manipulation and distribution boxes tagged ACC, MANIP and DIST.
- Inversion and retest entries as separate modes.
- 2R, prior liquidity and SD projection targets as separate modes.
- Optional 2-2.5 and 4-4.5 SD zones of the manipulation leg.
- Pending gaps, retest edge and stop level shown before an entry.
- Solid blue / red entry, black dotted SL / TP, orange dotted BE.
- PO3 timeframe selector with open line and panel read.
- Minimal and Full views and a cap on finished setups shown.
- Borderless panel: Stage, Range, Entry, PO3, Blocked, Last.
- Toggles for boxes, projection, PO3 open, pending setups, prices and labels.
- Alerts for long and short entries.
How to Use
Use index futures such as NQ or ES on a 1m to 15m chart. The chart must be at most half of the PO3 timeframe. Leave the defaults first, check the boxes against what you would mark by hand, then tune the range height and return body size.
The read is always the same:
- A green box and a red MANIP? box mean price is out of a range and has not come back.
- A blue DIST? box with a dotted SL? means the return happened. Wait for the entry trigger.
- A solid entry line means the trigger closed. SL and TP are the dotted lines.
Settings
- Setup: Entry, Target, R multiple.
- PO3: PO3 timeframe, PO3 open, Sweep must pass the PO3 open.
- Range: Range min bars, Range max bars, Range height max (ATR), Range max drift %, Return body min (ATR), Manipulation expiry, Entry window, Swing bars each side.
- Risk: Stop to entry after TP1, Risk per trade $.
- Display: Timeframe limit, View, Stage boxes, SD projection, Pending setups, Prices, Labels, Setups kept, Text, Table and position.
- Style: Long, Short, BE, Accumulation, Manipulation, Distribution, Gaps and SD.
Alerts
- AMD Range Model+ - Long: an entry fired on a confirmed bar.
- AMD Range Model+ - Short: same, short.
- A dynamic alert fires once per bar close with the symbol, entry, stop and target.
Pending states have no alerts.
Limitations
- Range detection is a rule-based approximation. A trader marking ranges by eye will mark some it misses and skip some it marks.
- A new range that overlaps a live setup's range is skipped. After a setup is dropped, a later sweep of nearly the same price can start a new one.
- Setups kept and View limit what is drawn, not what is tracked.
- Entry is on the close of the confirmed bar. Limit fills are not modelled.
- Intraday charts only, within the Timeframe limit and at most half of the PO3 timeframe.
- 4H and Weekly candle boundaries are inferred from the New York clock. Daylight-saving transition days can shift a boundary by an hour.
- Do not use Heikin Ashi, Renko, Kagi, Point & Figure, Line Break or Range charts.
- Defaults are starting points, not optimised values.
Tips
- Compare Inversion with the 2R target against the other modes on the same session.
- If too many ranges appear, lower the range height or raise the minimum bars.
- If real sweeps are missed, raise the drift limit or lower the return body size.
- Use Retest or Either when inversions are rare.
- Full view shows setups that died before an entry, with the reason in the Blocked row.
- Turn off Labels on crowded charts. Boxes and lines stay.
- Check the SD zones against equal highs and lows and session extremes.

Wyłączenie odpowiedzialności
Informacje i publikacje nie stanowią i nie powinny być traktowane jako porady finansowe, inwestycyjne, tradingowe ani jakiekolwiek inne rekomendacje dostarczane lub zatwierdzone przez TradingView. Więcej informacji znajduje się w Warunkach użytkowania.
Wyłączenie odpowiedzialności
Informacje i publikacje nie stanowią i nie powinny być traktowane jako porady finansowe, inwestycyjne, tradingowe ani jakiekolwiek inne rekomendacje dostarczane lub zatwierdzone przez TradingView. Więcej informacji znajduje się w Warunkach użytkowania.