OPEN-SOURCE SCRIPT
Mustang Algo EMA 20/50 Pullback+RSI
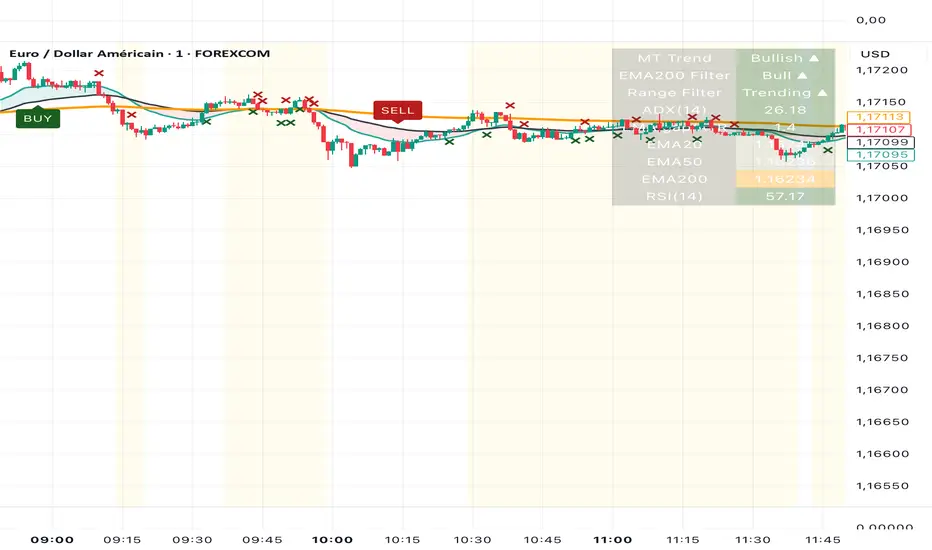
Mustang Algo — EMA 20/50 Pullback + RSI + EMA 200 + Anti-Range Filter
A complete trend-following pullback system that combines four layers of confluence — short-term momentum (EMA 20), mid-term trend (EMA 50), long-term bias (EMA 200), and an anti-range filter — gated by RSI(14). The indicator trades both long and short with fully symmetric logic and provides granular control over signal frequency through multiple anti-spam mechanisms.
Core concept
In a trending market, price doesn't move in straight lines. It pulls back to dynamic support (the EMA 20) before resuming. This indicator detects those exact moments — when momentum is still intact (RSI confirms direction), the mid-term structure is aligned (EMA 20 above/below EMA 50), the long-term bias agrees (price or EMA 50 on the right side of EMA 200), and the market is genuinely trending (not chopping sideways) — and prints a signal only on the candle that confirms the rebound.
The hardest part of any pullback strategy is avoiding range markets, where the same logic that catches clean trend continuations produces a stream of losing trades. This version addresses that head-on with a dedicated anti-range layer.
How it works
LONG signal fires when EMA 20 is above EMA 50, the candle touches EMA 20 (wick or body, configurable), the close is above EMA 20 with a bullish body, RSI is above the long threshold, the EMA 200 filter is satisfied, and the anti-range filter confirms a trending environment.
SHORT signal is the exact mirror: EMA 20 below EMA 50, touch on EMA 20, bearish rejection candle, RSI below the short threshold, EMA 200 filter satisfied for shorts, and anti-range filter active.
Initial signals (INIT L / INIT S) mark the moment of the EMA 20/50 cross when all filters already agree — useful to catch the very first leg of a new trend before any pullback has formed.
Exits trigger on the opposite EMA 20/50 cross or when price closes beyond the EMA 50 (both toggleable independently).
EMA 200 trend filter — three modes
Price vs EMA 200 — standard: longs only above, shorts only below.
EMA 50 vs EMA 200 — structural: requires the mid-term EMA to be aligned with the long-term EMA. Fewer signals, higher conviction.
Both (strict) — requires both conditions simultaneously. Designed for swing setups and conservative profiles.
A tolerance setting (%) allows price to sit slightly on the wrong side of the EMA 200 without invalidating the signal — useful on FX and metals where price oscillates tightly around the long-term mean.
Anti-range filter — four modes
This is what separates a pullback indicator that works in trends from one that survives in real markets.
ADX — Classic Wilder ADX. Below the minimum threshold (default 20), the market is considered ranging and signals are blocked. Reliable on indices and crypto.
EMA distance — Measures the gap between EMA 20 and EMA 50 normalized by ATR. Below a configurable multiple (default 0.5×ATR), the EMAs are too close together, signaling consolidation. More reactive than ADX, ideal for gold and FX.
Choppiness Index — Dedicated chop measure on a 0-100 scale. Above the configurable maximum (default 61.8, the Fibonacci threshold), the market is choppy. Highest precision for pure ranges, best on D1 swing setups.
ADX + EMA distance (strict) — Default mode. Requires both ADX and EMA distance conditions simultaneously. ADX catches absolute weakness in directionality; EMA distance catches geometric compression. Each compensates for the other's blind spot. The two metrics together produce the cleanest signal set.
When the filter blocks the market, an optional yellow background highlights the ranging zones so you can calibrate your thresholds visually.
Signal frequency control
Two independent anti-spam layers let you fine-tune how aggressive the indicator is:
One signal per pullback (default ON) — A pullback is considered "consumed" after a signal fires. The setup must re-arm by moving N×ATR away from EMA 20 (default 0.5) before a new signal is allowed. Eliminates clustered signals during consolidation on the EMA 20.
Only first signal after EMA cross (default OFF) — Only the FIRST pullback signal after each EMA 20/50 cross is fired. Subsequent pullbacks in the same trend leg are ignored until a new cross occurs. Designed for swing traders who only want to enter at the start of a new trend.
Configurable inputs
Direction (LONG / SHORT toggles, independent)
EMA lengths (20 / 50 / 200) and source
EMA 200 filter mode and tolerance
Anti-range filter mode, ADX length and threshold, EMA distance multiplier, Choppiness length and threshold
RSI length and dual thresholds (long / short)
Touch mode (wick or body) and touch tolerance
Re-arm distance in ATR multiples
First-after-cross gating
Exit conditions (EMA cross / close beyond EMA 50)
Visual options (zone fill, EMA 200 background, range background, status table)
Built-in alerts
Seven alert conditions covering pullback BUY, pullback SELL, initial LONG, initial SHORT, LONG exit, SHORT exit, and a generic "any signal" alert. All messages include ticker, timeframe, and price.
Status table
A live readout in the top-right shows MT trend, EMA 200 filter state, range filter state, current ADX value, EMA gap/ATR ratio, the three EMA values, and current RSI — color-coded so the full setup state is readable at a glance.
Recommended settings by context
XAUUSD H1 — ADX min 18, EMA distance 0.4×ATR (gold moves fast, slightly more permissive)
EURUSD H1-H4 — ADX min 22, EMA distance 0.6×ATR (FX ranges often, stricter)
Indices D1 — ADX min 20, EMA distance 0.5×ATR (default values)
Crypto H4 — ADX min 25, EMA distance 0.7×ATR (erratic volatility, strictest)
For ultra-conservative swing entries: enable "Only first signal after EMA cross", set EMA 200 filter to "Both (strict)", and keep anti-range in default "ADX + EMA distance (strict)" mode.
Recommended timeframes
Works on any timeframe but performs best on H1 to D1 for swing setups, and M15 to H1 for intraday. On lower timeframes, increase the ATR re-arm distance and consider switching the touch mode to "Body" for higher quality signals.
Methodology notes
The indicator uses only standard, well-documented building blocks (EMA, RSI, ATR, ADX, Choppiness Index) — no black-box signals, no hidden repaint mechanics, no curve-fit thresholds. Every parameter is exposed and every decision is auditable from the source.
Signals are evaluated on bar close. The anti-range and anti-spam mechanisms are deterministic and use only past data, so backtests reflect real-time behavior.
Disclaimer
This is a technical analysis indicator, not financial advice. Always backtest on your specific instrument, timeframe, and broker spread before committing capital. Trend-following pullback strategies underperform in pure ranging markets — the multi-layer filtering mitigates this but does not eliminate it. Past performance does not guarantee future results.
— Mustang Algo
A complete trend-following pullback system that combines four layers of confluence — short-term momentum (EMA 20), mid-term trend (EMA 50), long-term bias (EMA 200), and an anti-range filter — gated by RSI(14). The indicator trades both long and short with fully symmetric logic and provides granular control over signal frequency through multiple anti-spam mechanisms.
Core concept
In a trending market, price doesn't move in straight lines. It pulls back to dynamic support (the EMA 20) before resuming. This indicator detects those exact moments — when momentum is still intact (RSI confirms direction), the mid-term structure is aligned (EMA 20 above/below EMA 50), the long-term bias agrees (price or EMA 50 on the right side of EMA 200), and the market is genuinely trending (not chopping sideways) — and prints a signal only on the candle that confirms the rebound.
The hardest part of any pullback strategy is avoiding range markets, where the same logic that catches clean trend continuations produces a stream of losing trades. This version addresses that head-on with a dedicated anti-range layer.
How it works
LONG signal fires when EMA 20 is above EMA 50, the candle touches EMA 20 (wick or body, configurable), the close is above EMA 20 with a bullish body, RSI is above the long threshold, the EMA 200 filter is satisfied, and the anti-range filter confirms a trending environment.
SHORT signal is the exact mirror: EMA 20 below EMA 50, touch on EMA 20, bearish rejection candle, RSI below the short threshold, EMA 200 filter satisfied for shorts, and anti-range filter active.
Initial signals (INIT L / INIT S) mark the moment of the EMA 20/50 cross when all filters already agree — useful to catch the very first leg of a new trend before any pullback has formed.
Exits trigger on the opposite EMA 20/50 cross or when price closes beyond the EMA 50 (both toggleable independently).
EMA 200 trend filter — three modes
Price vs EMA 200 — standard: longs only above, shorts only below.
EMA 50 vs EMA 200 — structural: requires the mid-term EMA to be aligned with the long-term EMA. Fewer signals, higher conviction.
Both (strict) — requires both conditions simultaneously. Designed for swing setups and conservative profiles.
A tolerance setting (%) allows price to sit slightly on the wrong side of the EMA 200 without invalidating the signal — useful on FX and metals where price oscillates tightly around the long-term mean.
Anti-range filter — four modes
This is what separates a pullback indicator that works in trends from one that survives in real markets.
ADX — Classic Wilder ADX. Below the minimum threshold (default 20), the market is considered ranging and signals are blocked. Reliable on indices and crypto.
EMA distance — Measures the gap between EMA 20 and EMA 50 normalized by ATR. Below a configurable multiple (default 0.5×ATR), the EMAs are too close together, signaling consolidation. More reactive than ADX, ideal for gold and FX.
Choppiness Index — Dedicated chop measure on a 0-100 scale. Above the configurable maximum (default 61.8, the Fibonacci threshold), the market is choppy. Highest precision for pure ranges, best on D1 swing setups.
ADX + EMA distance (strict) — Default mode. Requires both ADX and EMA distance conditions simultaneously. ADX catches absolute weakness in directionality; EMA distance catches geometric compression. Each compensates for the other's blind spot. The two metrics together produce the cleanest signal set.
When the filter blocks the market, an optional yellow background highlights the ranging zones so you can calibrate your thresholds visually.
Signal frequency control
Two independent anti-spam layers let you fine-tune how aggressive the indicator is:
One signal per pullback (default ON) — A pullback is considered "consumed" after a signal fires. The setup must re-arm by moving N×ATR away from EMA 20 (default 0.5) before a new signal is allowed. Eliminates clustered signals during consolidation on the EMA 20.
Only first signal after EMA cross (default OFF) — Only the FIRST pullback signal after each EMA 20/50 cross is fired. Subsequent pullbacks in the same trend leg are ignored until a new cross occurs. Designed for swing traders who only want to enter at the start of a new trend.
Configurable inputs
Direction (LONG / SHORT toggles, independent)
EMA lengths (20 / 50 / 200) and source
EMA 200 filter mode and tolerance
Anti-range filter mode, ADX length and threshold, EMA distance multiplier, Choppiness length and threshold
RSI length and dual thresholds (long / short)
Touch mode (wick or body) and touch tolerance
Re-arm distance in ATR multiples
First-after-cross gating
Exit conditions (EMA cross / close beyond EMA 50)
Visual options (zone fill, EMA 200 background, range background, status table)
Built-in alerts
Seven alert conditions covering pullback BUY, pullback SELL, initial LONG, initial SHORT, LONG exit, SHORT exit, and a generic "any signal" alert. All messages include ticker, timeframe, and price.
Status table
A live readout in the top-right shows MT trend, EMA 200 filter state, range filter state, current ADX value, EMA gap/ATR ratio, the three EMA values, and current RSI — color-coded so the full setup state is readable at a glance.
Recommended settings by context
XAUUSD H1 — ADX min 18, EMA distance 0.4×ATR (gold moves fast, slightly more permissive)
EURUSD H1-H4 — ADX min 22, EMA distance 0.6×ATR (FX ranges often, stricter)
Indices D1 — ADX min 20, EMA distance 0.5×ATR (default values)
Crypto H4 — ADX min 25, EMA distance 0.7×ATR (erratic volatility, strictest)
For ultra-conservative swing entries: enable "Only first signal after EMA cross", set EMA 200 filter to "Both (strict)", and keep anti-range in default "ADX + EMA distance (strict)" mode.
Recommended timeframes
Works on any timeframe but performs best on H1 to D1 for swing setups, and M15 to H1 for intraday. On lower timeframes, increase the ATR re-arm distance and consider switching the touch mode to "Body" for higher quality signals.
Methodology notes
The indicator uses only standard, well-documented building blocks (EMA, RSI, ATR, ADX, Choppiness Index) — no black-box signals, no hidden repaint mechanics, no curve-fit thresholds. Every parameter is exposed and every decision is auditable from the source.
Signals are evaluated on bar close. The anti-range and anti-spam mechanisms are deterministic and use only past data, so backtests reflect real-time behavior.
Disclaimer
This is a technical analysis indicator, not financial advice. Always backtest on your specific instrument, timeframe, and broker spread before committing capital. Trend-following pullback strategies underperform in pure ranging markets — the multi-layer filtering mitigates this but does not eliminate it. Past performance does not guarantee future results.
— Mustang Algo
Скрипт с открытым кодом
В истинном духе TradingView, создатель этого скрипта сделал его открытым исходным кодом, чтобы трейдеры могли проверить и убедиться в его функциональности. Браво автору! Вы можете использовать его бесплатно, но помните, что перепубликация кода подчиняется нашим Правилам поведения.

Отказ от ответственности
Информация и публикации не предназначены для предоставления и не являются финансовыми, инвестиционными, торговыми или другими видами советов или рекомендаций, предоставленных или одобренных TradingView. Подробнее читайте в Условиях использования.
Скрипт с открытым кодом
В истинном духе TradingView, создатель этого скрипта сделал его открытым исходным кодом, чтобы трейдеры могли проверить и убедиться в его функциональности. Браво автору! Вы можете использовать его бесплатно, но помните, что перепубликация кода подчиняется нашим Правилам поведения.
Отказ от ответственности
Информация и публикации не предназначены для предоставления и не являются финансовыми, инвестиционными, торговыми или другими видами советов или рекомендаций, предоставленных или одобренных TradingView. Подробнее читайте в Условиях использования.