OPEN-SOURCE SCRIPT
Strong Reclaim Zones | ProjectSyndicate
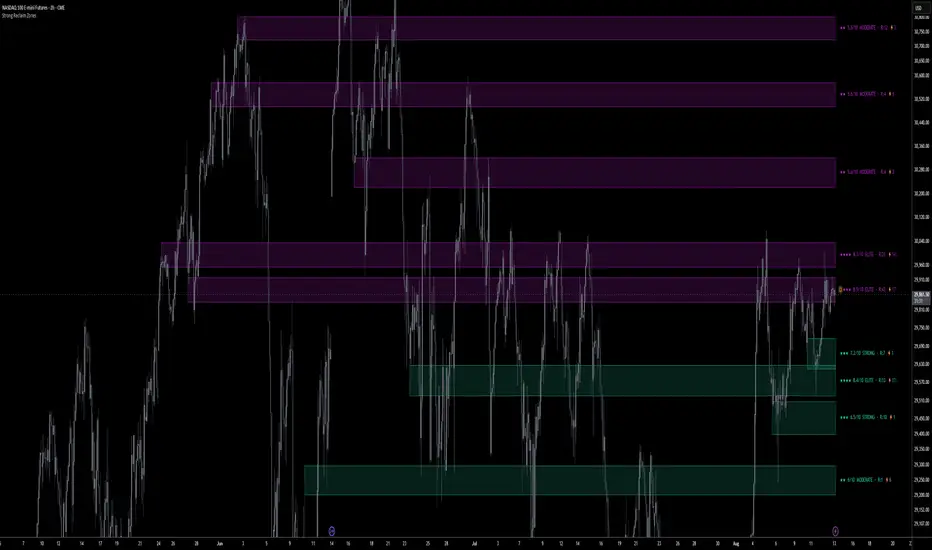
Strong Reclaim Zones
Strong Reclaim Zones maps the levels the market is built to defend — then waits for the trap. Every swing pivot becomes a resting-liquidity zone, ranked 0–10 by strength, and the indicator watches for the one event that flips a level from ordinary support/resistance into a high-conviction reversal: a sweep of the zone (the liquidity grab) followed by a reclaim back through it (the failed break). A bullish zone swept and reclaimed is a bear trap. A bearish zone swept and reclaimed is a bull trap. Your chart stays clean — shaded zones and a strength label, nothing else — while the engine tracks every grab-and-reclaim underneath.
Most zone tools trade the bounce or trade the break. This one trades the trap.
🎯 The Reclaim Engine — the core. Each zone is treated as a pool of resting liquidity where the crowd parks its stops. A wick that pierces a zone border by your Min Sweep Depth is a sweep — a liquidity grab, not a normal touch. If price then closes back through the zone within the Reclaim Window, the breakout has failed: that's the reclaim, and it's the contrarian event the whole tool is built around. Grab the stops, fail the break, reverse.
🟩🟥 Multi-Zone Pool — many levels, both sides, always live. Swing-low pivots build bullish zones, swing-high pivots build bearish zones — a full pool tracked at once, not one level per side. Overlap suppression keeps the read clean, a max-zones cap and lookback window keep it fast, and the oldest zones recycle automatically.
🧲 Sweep vs. Hold — the separation that matters. A wick that dips into a zone and closes back inside is a hold — it strengthens the level (its R:retest count). A wick that pierces clean through it by the sweep depth is a grab. The engine never confuses the two, so a genuine liquidity raid is flagged the moment it happens.
♻️ Reclaim Confirmation — border, midline, or far side. Choose how far back through the zone price must close to confirm a reclaim: the near border (loose), the midline, or the far border (strict). Deeper confirmation means fewer, higher-quality reclaims. An optional RSI momentum-extreme filter only accepts a bullish reclaim while oversold and a bearish reclaim while overbought — strictly contrarian.
💥 Genuine Break & Flip — when it isn't a trap. If price accepts beyond the border — a decisive close through, or no reclaim inside the window — the level genuinely broke. The zone doesn't just vanish: it flips its side in place and becomes a breaker, ready for break-and-retest continuation.
⚡ Sweep-Defense Memory — defended levels get stronger. Every time a zone is swept, reclaims and holds, it logs a defended sweep (the ⚡ count on its label) and its strength rises. A level that has trapped traders and survived is exactly the level that matters — and the ranking now reflects it.
🔢 0–10 Strength Ranking — the power-ranking, printed on every zone. Each zone carries a live grade to its right: stars · X.X/10 · tier · R:retests · ⚡reclaims. The score blends held retests, volume, rejection-wick depth and sweep-defense, with idle decay so stale levels fade. Set a strength floor and the weak zones simply don't draw — only the levels that earned attention survive.
🧼 Universal Zone Height — the legibility differentiator. Raw pivot zones come in wildly different sizes and clutter the read. Every zone is normalized to one clean height — ATR-based or a fixed percentage of price — centered on the swing level, so the map stays legible and every zone carries equal visual weight.
🧹 Clean-Chart Discipline — zones and strength, nothing else. No touch arrows, no signal labels stamped across your candles, no trade-plan clutter, no stat panel competing with price. Only the shaded zones and their right-edge strength labels. Everything else lives in the alerts.
🎨 Fully Themed & Configurable. Custom bullish/bearish zone tones, transparency and borders, label size, pivot left/right length, max zone life, zone-height method, min sweep depth, reclaim window and confirmation depth, decisive-break distance, the breaker-flip toggle, the RSI filter, the full strength-weight set and decay, plus the reclaim-alert scoring weights and floor.
🔒 Honest, Non-Repainting Core. Zones anchor to confirmed swing pivots — which, like all pivots, confirm a few bars after the fact; that is inherent, not a defect. A reclaim is evaluated on the reclaim bar's close and is fixed once that bar closes; on the live forming bar it can still flicker until close, as any close-based read does. Defended-sweep counts persist — they never un-count to flatter the chart. The 0–10 strength and reclaim scores are descriptive ranking frameworks for directing attention, not a backtested edge.
🔔 Native Alerts — proximity to a bullish/bearish zone and to a strong zone, zone touch/retest, zone sweep (liquidity grab), zone break (accepted), and the headline events: Bullish Reclaim, Bearish Reclaim, and Any Reclaim.
🎯 Why this is different. Bounce tools fade every touch and get run over on the break. Breakout tools buy the break and get trapped on the reclaim. Strong Reclaim Zones waits for the market to show its hand — the stop-raid and the failed break — grades the level it happened at, and only then frames the reversal. You react to the trap, not to a guess.
🚀 Apply to Gold (XAUUSD), Silver, Forex, Crypto, Indices and Futures on any timeframe. Volume sharpens the strength score where a symbol carries it, but the sweep-and-reclaim logic works on any market.
💡 Cleanest setup: raise Min Sweep Depth and set Reclaim Confirmation to Midline or Far Border for fewer, cleaner traps; turn on Show Only Strong Zones so only graded levels draw; and keep the RSI filter on when you want strictly contrarian reclaims.
🎯 How To Trade It — Two Approaches
Everything hinges on one read: did a strong zone just get swept and reclaimed?
◾ 1) Fade the trap — trade the reclaim (the core thesis)
Use when a high-strength zone is swept and price closes back through it.
▪️ Mark the strong zones (7+) — these are the levels worth defending.
▪️ Wait for the sweep: price wicks clean through the zone, grabbing the liquidity resting beyond it (Zone Sweep alert).
▪️ Trigger: price closes back through the zone within the reclaim window (Bullish / Bearish Reclaim alert). The breakout failed.
▪️ Entry: on the reclaim, in the reclaim's direction — long when a bullish zone is swept low and reclaims, short when a bearish zone is swept high and reclaims.
▪️ Stop: beyond the sweep extreme; if price re-breaks and accepts there, it was real acceptance, not a trap — stand aside.
▪️ Target: the opposite side of the zone first, then the next zone / unswept level in your direction.
⚖️ The cleanest version: a strong bullish zone (⭐ 8/10, already carrying a ⚡ defended sweep) gets raided — price spears below it and stops out the longs — then snaps back and closes above the zone within a couple of bars on a volume surge, RSI stretched oversold. Grab, fail, reverse. That is the exact event this tool is built to frame.
◾ 2) Stand down — the map says wait
▪️ Clean acceptance, not a reclaim — price closed and held beyond the border (Zone Break alert). The level genuinely broke; don't fade it.
▪️ Weak zones only — low scores everywhere means nothing worth defending. Let structure develop.
▪️ No sweep yet — a zone being approached is not a zone being reclaimed. Wait for the grab and the close back through.
Rule of thumb: ⭐ Strong zone + sweep + reclaim in the same direction → fade the trap toward the zone's far side. ⭐ Genuine break/acceptance, weak scores, or no reclaim yet → stand down until the map agrees.
Strong Reclaim Zones maps the levels the market is built to defend — then waits for the trap. Every swing pivot becomes a resting-liquidity zone, ranked 0–10 by strength, and the indicator watches for the one event that flips a level from ordinary support/resistance into a high-conviction reversal: a sweep of the zone (the liquidity grab) followed by a reclaim back through it (the failed break). A bullish zone swept and reclaimed is a bear trap. A bearish zone swept and reclaimed is a bull trap. Your chart stays clean — shaded zones and a strength label, nothing else — while the engine tracks every grab-and-reclaim underneath.
Most zone tools trade the bounce or trade the break. This one trades the trap.
🎯 The Reclaim Engine — the core. Each zone is treated as a pool of resting liquidity where the crowd parks its stops. A wick that pierces a zone border by your Min Sweep Depth is a sweep — a liquidity grab, not a normal touch. If price then closes back through the zone within the Reclaim Window, the breakout has failed: that's the reclaim, and it's the contrarian event the whole tool is built around. Grab the stops, fail the break, reverse.
🟩🟥 Multi-Zone Pool — many levels, both sides, always live. Swing-low pivots build bullish zones, swing-high pivots build bearish zones — a full pool tracked at once, not one level per side. Overlap suppression keeps the read clean, a max-zones cap and lookback window keep it fast, and the oldest zones recycle automatically.
🧲 Sweep vs. Hold — the separation that matters. A wick that dips into a zone and closes back inside is a hold — it strengthens the level (its R:retest count). A wick that pierces clean through it by the sweep depth is a grab. The engine never confuses the two, so a genuine liquidity raid is flagged the moment it happens.
♻️ Reclaim Confirmation — border, midline, or far side. Choose how far back through the zone price must close to confirm a reclaim: the near border (loose), the midline, or the far border (strict). Deeper confirmation means fewer, higher-quality reclaims. An optional RSI momentum-extreme filter only accepts a bullish reclaim while oversold and a bearish reclaim while overbought — strictly contrarian.
💥 Genuine Break & Flip — when it isn't a trap. If price accepts beyond the border — a decisive close through, or no reclaim inside the window — the level genuinely broke. The zone doesn't just vanish: it flips its side in place and becomes a breaker, ready for break-and-retest continuation.
⚡ Sweep-Defense Memory — defended levels get stronger. Every time a zone is swept, reclaims and holds, it logs a defended sweep (the ⚡ count on its label) and its strength rises. A level that has trapped traders and survived is exactly the level that matters — and the ranking now reflects it.
🔢 0–10 Strength Ranking — the power-ranking, printed on every zone. Each zone carries a live grade to its right: stars · X.X/10 · tier · R:retests · ⚡reclaims. The score blends held retests, volume, rejection-wick depth and sweep-defense, with idle decay so stale levels fade. Set a strength floor and the weak zones simply don't draw — only the levels that earned attention survive.
🧼 Universal Zone Height — the legibility differentiator. Raw pivot zones come in wildly different sizes and clutter the read. Every zone is normalized to one clean height — ATR-based or a fixed percentage of price — centered on the swing level, so the map stays legible and every zone carries equal visual weight.
🧹 Clean-Chart Discipline — zones and strength, nothing else. No touch arrows, no signal labels stamped across your candles, no trade-plan clutter, no stat panel competing with price. Only the shaded zones and their right-edge strength labels. Everything else lives in the alerts.
🎨 Fully Themed & Configurable. Custom bullish/bearish zone tones, transparency and borders, label size, pivot left/right length, max zone life, zone-height method, min sweep depth, reclaim window and confirmation depth, decisive-break distance, the breaker-flip toggle, the RSI filter, the full strength-weight set and decay, plus the reclaim-alert scoring weights and floor.
🔒 Honest, Non-Repainting Core. Zones anchor to confirmed swing pivots — which, like all pivots, confirm a few bars after the fact; that is inherent, not a defect. A reclaim is evaluated on the reclaim bar's close and is fixed once that bar closes; on the live forming bar it can still flicker until close, as any close-based read does. Defended-sweep counts persist — they never un-count to flatter the chart. The 0–10 strength and reclaim scores are descriptive ranking frameworks for directing attention, not a backtested edge.
🔔 Native Alerts — proximity to a bullish/bearish zone and to a strong zone, zone touch/retest, zone sweep (liquidity grab), zone break (accepted), and the headline events: Bullish Reclaim, Bearish Reclaim, and Any Reclaim.
🎯 Why this is different. Bounce tools fade every touch and get run over on the break. Breakout tools buy the break and get trapped on the reclaim. Strong Reclaim Zones waits for the market to show its hand — the stop-raid and the failed break — grades the level it happened at, and only then frames the reversal. You react to the trap, not to a guess.
🚀 Apply to Gold (XAUUSD), Silver, Forex, Crypto, Indices and Futures on any timeframe. Volume sharpens the strength score where a symbol carries it, but the sweep-and-reclaim logic works on any market.
💡 Cleanest setup: raise Min Sweep Depth and set Reclaim Confirmation to Midline or Far Border for fewer, cleaner traps; turn on Show Only Strong Zones so only graded levels draw; and keep the RSI filter on when you want strictly contrarian reclaims.
🎯 How To Trade It — Two Approaches
Everything hinges on one read: did a strong zone just get swept and reclaimed?
◾ 1) Fade the trap — trade the reclaim (the core thesis)
Use when a high-strength zone is swept and price closes back through it.
▪️ Mark the strong zones (7+) — these are the levels worth defending.
▪️ Wait for the sweep: price wicks clean through the zone, grabbing the liquidity resting beyond it (Zone Sweep alert).
▪️ Trigger: price closes back through the zone within the reclaim window (Bullish / Bearish Reclaim alert). The breakout failed.
▪️ Entry: on the reclaim, in the reclaim's direction — long when a bullish zone is swept low and reclaims, short when a bearish zone is swept high and reclaims.
▪️ Stop: beyond the sweep extreme; if price re-breaks and accepts there, it was real acceptance, not a trap — stand aside.
▪️ Target: the opposite side of the zone first, then the next zone / unswept level in your direction.
⚖️ The cleanest version: a strong bullish zone (⭐ 8/10, already carrying a ⚡ defended sweep) gets raided — price spears below it and stops out the longs — then snaps back and closes above the zone within a couple of bars on a volume surge, RSI stretched oversold. Grab, fail, reverse. That is the exact event this tool is built to frame.
◾ 2) Stand down — the map says wait
▪️ Clean acceptance, not a reclaim — price closed and held beyond the border (Zone Break alert). The level genuinely broke; don't fade it.
▪️ Weak zones only — low scores everywhere means nothing worth defending. Let structure develop.
▪️ No sweep yet — a zone being approached is not a zone being reclaimed. Wait for the grab and the close back through.
Rule of thumb: ⭐ Strong zone + sweep + reclaim in the same direction → fade the trap toward the zone's far side. ⭐ Genuine break/acceptance, weak scores, or no reclaim yet → stand down until the map agrees.
Скрипт с открытым кодом
В истинном духе TradingView, создатель этого скрипта сделал его открытым исходным кодом, чтобы трейдеры могли проверить и убедиться в его функциональности. Браво автору! Вы можете использовать его бесплатно, но помните, что перепубликация кода подчиняется нашим Правилам поведения.

Gold Algo Trading · +1100% YTD · max DD <5%
Syndicate Ultimate · 5 algo systems · 1 bundle
1 payment · lifetime access · no monthly fees
+ FX · NQ/ES · 10+ yr institutional desk
syndicate001.com
Join on Telegram
t.me/aisyndicate001
Syndicate Ultimate · 5 algo systems · 1 bundle
1 payment · lifetime access · no monthly fees
+ FX · NQ/ES · 10+ yr institutional desk
syndicate001.com
Join on Telegram
t.me/aisyndicate001
Отказ от ответственности
Информация и публикации не предназначены для предоставления и не являются финансовыми, инвестиционными, торговыми или другими видами советов или рекомендаций, предоставленных или одобренных TradingView. Подробнее читайте в Условиях использования.
Скрипт с открытым кодом
В истинном духе TradingView, создатель этого скрипта сделал его открытым исходным кодом, чтобы трейдеры могли проверить и убедиться в его функциональности. Браво автору! Вы можете использовать его бесплатно, но помните, что перепубликация кода подчиняется нашим Правилам поведения.
Gold Algo Trading · +1100% YTD · max DD <5%
Syndicate Ultimate · 5 algo systems · 1 bundle
1 payment · lifetime access · no monthly fees
+ FX · NQ/ES · 10+ yr institutional desk
syndicate001.com
Join on Telegram
t.me/aisyndicate001
Syndicate Ultimate · 5 algo systems · 1 bundle
1 payment · lifetime access · no monthly fees
+ FX · NQ/ES · 10+ yr institutional desk
syndicate001.com
Join on Telegram
t.me/aisyndicate001
Отказ от ответственности
Информация и публикации не предназначены для предоставления и не являются финансовыми, инвестиционными, торговыми или другими видами советов или рекомендаций, предоставленных или одобренных TradingView. Подробнее читайте в Условиях использования.