Обновлено
Svopex Supply & Demand Zones
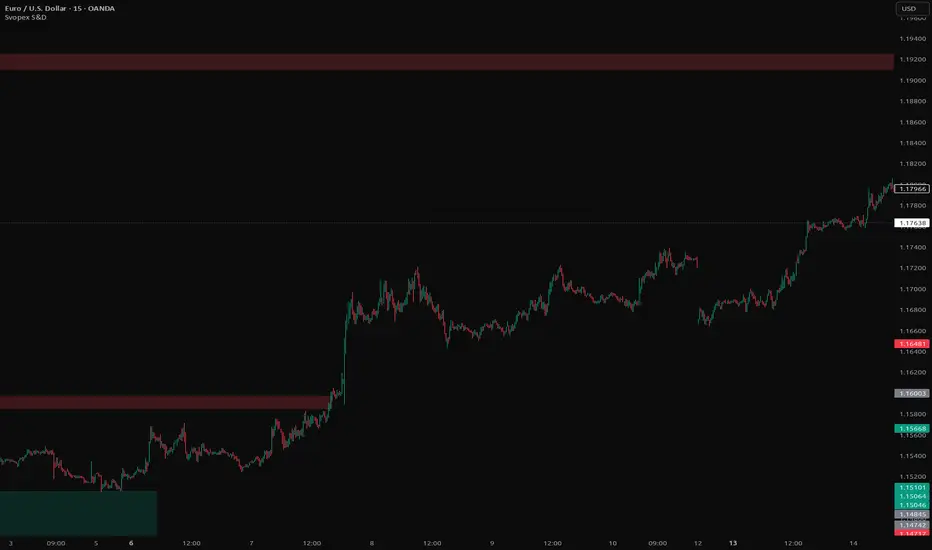
Automatically detects and plots Supply and Demand zones using 4H price action — works on any chart timeframe.
This indicator draws the classic Supply & Demand zones that institutional traders watch: areas
where price consolidated (a "base") and then exploded away sharply. These zones often act as
powerful support/resistance when price returns.
- Supply zones (red) — where price consolidated, then dropped sharply → expect selling
pressure on retest.
- Demand zones (green) — where price consolidated, then rallied sharply → expect buying
pressure on retest.
- Zones extend to the right and automatically freeze the moment price closes through them, so
your chart stays clean.
- Detection always runs on the 4H timeframe (configurable), regardless of the chart you're
viewing — so zones stay consistent whether you're on 15m, 1H, 4H or Daily.
How it works
A zone is formed by the textbook 4-candle patterns:
- DBR (Drop → Base → Rally) → Demand zone
- RBR (Rally → Base → Rally) → Demand zone
- RBD (Rally → Base → Drop) → Supply zone
- DBD (Drop → Base → Drop) → Supply zone
Detection logic:
1. Base candle = body smaller than Base body ≤ ATR × (default 0.5 × ATR).
2. Explosive candle = body larger than Explosive body ≥ ATR × (default 1.5 × ATR).
3. When 1–3 base candles are followed by an explosive candle, the base range becomes a zone.
4. The zone is drawn from the base's start time, with top = highest base high and bottom =
lowest base low.
5. Zones are non-repainting — detection uses the previous confirmed HTF bar (request.security
with lookahead_off + [1]).
Inputs
• Zone Timeframe — default 240 (4H). Timeframe used for zone detection.
• Max base candles — default 3. Maximum base candles allowed before the explosive move.
• Base body ≤ ATR × — default 0.5. Base candle body must be smaller than this × ATR.
• Explosive body ≥ ATR × — default 1.5. Breakout candle body must be larger than this × ATR.
• ATR length — default 14. Reference volatility for base/explosive classification.
• Supply / Demand fill — default red / green @ 80% transparency. Zone colors, fully
customizable.
• Show labels — default ON. Displays "Supply" / "Demand" text labels.
• Max active zones per side — default 20. FIFO cap to keep the chart tidy.
How to use it
- Swing / day trading: Watch for price to retest a zone and look for rejection candles /
reversal signals.
- Confluence: Zones overlapping with POC, VAH/VAL, LVN, prior session high/low or
psychological levels are significantly stronger.
- Trend continuation: In an uptrend, buy retests of Demand zones; in a downtrend, sell retests
of Supply zones.
- Broken zones: Once price closes through a zone, the box is frozen — a broken Supply often
flips into Demand (and vice versa).
Tuning guide
- Too many zones? Increase Explosive body ≥ ATR × to 2.0 and/or lower Base body ≤ ATR × to
0.3.
- Not enough zones / high-volatility asset? Raise Max base candles to 5–6 and lower Explosive
body ≥ ATR × to 1.2.
- Forex / indices / futures → defaults work well.
- Crypto → try Explosive body ≥ ATR × = 2.0 for cleaner signals.
Notes
- Detection is based on candle bodies, not wicks — long-wick base candles may occasionally
produce wider zones than expected.
- Zone break is measured on close, not wick — intrabar spikes through a zone will NOT
invalidate it (by design — filters noise).
- Zones appear only after the next 4H candle confirms → non-repainting, but with one HTF-bar
delay.
Open-source. Feel free to fork, tweak, and make it your own. Feedback welcome in the comments.
This indicator draws the classic Supply & Demand zones that institutional traders watch: areas
where price consolidated (a "base") and then exploded away sharply. These zones often act as
powerful support/resistance when price returns.
- Supply zones (red) — where price consolidated, then dropped sharply → expect selling
pressure on retest.
- Demand zones (green) — where price consolidated, then rallied sharply → expect buying
pressure on retest.
- Zones extend to the right and automatically freeze the moment price closes through them, so
your chart stays clean.
- Detection always runs on the 4H timeframe (configurable), regardless of the chart you're
viewing — so zones stay consistent whether you're on 15m, 1H, 4H or Daily.
How it works
A zone is formed by the textbook 4-candle patterns:
- DBR (Drop → Base → Rally) → Demand zone
- RBR (Rally → Base → Rally) → Demand zone
- RBD (Rally → Base → Drop) → Supply zone
- DBD (Drop → Base → Drop) → Supply zone
Detection logic:
1. Base candle = body smaller than Base body ≤ ATR × (default 0.5 × ATR).
2. Explosive candle = body larger than Explosive body ≥ ATR × (default 1.5 × ATR).
3. When 1–3 base candles are followed by an explosive candle, the base range becomes a zone.
4. The zone is drawn from the base's start time, with top = highest base high and bottom =
lowest base low.
5. Zones are non-repainting — detection uses the previous confirmed HTF bar (request.security
with lookahead_off + [1]).
Inputs
• Zone Timeframe — default 240 (4H). Timeframe used for zone detection.
• Max base candles — default 3. Maximum base candles allowed before the explosive move.
• Base body ≤ ATR × — default 0.5. Base candle body must be smaller than this × ATR.
• Explosive body ≥ ATR × — default 1.5. Breakout candle body must be larger than this × ATR.
• ATR length — default 14. Reference volatility for base/explosive classification.
• Supply / Demand fill — default red / green @ 80% transparency. Zone colors, fully
customizable.
• Show labels — default ON. Displays "Supply" / "Demand" text labels.
• Max active zones per side — default 20. FIFO cap to keep the chart tidy.
How to use it
- Swing / day trading: Watch for price to retest a zone and look for rejection candles /
reversal signals.
- Confluence: Zones overlapping with POC, VAH/VAL, LVN, prior session high/low or
psychological levels are significantly stronger.
- Trend continuation: In an uptrend, buy retests of Demand zones; in a downtrend, sell retests
of Supply zones.
- Broken zones: Once price closes through a zone, the box is frozen — a broken Supply often
flips into Demand (and vice versa).
Tuning guide
- Too many zones? Increase Explosive body ≥ ATR × to 2.0 and/or lower Base body ≤ ATR × to
0.3.
- Not enough zones / high-volatility asset? Raise Max base candles to 5–6 and lower Explosive
body ≥ ATR × to 1.2.
- Forex / indices / futures → defaults work well.
- Crypto → try Explosive body ≥ ATR × = 2.0 for cleaner signals.
Notes
- Detection is based on candle bodies, not wicks — long-wick base candles may occasionally
produce wider zones than expected.
- Zone break is measured on close, not wick — intrabar spikes through a zone will NOT
invalidate it (by design — filters noise).
- Zones appear only after the next 4H candle confirms → non-repainting, but with one HTF-bar
delay.
Open-source. Feel free to fork, tweak, and make it your own. Feedback welcome in the comments.
Информация о релизе
Auto-detects Supply & Demand zones from higher-timeframe price action — works on any chart TF with full control over when a zone is "broken". What it does
🟥 Supply (red) — price consolidated, then dropped sharply → sellers likely on retest.
🟩 Demand (green) — price consolidated, then rallied sharply → buyers likely on retest.
Zones extend right and auto-freeze when price penetrates them by a user-defined amount. Detection runs on 4H by default (configurable), so zones stay
consistent on any chart timeframe.
How it works
Detects the four S&D patterns: DBR / RBR → Demand · RBD / DBD → Supply.
A base candle = body < Base body ≤ ATR × (0.5× ATR). An **explosive candle** = body > Explosive body ≥ ATR × (1.5× ATR). When 1–3 base candles are followed by
an explosive candle, the base range becomes a zone. Non-repainting — uses the previous confirmed HTF bar.
Zone Break
Include wicks (default OFF) — ON = wicks count as penetration, OFF = body only.
Break threshold (%) (default 100) — zone ends when penetration reaches this %:
100 = full break (classic) · 70–80 = conservative · 50 = midpoint · 0 = any touch.
Inputs
Zone Timeframe (240) · Max base candles (3) · Base body ≤ ATR × (0.5) · Explosive body ≥ ATR × (1.5) · ATR length (14) · Include wicks (OFF) · Break threshold
% (100) · Supply / Demand fill (red / green @ 80%) · Show labels (ON) · Max active zones per side (20).
How to use it
Buy Demand retests in uptrends, sell Supply retests in downtrends, look for rejection. Confluence with POC, VAH/VAL, LVN or session levels makes zones
stronger. Broken Supply often flips to Demand (and vice versa).
Tuning
Too many zones → Explosive × 2.0, Base body × 0.3.
Too few / volatile → Max base candles 5–6, Explosive × 1.2.
Crypto → Explosive × 2.0.
Notes
Detection is body-based (long wicks can widen zones). Break is evaluated on bar close — no intrabar flicker. Zones appear after the next HTF candle confirms
(non-repainting, one HTF-bar delay).
---
Open-source — fork it, tweak it, feedback welcome.
Информация о релизе
New name. New picture.Информация о релизе
v2.1 — Added "Show zone border" toggle Under Visuals → new boolean input. When OFF (default), zones render as clean fill only (no border).
When ON, each zone gets a thin colored border (1px) matching its side.
No changes to detection logic or break behavior.
Информация о релизе
Rename script...Информация о релизе
V3 - added "Use chart timeframe" toggle (default OFF). When ON, zone detection follows the chart's current timeframe (e.g. switching chart to 15M displays 15M zones); when OFF, uses the fixed Zone Timeframe setting.
Информация о релизе
● What's new in this version - Use chart timeframe — now enabled by default. Zone detection follows the chart's timeframe out of the box; switch to a fixed HTF only if needed.
- Include wicks — now enabled by default. Zone breaks are evaluated against full candle highs/lows instead of bodies, catching wick-only invalidations.
- Break threshold — default lowered from 100% to 0%. Any touch of the zone now closes it (strict invalidation); raise the value if you prefer partial-penetration
tolerance.
- Show labels — now disabled by default for a cleaner chart. Re-enable in settings if you want the "Supply" / "Demand" tags.
No logic changes — only default values were updated to match the most common usage. Existing chart instances keep their saved settings; click "Defaults → Reset
Settings" or re-add the indicator to pick up the new defaults.

Отказ от ответственности
Информация и публикации не предназначены для предоставления и не являются финансовыми, инвестиционными, торговыми или другими видами советов или рекомендаций, предоставленных или одобренных TradingView. Подробнее читайте в Условиях использования.
Отказ от ответственности
Информация и публикации не предназначены для предоставления и не являются финансовыми, инвестиционными, торговыми или другими видами советов или рекомендаций, предоставленных или одобренных TradingView. Подробнее читайте в Условиях использования.