

AUDUSD: Commodity Supercycle meets RBA/Fed Divergence
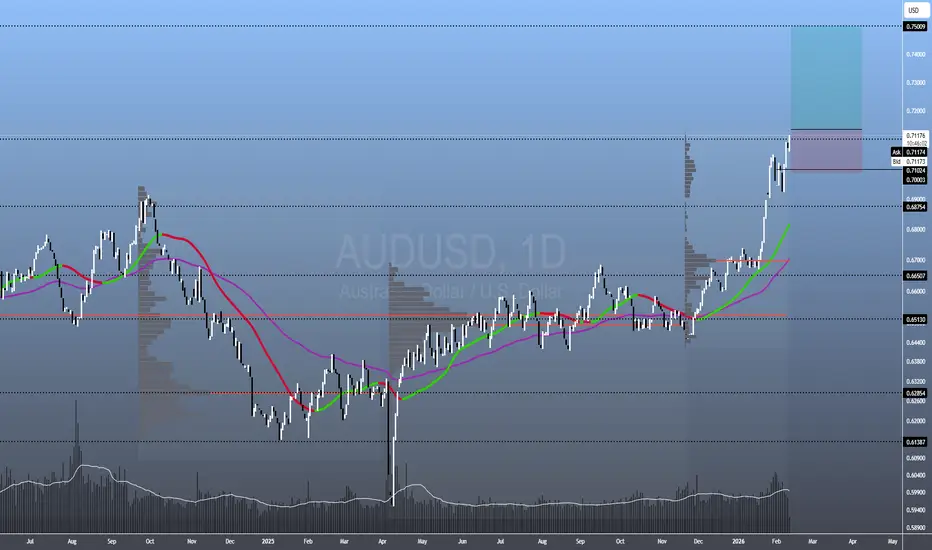
📍Quick Summary
The Australian Dollar is witnessing a structural regime shift, clearing the 0.7000 psychological handle on the weekly timeframe. This "rip" is the result of a "Perfect Storm": a hawkish Reserve Bank of Australia (RBA), record-breaking commodity prices, and a weakening U.S. Dollar ahead of critical Non-Farm Payrolls (NFP) data.
The Macro Environment
The fundamental backdrop for the Aussie has flipped to "Aggressive Bullish" due to three core drivers:
Monetary Policy Divergence:
The RBA surprised the market in February with a hike to 3.85%, citing sticky inflation. Meanwhile, the Federal Reserve is expected to ease toward a target range of 3.25% by year-end. This yield spread is a massive magnet for institutional carry-trade inflows.
The Commodity Super-cycle:
AUD is acting as a "Hard Asset Proxy." With Spot Gold trading above $5,050 and Copper at $5.98, the terms of trade for Australia are at multi-year highs. We are seeing a "debasement trade" out of fiat and into materials.
China Disinflation Hedge:
While China's 0.2% CPI print is a global concern, the RBA's hawkish stance is keeping the AUD stronger than its peers (CAD, EUR), as it acts as a selective play on base metal demand.
Technical key-levels:
The weekly chart shows a vertical expansion following a successful retest of the 0.6900 support zone. We have officially cleared the 200-week Moving Average, which has acted as a ceiling for the last two years.
Immediate Resistance: 0.7150, 0.7180 (NFP Targets)
Psychological Target: 0.7300 (Q3 2026 Objective)
Main Supply Target: 0.7500
Support Levels: 0.7020, 0.6980
📍The Bull Case (The "Rocket" Scenario)
The structural momentum is being driven by a rare convergence of monetary hawkishness and a multi-decade commodity rip.
Carry Trade Magnet:
The RBA is the only "G10 Hawk" left, making the AUD the primary destination for yield.
Hard Asset Proxy:
Global investors are treating the AUD as a liquid way to play the surge in Gold and Copper.
Dollar De-leveraging:
The DXY is entering a "Death Spiral" as markets frontrun a recessionary NFP.
📍The Bear Case (The "China Proxy" Trap)
To remain objective, we must identify the "Fail State":
China Demand Deficit:
If 0.2% CPI leads to an industrial collapse, the AUD's link to metals won't save it from a "China Proxy" sell-off.
Iron Ore Divergence:
If the softening in Iron Ore ($100 handle) eventually outweighs the rally in Gold/Copper, the AUD's "Resource Floor" may be thinner than expected.
Hawkish Shock:
A "Beat" in NFP (>100k) would trigger a "Bull Trap" liquidation back to 0.7000.
📍Event Risk:
Current intraday gains look like "Frontrunning" the delayed NFP print.
Bull Case: NFP < 50k confirms the recession narrative, catapulting AUDUSD toward 0.7200.
Bear Case: NFP > 100k triggers a short-squeeze in the DXY, testing 0.7000.
The Australian Dollar is witnessing a structural regime shift, clearing the 0.7000 psychological handle on the weekly timeframe. This "rip" is the result of a "Perfect Storm": a hawkish Reserve Bank of Australia (RBA), record-breaking commodity prices, and a weakening U.S. Dollar ahead of critical Non-Farm Payrolls (NFP) data.
The Macro Environment
The fundamental backdrop for the Aussie has flipped to "Aggressive Bullish" due to three core drivers:
Monetary Policy Divergence:
The RBA surprised the market in February with a hike to 3.85%, citing sticky inflation. Meanwhile, the Federal Reserve is expected to ease toward a target range of 3.25% by year-end. This yield spread is a massive magnet for institutional carry-trade inflows.
The Commodity Super-cycle:
AUD is acting as a "Hard Asset Proxy." With Spot Gold trading above $5,050 and Copper at $5.98, the terms of trade for Australia are at multi-year highs. We are seeing a "debasement trade" out of fiat and into materials.
China Disinflation Hedge:
While China's 0.2% CPI print is a global concern, the RBA's hawkish stance is keeping the AUD stronger than its peers (CAD, EUR), as it acts as a selective play on base metal demand.
Technical key-levels:
The weekly chart shows a vertical expansion following a successful retest of the 0.6900 support zone. We have officially cleared the 200-week Moving Average, which has acted as a ceiling for the last two years.
Immediate Resistance: 0.7150, 0.7180 (NFP Targets)
Psychological Target: 0.7300 (Q3 2026 Objective)
Main Supply Target: 0.7500
Support Levels: 0.7020, 0.6980
📍The Bull Case (The "Rocket" Scenario)
The structural momentum is being driven by a rare convergence of monetary hawkishness and a multi-decade commodity rip.
Carry Trade Magnet:
The RBA is the only "G10 Hawk" left, making the AUD the primary destination for yield.
Hard Asset Proxy:
Global investors are treating the AUD as a liquid way to play the surge in Gold and Copper.
Dollar De-leveraging:
The DXY is entering a "Death Spiral" as markets frontrun a recessionary NFP.
📍The Bear Case (The "China Proxy" Trap)
To remain objective, we must identify the "Fail State":
China Demand Deficit:
If 0.2% CPI leads to an industrial collapse, the AUD's link to metals won't save it from a "China Proxy" sell-off.
Iron Ore Divergence:
If the softening in Iron Ore ($100 handle) eventually outweighs the rally in Gold/Copper, the AUD's "Resource Floor" may be thinner than expected.
Hawkish Shock:
A "Beat" in NFP (>100k) would trigger a "Bull Trap" liquidation back to 0.7000.
📍Event Risk:
Current intraday gains look like "Frontrunning" the delayed NFP print.
Bull Case: NFP < 50k confirms the recession narrative, catapulting AUDUSD toward 0.7200.
Bear Case: NFP > 100k triggers a short-squeeze in the DXY, testing 0.7000.
ออร์เดอร์ถูกยกเลิก
This might crash after CPI, specially if it comes hot. Macro not in favor right now, so we canceled.
คำจำกัดสิทธิ์ความรับผิดชอบ
ข้อมูลและบทความไม่ได้มีวัตถุประสงค์เพื่อก่อให้เกิดกิจกรรมทางการเงิน, การลงทุน, การซื้อขาย, ข้อเสนอแนะ หรือคำแนะนำประเภทอื่น ๆ ที่ให้หรือรับรองโดย TradingView อ่านเพิ่มเติมใน ข้อกำหนดการใช้งาน
คำจำกัดสิทธิ์ความรับผิดชอบ
ข้อมูลและบทความไม่ได้มีวัตถุประสงค์เพื่อก่อให้เกิดกิจกรรมทางการเงิน, การลงทุน, การซื้อขาย, ข้อเสนอแนะ หรือคำแนะนำประเภทอื่น ๆ ที่ให้หรือรับรองโดย TradingView อ่านเพิ่มเติมใน ข้อกำหนดการใช้งาน