
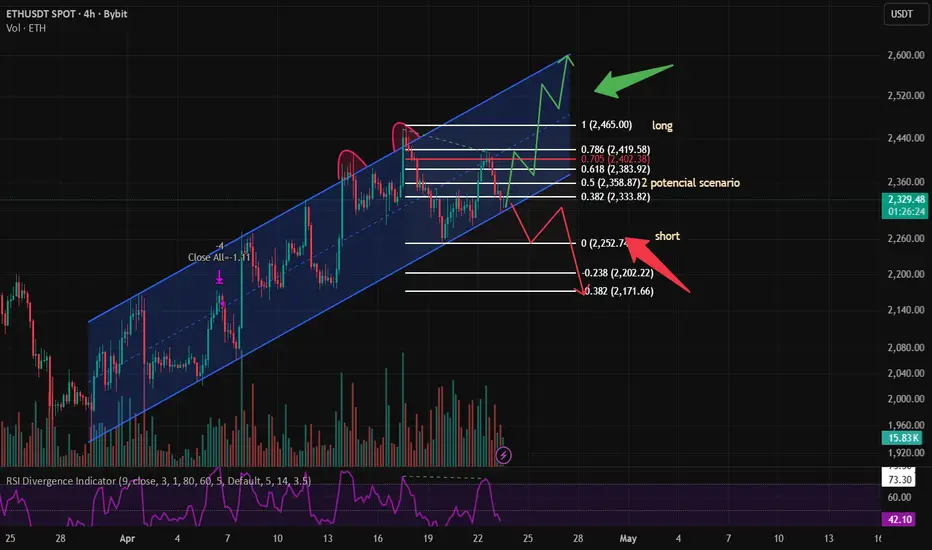
Ethereum is currently trading within a well-defined ascending channel on the 4-hour timeframe. The price is currently testing the mid-range of this structure, coinciding with key Fibonacci retracement levels. As we approach a critical liquidity juncture, we are monitoring two primary scenarios based on the reaction at current support.
Market Structure: ETH remains in a local uptrend, characterized by higher highs and higher lows within the blue channel. However, the recent rejection from the $2,465 resistance has brought the price back to the 0.382 - 0.5 Fibonacci support cluster
Support Zone: $2,333 – $2,358 (0.382 to 0.5 Fib levels). This area is currently serving as a "pivot" for the next major move.
Resistance: $2,419 (0.786 Fib) and the psychological level of $2,465.
The Two Scenarios:
Scenario 1 (Long/Bullish): A successful defense of the lower channel boundary and the 0.382 Fib level. This would initiate an impulsive "zigzag" recovery targeting a breakout above $2,500.
Scenario 2 (Short/Bearish): A decisive break below the channel and the $2,333 level. This would shift the bias toward a deep correction to mitigate lower imbalances, targeting the $2,202 – $2,171 zone (-0.238 to -0.382 extensions).
Market Structure: ETH remains in a local uptrend, characterized by higher highs and higher lows within the blue channel. However, the recent rejection from the $2,465 resistance has brought the price back to the 0.382 - 0.5 Fibonacci support cluster
Support Zone: $2,333 – $2,358 (0.382 to 0.5 Fib levels). This area is currently serving as a "pivot" for the next major move.
Resistance: $2,419 (0.786 Fib) and the psychological level of $2,465.
The Two Scenarios:
Scenario 1 (Long/Bullish): A successful defense of the lower channel boundary and the 0.382 Fib level. This would initiate an impulsive "zigzag" recovery targeting a breakout above $2,500.
Scenario 2 (Short/Bearish): A decisive break below the channel and the $2,333 level. This would shift the bias toward a deep correction to mitigate lower imbalances, targeting the $2,202 – $2,171 zone (-0.238 to -0.382 extensions).

📲Join Honey Badger Trading Bot for free:
Find more analytics and our trading results here - t.me/Neuro_trade_AI_bot?start=Tradingview
HoneyBadger is the Top-1 Master Trader on Bybit TradFi.
Find more analytics and our trading results here - t.me/Neuro_trade_AI_bot?start=Tradingview
HoneyBadger is the Top-1 Master Trader on Bybit TradFi.
คำจำกัดสิทธิ์ความรับผิดชอบ
ข้อมูลและบทความไม่ได้มีวัตถุประสงค์เพื่อก่อให้เกิดกิจกรรมทางการเงิน, การลงทุน, การซื้อขาย, ข้อเสนอแนะ หรือคำแนะนำประเภทอื่น ๆ ที่ให้หรือรับรองโดย TradingView อ่านเพิ่มเติมใน ข้อกำหนดการใช้งาน
📲Join Honey Badger Trading Bot for free:
Find more analytics and our trading results here - t.me/Neuro_trade_AI_bot?start=Tradingview
HoneyBadger is the Top-1 Master Trader on Bybit TradFi.
Find more analytics and our trading results here - t.me/Neuro_trade_AI_bot?start=Tradingview
HoneyBadger is the Top-1 Master Trader on Bybit TradFi.
คำจำกัดสิทธิ์ความรับผิดชอบ
ข้อมูลและบทความไม่ได้มีวัตถุประสงค์เพื่อก่อให้เกิดกิจกรรมทางการเงิน, การลงทุน, การซื้อขาย, ข้อเสนอแนะ หรือคำแนะนำประเภทอื่น ๆ ที่ให้หรือรับรองโดย TradingView อ่านเพิ่มเติมใน ข้อกำหนดการใช้งาน