

Market Structure
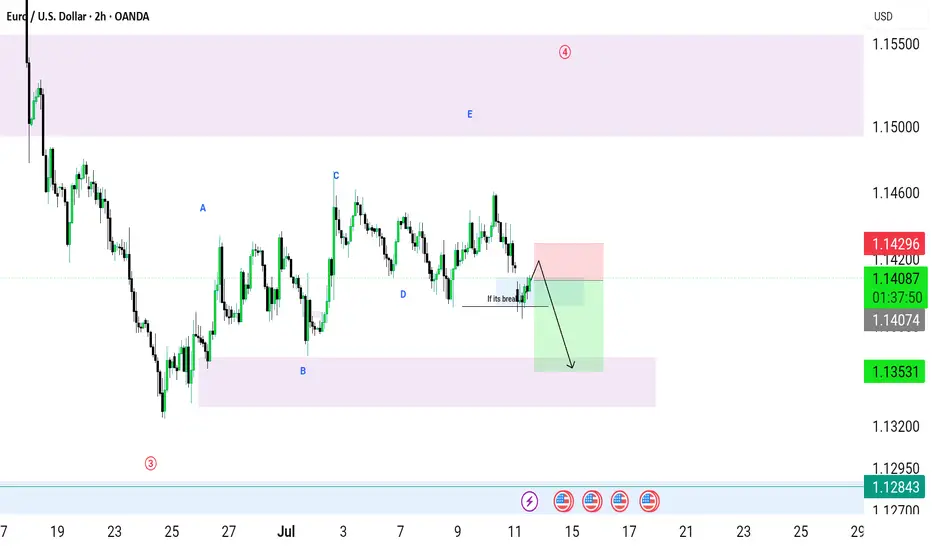
Bias: Bearish
Trend: Lower highs and lower lows
Setup: Break and retest of previous support
Timeframe: 2H
📍Trade Plan
Entry: On bearish rejection from the marked resistance zone
Stop Loss: Above the resistance/swing high
Take Profit: Lower demand zone (purple area)
Risk Management: Risk only 1–2% per trade and wait for candle confirmation before entering.
⚠️ *This is an educational market analysis, not financial advice. Always wait for confirmation and manage your risk properly.*
Bias: Bearish
Trend: Lower highs and lower lows
Setup: Break and retest of previous support
Timeframe: 2H
📍Trade Plan
Entry: On bearish rejection from the marked resistance zone
Stop Loss: Above the resistance/swing high
Take Profit: Lower demand zone (purple area)
Risk Management: Risk only 1–2% per trade and wait for candle confirmation before entering.
⚠️ *This is an educational market analysis, not financial advice. Always wait for confirmation and manage your risk properly.*

การนำเสนอที่เกี่ยวข้อง
คำจำกัดสิทธิ์ความรับผิดชอบ
ข้อมูลและบทความไม่ได้มีวัตถุประสงค์เพื่อก่อให้เกิดกิจกรรมทางการเงิน, การลงทุน, การซื้อขาย, ข้อเสนอแนะ หรือคำแนะนำประเภทอื่น ๆ ที่ให้หรือรับรองโดย TradingView อ่านเพิ่มเติมใน ข้อกำหนดการใช้งาน
การนำเสนอที่เกี่ยวข้อง
คำจำกัดสิทธิ์ความรับผิดชอบ
ข้อมูลและบทความไม่ได้มีวัตถุประสงค์เพื่อก่อให้เกิดกิจกรรมทางการเงิน, การลงทุน, การซื้อขาย, ข้อเสนอแนะ หรือคำแนะนำประเภทอื่น ๆ ที่ให้หรือรับรองโดย TradingView อ่านเพิ่มเติมใน ข้อกำหนดการใช้งาน