
A trailing stop should not simply follow price candle after candle.
If it is too aggressive, it can close a good position during a normal market pullback.
If it is too slow, a large part of the unrealized profit can be given back.
The goal of a smart trailing stop is therefore to find the right balance: progressively reduce risk while still giving the market enough room to continue.
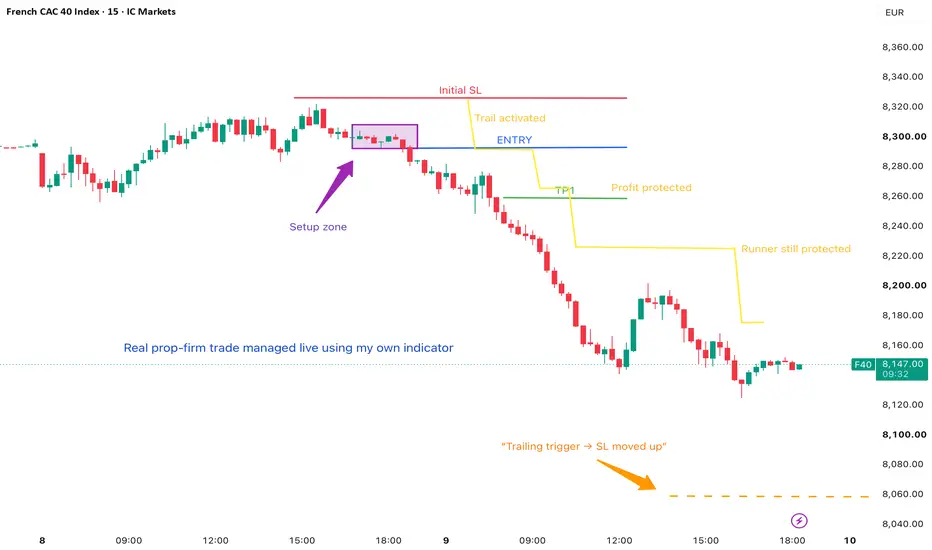
In this F40 M15 example, the setup is bearish.
The trade starts with a defined entry and an initial structural Stop Loss. As long as price has not moved far enough in our favor, the SL remains unchanged. There is no reason to protect a trade too early before the market has actually confirmed the move.
Once price reaches the first trigger level, dynamic trade management begins.
The logic is simple:
1. Price reaches a trigger level.
The trade has progressed far enough to justify additional protection.
2. The Stop Loss moves to a new protection level.
The stop does not simply follow price closely. Enough room is deliberately left for normal market fluctuations.
3. If the trend continues, another trigger level is reached.
The SL is then moved again to the next protection step.
4. This process continues for as long as the trend keeps extending.
These are the different yellow steps shown on the chart.
After TP1, part of the result is already secured. The runner can then remain exposed to the trend while the stop progressively protects more and more of the open profit.
The orange dotted level represents the next trailing trigger. If price continues lower and reaches this area, the management logic allows the SL to move again to the next protection level.
The objective is therefore not to predict exactly where the trend will end.
Instead, the idea is to build a management process where:
the market decides how far the move can go, while risk is progressively reduced.
This becomes particularly useful when a trade develops into a much larger move than originally expected. Instead of closing everything automatically at 2R or 3R, the runner can remain in the market while the trend continues to justify holding the position.
Note: the setup and levels shown here come from a real prop-firm trade triggered by my own indicator. Due to a technical issue unrelated to the setup itself, the live position was manually closed before the full move was completed. The chart therefore illustrates how the trailing-stop logic would have continued to manage the position step by step.
A good trailing stop is not designed to exit at the exact bottom of a short trade or the exact top of a long trade.
Its real purpose is to answer one question:
How can we protect more and more of the trade without preventing an exceptional move from developing?
That is the philosophy behind this step-based trailing management.
If it is too aggressive, it can close a good position during a normal market pullback.
If it is too slow, a large part of the unrealized profit can be given back.
The goal of a smart trailing stop is therefore to find the right balance: progressively reduce risk while still giving the market enough room to continue.
In this F40 M15 example, the setup is bearish.
The trade starts with a defined entry and an initial structural Stop Loss. As long as price has not moved far enough in our favor, the SL remains unchanged. There is no reason to protect a trade too early before the market has actually confirmed the move.
Once price reaches the first trigger level, dynamic trade management begins.
The logic is simple:
1. Price reaches a trigger level.
The trade has progressed far enough to justify additional protection.
2. The Stop Loss moves to a new protection level.
The stop does not simply follow price closely. Enough room is deliberately left for normal market fluctuations.
3. If the trend continues, another trigger level is reached.
The SL is then moved again to the next protection step.
4. This process continues for as long as the trend keeps extending.
These are the different yellow steps shown on the chart.
After TP1, part of the result is already secured. The runner can then remain exposed to the trend while the stop progressively protects more and more of the open profit.
The orange dotted level represents the next trailing trigger. If price continues lower and reaches this area, the management logic allows the SL to move again to the next protection level.
The objective is therefore not to predict exactly where the trend will end.
Instead, the idea is to build a management process where:
the market decides how far the move can go, while risk is progressively reduced.
This becomes particularly useful when a trade develops into a much larger move than originally expected. Instead of closing everything automatically at 2R or 3R, the runner can remain in the market while the trend continues to justify holding the position.
Note: the setup and levels shown here come from a real prop-firm trade triggered by my own indicator. Due to a technical issue unrelated to the setup itself, the live position was manually closed before the full move was completed. The chart therefore illustrates how the trailing-stop logic would have continued to manage the position step by step.
A good trailing stop is not designed to exit at the exact bottom of a short trade or the exact top of a long trade.
Its real purpose is to answer one question:
How can we protect more and more of the trade without preventing an exceptional move from developing?
That is the philosophy behind this step-based trailing management.

VEK Pro Flow — Professional TradingView tools for trade planning & risk management.
VEK Trade Planner: whop.com/vek-pro-flow/vek-trade-planner/
Questions & support: support.vekproflow@gmail.com
VEK Trade Planner: whop.com/vek-pro-flow/vek-trade-planner/
Questions & support: support.vekproflow@gmail.com
คำจำกัดสิทธิ์ความรับผิดชอบ
ข้อมูลและบทความไม่ได้มีวัตถุประสงค์เพื่อก่อให้เกิดกิจกรรมทางการเงิน, การลงทุน, การซื้อขาย, ข้อเสนอแนะ หรือคำแนะนำประเภทอื่น ๆ ที่ให้หรือรับรองโดย TradingView อ่านเพิ่มเติมใน ข้อกำหนดการใช้งาน
VEK Pro Flow — Professional TradingView tools for trade planning & risk management.
VEK Trade Planner: whop.com/vek-pro-flow/vek-trade-planner/
Questions & support: support.vekproflow@gmail.com
VEK Trade Planner: whop.com/vek-pro-flow/vek-trade-planner/
Questions & support: support.vekproflow@gmail.com
คำจำกัดสิทธิ์ความรับผิดชอบ
ข้อมูลและบทความไม่ได้มีวัตถุประสงค์เพื่อก่อให้เกิดกิจกรรมทางการเงิน, การลงทุน, การซื้อขาย, ข้อเสนอแนะ หรือคำแนะนำประเภทอื่น ๆ ที่ให้หรือรับรองโดย TradingView อ่านเพิ่มเติมใน ข้อกำหนดการใช้งาน