
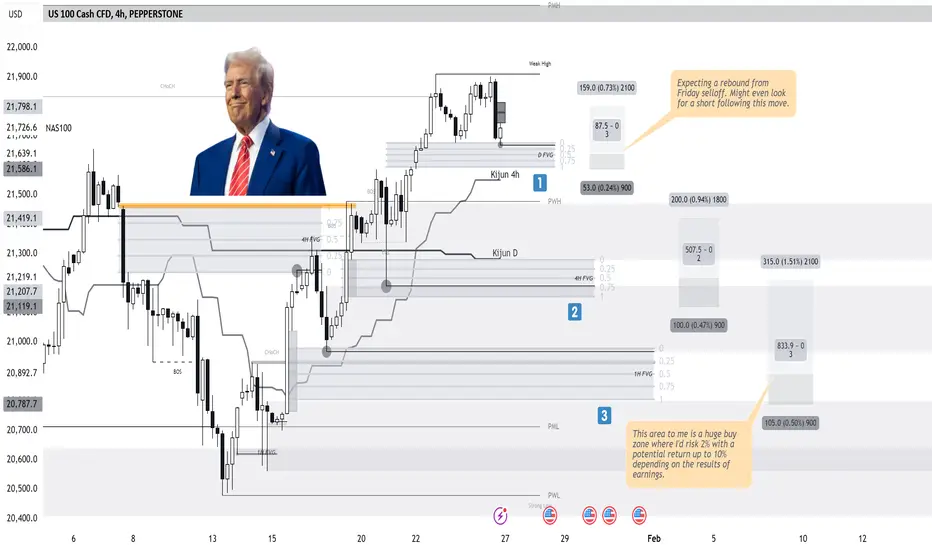
US100 analysis: Three "buy zones" identified for potential entries with distinct risk levels.
1. "Zone 1": Near the "4H Kijun" and prior weak high, aiming for short-term rebound with controlled risk.
2. "Zone 2": Aligns with deeper "4H FVG" support. This setup offers a higher conviction for a reversal targeting the mid-range.
3. "Zone 3": Major buy zone with strong confluence at the "PML" and "1H FVG". Willing to risk 2% for a potential return of up to 10%, depending on upcoming earnings.
Each zone represents escalating risk-reward setups, ensuring precise risk management across macro support structures. Consider macro headwinds and earnings season's volatility.
1. "Zone 1": Near the "4H Kijun" and prior weak high, aiming for short-term rebound with controlled risk.
2. "Zone 2": Aligns with deeper "4H FVG" support. This setup offers a higher conviction for a reversal targeting the mid-range.
3. "Zone 3": Major buy zone with strong confluence at the "PML" and "1H FVG". Willing to risk 2% for a potential return of up to 10%, depending on upcoming earnings.
Each zone represents escalating risk-reward setups, ensuring precise risk management across macro support structures. Consider macro headwinds and earnings season's volatility.
ปิดการเทรด: ถึงเป้าหมายการตัดขาดทุน
Got killed lol
คำจำกัดสิทธิ์ความรับผิดชอบ
ข้อมูลและบทความไม่ได้มีวัตถุประสงค์เพื่อก่อให้เกิดกิจกรรมทางการเงิน, การลงทุน, การซื้อขาย, ข้อเสนอแนะ หรือคำแนะนำประเภทอื่น ๆ ที่ให้หรือรับรองโดย TradingView อ่านเพิ่มเติมใน ข้อกำหนดการใช้งาน
คำจำกัดสิทธิ์ความรับผิดชอบ
ข้อมูลและบทความไม่ได้มีวัตถุประสงค์เพื่อก่อให้เกิดกิจกรรมทางการเงิน, การลงทุน, การซื้อขาย, ข้อเสนอแนะ หรือคำแนะนำประเภทอื่น ๆ ที่ให้หรือรับรองโดย TradingView อ่านเพิ่มเติมใน ข้อกำหนดการใช้งาน