
Overview
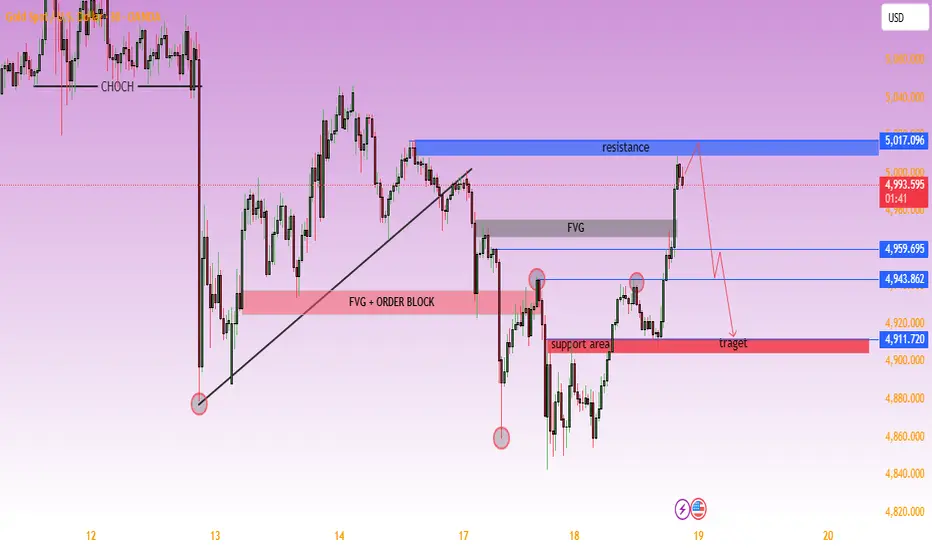
The chart shows an earlier CHoCH (Change of Character) on the left side, confirming a bearish structural shift.
After the sharp sell-off, price formed a higher low and began a corrective bullish move.
However, the broader structure remains fragile as price recently created equal highs and liquidity sweeps before moving higher.
📍 2. Key Zones Identified
🔵 Resistance Zone: 5,017 Area
Strong supply zone.
Previous reaction point.
Current price has impulsively tapped into this level.
Likely liquidity grab above prior highs.
This is the critical decision point.
🟫 FVG (Fair Value Gap) – Mid Zone
Located below current price.
Acts as imbalance that price may revisit.
Often works as a magnet after impulsive moves.
🔴 Support / Target Zone: 4,911 Area
Marked as strong demand.
Previous reaction base.
Aligns with projected bearish path.
Logical downside target if rejection confirms.
📊 Current Price Behavior
Strong bullish impulse into resistance.
No major pullback yet (overextended move).
Reaction from resistance will determine next direction.
📉 Bearish Scenario (Higher Probability Setup)
If price:
Rejects strongly from 5,017 resistance
Forms bearish structure (lower high on lower timeframe)
Then likely path:
Drop into FVG
Break minor structure
Continue toward 4,911 support (target zone)
This aligns with liquidity sweep + mean reversion logic.
📈 Bullish Invalidation Scenario
If price:
Breaks and closes strongly above 5,017
Holds above resistance as support
Then:
Structure shifts bullish
Next upside expansion likely
🎯 Trade Idea Summary (Conceptual)
Setup Entry Zone Target Invalidation
Short 5,017 resistance rejection 4,911 Strong close above resistance
🧠 Overall Bias
Short-term bias: Bearish from resistance
Confirmation needed: Lower timeframe rejection + structure break
This is a classic liquidity grab into supply → potential distribution move setup.
The chart shows an earlier CHoCH (Change of Character) on the left side, confirming a bearish structural shift.
After the sharp sell-off, price formed a higher low and began a corrective bullish move.
However, the broader structure remains fragile as price recently created equal highs and liquidity sweeps before moving higher.
📍 2. Key Zones Identified
🔵 Resistance Zone: 5,017 Area
Strong supply zone.
Previous reaction point.
Current price has impulsively tapped into this level.
Likely liquidity grab above prior highs.
This is the critical decision point.
🟫 FVG (Fair Value Gap) – Mid Zone
Located below current price.
Acts as imbalance that price may revisit.
Often works as a magnet after impulsive moves.
🔴 Support / Target Zone: 4,911 Area
Marked as strong demand.
Previous reaction base.
Aligns with projected bearish path.
Logical downside target if rejection confirms.
📊 Current Price Behavior
Strong bullish impulse into resistance.
No major pullback yet (overextended move).
Reaction from resistance will determine next direction.
📉 Bearish Scenario (Higher Probability Setup)
If price:
Rejects strongly from 5,017 resistance
Forms bearish structure (lower high on lower timeframe)
Then likely path:
Drop into FVG
Break minor structure
Continue toward 4,911 support (target zone)
This aligns with liquidity sweep + mean reversion logic.
📈 Bullish Invalidation Scenario
If price:
Breaks and closes strongly above 5,017
Holds above resistance as support
Then:
Structure shifts bullish
Next upside expansion likely
🎯 Trade Idea Summary (Conceptual)
Setup Entry Zone Target Invalidation
Short 5,017 resistance rejection 4,911 Strong close above resistance
🧠 Overall Bias
Short-term bias: Bearish from resistance
Confirmation needed: Lower timeframe rejection + structure break
This is a classic liquidity grab into supply → potential distribution move setup.
การซื้อขายยังคงดำเนินอยู่
ปิดการเทรด ด้วยตนเอง
BE picked after 50% profit booked.

Join My telegram channel Free:
t.me/+r-thYiraqh4xNjI0
t.me/+r-thYiraqh4xNjI0
คำจำกัดสิทธิ์ความรับผิดชอบ
ข้อมูลและบทความไม่ได้มีวัตถุประสงค์เพื่อก่อให้เกิดกิจกรรมทางการเงิน, การลงทุน, การซื้อขาย, ข้อเสนอแนะ หรือคำแนะนำประเภทอื่น ๆ ที่ให้หรือรับรองโดย TradingView อ่านเพิ่มเติมใน ข้อกำหนดการใช้งาน
Join My telegram channel Free:
t.me/+r-thYiraqh4xNjI0
t.me/+r-thYiraqh4xNjI0
คำจำกัดสิทธิ์ความรับผิดชอบ
ข้อมูลและบทความไม่ได้มีวัตถุประสงค์เพื่อก่อให้เกิดกิจกรรมทางการเงิน, การลงทุน, การซื้อขาย, ข้อเสนอแนะ หรือคำแนะนำประเภทอื่น ๆ ที่ให้หรือรับรองโดย TradingView อ่านเพิ่มเติมใน ข้อกำหนดการใช้งาน