
Many traders still start with the same question:
“How many lots should I trade?”
But the better question is:
“How much am I willing to lose if my trade idea is wrong?”
A more consistent risk-management process is:
Account Size → Risk % → Stop Loss → Position Size
Your Stop Loss should come from your market analysis.
Your position size should then adapt to the distance between your Entry and that Stop Loss.
Not the other way around.
⸻
Practical example on XAUUSD
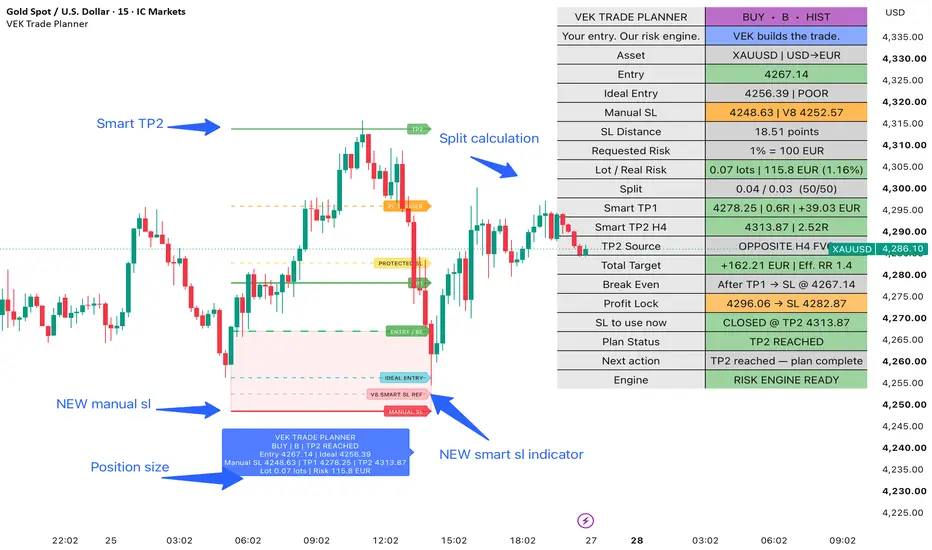
In the chart shown here:
Account size: €10,000
Requested risk: 1% = €100
Entry:
4267.14
Manual Stop Loss:
4248.63
SL distance:
18.51 points
From that distance, the position size is calculated automatically:
Total position: 0.07 lot
Real risk: €115.80 = 1.16%
Why is the real risk slightly above the requested €100?
Because in real trading conditions, position sizes must respect the broker’s executable lot size and lot-step constraints.
That is why it is important to look at the real risk after position-size rounding, not only the theoretical risk.
⸻
Why position size should change from trade to trade
If your Stop Loss is close to your Entry, your position size can be larger while keeping approximately the same monetary risk.
If your Stop Loss is farther away, your position size must decrease.
This is why two trades using exactly the same lot size can represent completely different levels of risk.
The same principle becomes even more important when changing markets:
Forex, Gold, indices, Bitcoin…
Contract specifications and point values are not identical.
Position size should therefore be recalculated for every setup.
⸻
Risk management does not stop at position sizing
Once the position size is defined, the trade still needs an exit plan.
In this example, the 0.07 lot position is split into two parts:
TP1: 0.04 lot
Runner: 0.03 lot
First target:
TP1: 4278.25
Main target:
Smart TP2 H4: 4313.87
The TP2 target represents approximately:
2.52R
But there is an important distinction.
That 2.52R belongs to the runner, not to the entire position.
Part of the trade is already closed at TP1.
For this reason, the overall trade is better represented by the Effective RR:
Estimated total target: +€162.21
Effective RR: 1.40R
This gives a more realistic view of the expected reward when using a TP1 / TP2 split.
⸻
Smart SL or Manual Stop Loss?
In this example, the Stop Loss has been selected manually.
The V8 Smart SL remains visible as a structural reference, while the Manual SL is the level actually used for the risk calculations.
When the Stop Loss is moved, the whole plan is recalculated:
SL Distance → Position Size → Split → TP1 → TP2 → Break Even → Profit Lock → Effective RR
The trader therefore remains in control of the Entry and the invalidation level.
The risk engine simply rebuilds the money-management plan around those decisions.
⸻
The question to ask before entering a trade
❌ “I want to trade 1 lot. Where should I place my Stop Loss?”
✅ “My Stop Loss needs to be here. I want to risk 1%. What position size should I use?”
That simple change in thinking can completely change the way risk is managed.
The chart shown here uses VEK Trade Planner to illustrate this process: Manual SL, Smart SL reference, position sizing, TP1/TP2 split, Smart TP2, Break Even, Profit Lock and Effective RR.
Good risk management starts before you click Buy or Sell.
“How many lots should I trade?”
But the better question is:
“How much am I willing to lose if my trade idea is wrong?”
A more consistent risk-management process is:
Account Size → Risk % → Stop Loss → Position Size
Your Stop Loss should come from your market analysis.
Your position size should then adapt to the distance between your Entry and that Stop Loss.
Not the other way around.
⸻
Practical example on XAUUSD
In the chart shown here:
Account size: €10,000
Requested risk: 1% = €100
Entry:
4267.14
Manual Stop Loss:
4248.63
SL distance:
18.51 points
From that distance, the position size is calculated automatically:
Total position: 0.07 lot
Real risk: €115.80 = 1.16%
Why is the real risk slightly above the requested €100?
Because in real trading conditions, position sizes must respect the broker’s executable lot size and lot-step constraints.
That is why it is important to look at the real risk after position-size rounding, not only the theoretical risk.
⸻
Why position size should change from trade to trade
If your Stop Loss is close to your Entry, your position size can be larger while keeping approximately the same monetary risk.
If your Stop Loss is farther away, your position size must decrease.
This is why two trades using exactly the same lot size can represent completely different levels of risk.
The same principle becomes even more important when changing markets:
Forex, Gold, indices, Bitcoin…
Contract specifications and point values are not identical.
Position size should therefore be recalculated for every setup.
⸻
Risk management does not stop at position sizing
Once the position size is defined, the trade still needs an exit plan.
In this example, the 0.07 lot position is split into two parts:
TP1: 0.04 lot
Runner: 0.03 lot
First target:
TP1: 4278.25
Main target:
Smart TP2 H4: 4313.87
The TP2 target represents approximately:
2.52R
But there is an important distinction.
That 2.52R belongs to the runner, not to the entire position.
Part of the trade is already closed at TP1.
For this reason, the overall trade is better represented by the Effective RR:
Estimated total target: +€162.21
Effective RR: 1.40R
This gives a more realistic view of the expected reward when using a TP1 / TP2 split.
⸻
Smart SL or Manual Stop Loss?
In this example, the Stop Loss has been selected manually.
The V8 Smart SL remains visible as a structural reference, while the Manual SL is the level actually used for the risk calculations.
When the Stop Loss is moved, the whole plan is recalculated:
SL Distance → Position Size → Split → TP1 → TP2 → Break Even → Profit Lock → Effective RR
The trader therefore remains in control of the Entry and the invalidation level.
The risk engine simply rebuilds the money-management plan around those decisions.
⸻
The question to ask before entering a trade
❌ “I want to trade 1 lot. Where should I place my Stop Loss?”
✅ “My Stop Loss needs to be here. I want to risk 1%. What position size should I use?”
That simple change in thinking can completely change the way risk is managed.
The chart shown here uses VEK Trade Planner to illustrate this process: Manual SL, Smart SL reference, position sizing, TP1/TP2 split, Smart TP2, Break Even, Profit Lock and Effective RR.
Good risk management starts before you click Buy or Sell.

VEK Pro Flow — Professional TradingView tools for trade planning & risk management.
VEK Trade Planner: whop.com/vek-pro-flow/vek-trade-planner/
Questions & support: support.vekproflow@gmail.com
VEK Trade Planner: whop.com/vek-pro-flow/vek-trade-planner/
Questions & support: support.vekproflow@gmail.com
คำจำกัดสิทธิ์ความรับผิดชอบ
ข้อมูลและบทความไม่ได้มีวัตถุประสงค์เพื่อก่อให้เกิดกิจกรรมทางการเงิน, การลงทุน, การซื้อขาย, ข้อเสนอแนะ หรือคำแนะนำประเภทอื่น ๆ ที่ให้หรือรับรองโดย TradingView อ่านเพิ่มเติมใน ข้อกำหนดการใช้งาน
VEK Pro Flow — Professional TradingView tools for trade planning & risk management.
VEK Trade Planner: whop.com/vek-pro-flow/vek-trade-planner/
Questions & support: support.vekproflow@gmail.com
VEK Trade Planner: whop.com/vek-pro-flow/vek-trade-planner/
Questions & support: support.vekproflow@gmail.com
คำจำกัดสิทธิ์ความรับผิดชอบ
ข้อมูลและบทความไม่ได้มีวัตถุประสงค์เพื่อก่อให้เกิดกิจกรรมทางการเงิน, การลงทุน, การซื้อขาย, ข้อเสนอแนะ หรือคำแนะนำประเภทอื่น ๆ ที่ให้หรือรับรองโดย TradingView อ่านเพิ่มเติมใน ข้อกำหนดการใช้งาน