OPEN-SOURCE SCRIPT
Multi-System (RSI2 + Squeeze + MACD/ADX)
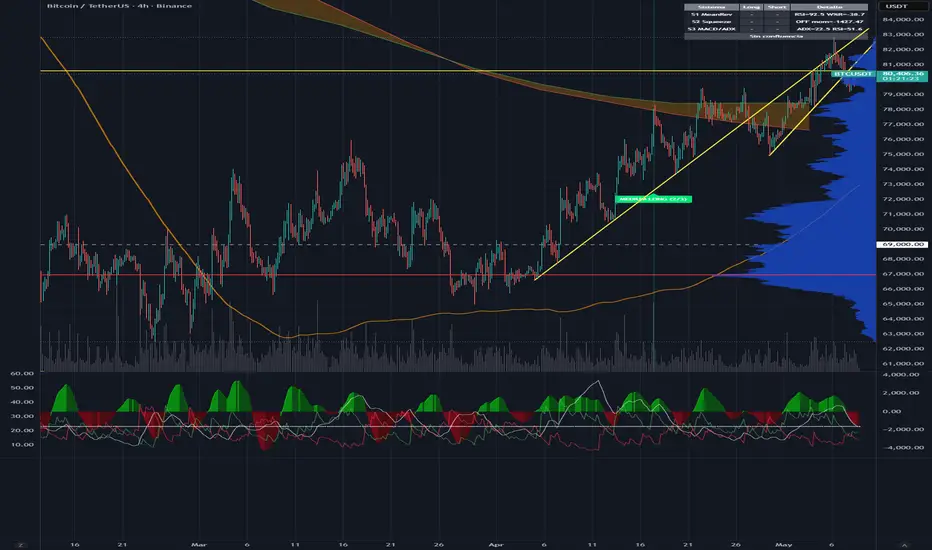
Confluence Multi-System combines three independent, well-documented signal frameworks into a single overlay and only fires alerts when two or more agree on direction. The goal is to filter noise: each system has its own logic and failure mode, so coincidence between them is statistically rarer and historically higher quality than any individual signal.
THE THREE SYSTEMS
System 1 — Mean Reversion (RSI-2 + Williams %R + 200 SMA)
Larry Connors-style countertrend setup. Trades only in the direction of the 200 SMA trend filter, requires RSI(2) at an extreme (<5 long, >95 short) and Williams %R(10) confirming (<-90 long, >-10 short). Designed for pullbacks within a trend, not reversals against it.
System 2 — TTM Squeeze
Classic John Carter volatility compression setup. Detects when Bollinger Bands(20, 2.0) contract inside Keltner Channels(20, 1.5) — a "squeeze" — then signals on the release in the direction of a linear-regression momentum oscillator. Catches breakouts after consolidation.
System 3 — Triple Confirmation (MACD + RSI + ADX)
Trend-following filter stack. Long requires MACD(12,26,9) bullish cross + RSI(14) > 50 + ADX(14) > 25. Short is the mirror. ADX gates out chop; RSI confirms the cross is in the dominant momentum side.
CONFLUENCE LOGIC
The indicator counts how many systems are signaling in the same direction on the same bar:
• 3/3 → STRONG signal (background tinted, label printed, dedicated alert)
• 2/3 → MEDIUM signal (lighter tint, dedicated alert)
• <2 → no signal, no alert
The minimum number of systems required can be configured (default 2). You can also disable any system individually if you want to test 2-of-2 confluence on specific pairs.
WHAT YOU SEE ON THE CHART
• Background tint on confluence bars (green/red strong, lime/fuchsia medium)
• Labels marking the bar where confluence first appears
• 200 SMA plotted as visual reference for the System 1 trend filter
• A status table (top-right) showing for each system: long/short state, key indicator values (RSI, Williams %R, ADX, squeeze state, momentum), plus a summary row with the current confluence level
ALERTS
Six alertconditions are exposed:
• STRONG LONG (3/3) / STRONG SHORT (3/3)
• MEDIUM LONG (2/3) / MEDIUM SHORT (2/3)
• ANY CONFLUENCE LONG / ANY CONFLUENCE SHORT (respect the configured minimum)
Alerts include ticker, interval, and close price via standard TradingView placeholders.
INPUTS
All three systems are fully parametrized: SMA length, RSI/Williams %R lengths and thresholds, Bollinger and Keltner lengths and multipliers, MACD periods, ADX length and minimum strength. Defaults match the original published values for each framework.
USE CASES
• Day trading on lower timeframes — wait for 2/3 or 3/3 to enter, exit on opposite confluence or your own stop
• Swing trading on 1H/4H/Daily — confluence becomes rare but high quality
• As a confirmation layer over your own strategy — read the table to see which systems agree before pulling the trigger
NOTES AND DISCLAIMERS
This is an indicator, not a strategy — it does not place orders, manage stops, or compute P&L. Win-rate ranges referenced for each underlying system come from the original literature (Connors, Carter, Wilder/Appel) and are heavily dependent on instrument, timeframe, and exit logic. Past performance does not guarantee future results. Always backtest with your own exit rules before trading live.
Open source — fork it, adapt the thresholds, plug in your own systems.
THE THREE SYSTEMS
System 1 — Mean Reversion (RSI-2 + Williams %R + 200 SMA)
Larry Connors-style countertrend setup. Trades only in the direction of the 200 SMA trend filter, requires RSI(2) at an extreme (<5 long, >95 short) and Williams %R(10) confirming (<-90 long, >-10 short). Designed for pullbacks within a trend, not reversals against it.
System 2 — TTM Squeeze
Classic John Carter volatility compression setup. Detects when Bollinger Bands(20, 2.0) contract inside Keltner Channels(20, 1.5) — a "squeeze" — then signals on the release in the direction of a linear-regression momentum oscillator. Catches breakouts after consolidation.
System 3 — Triple Confirmation (MACD + RSI + ADX)
Trend-following filter stack. Long requires MACD(12,26,9) bullish cross + RSI(14) > 50 + ADX(14) > 25. Short is the mirror. ADX gates out chop; RSI confirms the cross is in the dominant momentum side.
CONFLUENCE LOGIC
The indicator counts how many systems are signaling in the same direction on the same bar:
• 3/3 → STRONG signal (background tinted, label printed, dedicated alert)
• 2/3 → MEDIUM signal (lighter tint, dedicated alert)
• <2 → no signal, no alert
The minimum number of systems required can be configured (default 2). You can also disable any system individually if you want to test 2-of-2 confluence on specific pairs.
WHAT YOU SEE ON THE CHART
• Background tint on confluence bars (green/red strong, lime/fuchsia medium)
• Labels marking the bar where confluence first appears
• 200 SMA plotted as visual reference for the System 1 trend filter
• A status table (top-right) showing for each system: long/short state, key indicator values (RSI, Williams %R, ADX, squeeze state, momentum), plus a summary row with the current confluence level
ALERTS
Six alertconditions are exposed:
• STRONG LONG (3/3) / STRONG SHORT (3/3)
• MEDIUM LONG (2/3) / MEDIUM SHORT (2/3)
• ANY CONFLUENCE LONG / ANY CONFLUENCE SHORT (respect the configured minimum)
Alerts include ticker, interval, and close price via standard TradingView placeholders.
INPUTS
All three systems are fully parametrized: SMA length, RSI/Williams %R lengths and thresholds, Bollinger and Keltner lengths and multipliers, MACD periods, ADX length and minimum strength. Defaults match the original published values for each framework.
USE CASES
• Day trading on lower timeframes — wait for 2/3 or 3/3 to enter, exit on opposite confluence or your own stop
• Swing trading on 1H/4H/Daily — confluence becomes rare but high quality
• As a confirmation layer over your own strategy — read the table to see which systems agree before pulling the trigger
NOTES AND DISCLAIMERS
This is an indicator, not a strategy — it does not place orders, manage stops, or compute P&L. Win-rate ranges referenced for each underlying system come from the original literature (Connors, Carter, Wilder/Appel) and are heavily dependent on instrument, timeframe, and exit logic. Past performance does not guarantee future results. Always backtest with your own exit rules before trading live.
Open source — fork it, adapt the thresholds, plug in your own systems.
สคริปต์แบบโอเพนซอร์ส
ด้วยเจตนารมณ์หลักของ TradingView ผู้สร้างสคริปต์นี้ได้ทำให้เป็นโอเพนซอร์ส เพื่อให้เทรดเดอร์สามารถตรวจสอบและยืนยันฟังก์ชันการทำงานของมันได้ ขอชื่นชมผู้เขียน! แม้ว่าคุณจะใช้งานได้ฟรี แต่โปรดจำไว้ว่าการเผยแพร่โค้ดซ้ำจะต้องเป็นไปตาม กฎระเบียบการใช้งาน ของเรา

คำจำกัดสิทธิ์ความรับผิดชอบ
ข้อมูลและบทความไม่ได้มีวัตถุประสงค์เพื่อก่อให้เกิดกิจกรรมทางการเงิน, การลงทุน, การซื้อขาย, ข้อเสนอแนะ หรือคำแนะนำประเภทอื่น ๆ ที่ให้หรือรับรองโดย TradingView อ่านเพิ่มเติมใน ข้อกำหนดการใช้งาน
สคริปต์แบบโอเพนซอร์ส
ด้วยเจตนารมณ์หลักของ TradingView ผู้สร้างสคริปต์นี้ได้ทำให้เป็นโอเพนซอร์ส เพื่อให้เทรดเดอร์สามารถตรวจสอบและยืนยันฟังก์ชันการทำงานของมันได้ ขอชื่นชมผู้เขียน! แม้ว่าคุณจะใช้งานได้ฟรี แต่โปรดจำไว้ว่าการเผยแพร่โค้ดซ้ำจะต้องเป็นไปตาม กฎระเบียบการใช้งาน ของเรา
คำจำกัดสิทธิ์ความรับผิดชอบ
ข้อมูลและบทความไม่ได้มีวัตถุประสงค์เพื่อก่อให้เกิดกิจกรรมทางการเงิน, การลงทุน, การซื้อขาย, ข้อเสนอแนะ หรือคำแนะนำประเภทอื่น ๆ ที่ให้หรือรับรองโดย TradingView อ่านเพิ่มเติมใน ข้อกำหนดการใช้งาน