ICT Combined Venom Silver Bullet Displacement Liquidity
ICT Combined — Venom / Silver Bullet / Displacement / Liquidity
WHAT THIS IS
Fourteen independent ICT modules in one overlay, each with its own on/off switch. It exists to replace four or five separate scripts on a single chart, which is why the modules are switchable rather than fused together.
Nothing here predicts price. Every module is a mechanical description of something that has already happened on the chart, drawn so it can be seen at a glance.
MODULES 1, 2 AND 3 — THE SESSION MODEL
Three independent instances of the same engine: a Venom NY instance with its own sessions, and two Silver Bullet windows defaulting to 10:00-11:00 and 14:00-15:00 New York. The sequence each one runs is:
1. Build an opening range. During the opening-range session the highest high and lowest low are tracked. The range seals the instant that session ends — the first bar of the trading window does not extend it.
2. Wait for a directional raid. During the trading window, the first side of the range taken out arms the model in the opposite direction: a high taken arms the bearish case, a low taken arms the bullish case. If both sides get taken the model stands down for that session, because the range was not respected and there is no clean directional read.
3. Locate the CISD level. On the raid bar the script scans back up to "Bar Back Check" bars for the most recent candle whose body opposed the raid — a down-body candle for a high raid. That candle's open becomes the change-in-state-of-delivery level. Where two consecutive opposing candles exist the more conservative of the two opens is used. A dotted line runs from that candle forward, extending while price stays on the raid side.
4. Confirm. When a candle CLOSES BACK THROUGH the level, the model confirms and a triangle marks the bar. Body close, not wick — a wick through the level is not a change in state of delivery. A level left untouched longer than the staleness setting is abandoned.
5. Mark the zone. On confirmation the order block anchored at the session extreme is drawn and refined. In parallel the script tracks fair value gaps formed while the model was armed, discards any price has already mitigated, and draws the most recent survivor. Mitigation level is selectable for both zone types — proximal edge, 50%, or distal edge.
Why three instances: the engine holds per-session state, so one copy cannot track two overlapping windows. Three independent instances let a broad session model and two narrow windows coexist without interfering. All sessions are editable and a London Silver Bullet preset is included. Times are America/New_York and follow daylight saving automatically.
MODULE 4 — DISPLACEMENT
Flags candles whose range is unusually large relative to recent behaviour and that leave an unfilled gap behind them.
The measure is either the absolute open-to-close distance or the high-to-low range, compared against a rolling standard deviation of that same measure multiplied by a strength factor. A candle qualifying on size AND producing a three-bar fair value gap is coloured, and a short marker box is drawn over the gap.
Everything here evaluates on confirmed bars only. The gap test reads the third bar of the pattern, which is still forming in real time, so an unconfirmed signal could otherwise appear and then vanish. By default the module only marks candles inside an active trading window rather than painting all session.
MODULE 5 — LIQUIDITY LEVELS AND SWEEPS
Draws prior-day, prior-week, prior-month, Asia-session and London-session highs and lows, and marks when one is swept.
Higher-timeframe levels use the previously closed period, requested in a way that reveals nothing early. Asia and London use the most recently completed session range, so both are sealed before the New York open.
A sweep here means RAID AND REJECTION, not a break. Price must trade through the level and close back on the original side within the same candle. A candle closing beyond the level is treated as acceptance, not a sweep, and is not marked. Each level fires once and re-arms only when the level itself updates.
Marks name every level taken on that bar, so a candle raiding several pools at once is visible as exactly that.
MODULE 6 — FIRST PRESENTED FVG
The first fair value gap to form in the morning and afternoon windows, with Consequent Encroachment (the 50% midpoint) drawn as a dashed line and the gap labelled with its formation time.
Two details matter here.
First, the gap is always sourced from the ONE-MINUTE chart regardless of the timeframe being viewed. The first presented gap is a one-minute event; detecting it on a 15-minute chart would find a different gap at a different price. Zones are anchored by timestamp, so they land correctly even when the gap forms mid-bar on a higher timeframe.
Second, the session window is tested against the MIDDLE candle of the three — the candle that creates the gap. A 09:31 start therefore means the 09:30 opening candle is never the gap-forming candle. Testing the confirming candle instead would let the pattern reach back to 09:29, before the open.
Gaps are retained across days rather than cleared nightly, because they stay relevant long after the session that made them. Up to thirty days can be kept, ten by default, and there are two carry rules: carry every retained gap to the current bar, and always carry Monday's gap through its own week. With both off, a gap simply stops at the end of its own day. A Friday chart with carry-all enabled therefore still shows the whole week plus the tail of the week before.
Retest and CE alerts fire only for the current day's gap. Ten retained gaps each re-arming would produce a stream of alerts from stale levels.
MODULE 7 — OPENING RANGE GAP
The gap between the prior day's regular-session close and today's regular-session open, with the 50% midpoint marked as Consequent Encroachment and optional quadrant lines at 25% and 75%.
The default session ends at 16:15 to match CME index-futures settlement; use 09:30-16:00 for cash equities and indices. Gaps narrower than a configurable minimum are ignored. The gap is reported as filled when price trades back across it to the prior close — the direction of the fill test follows whether the day gapped up or down.
MODULE 8 — PREMARKET DEALING RANGE
The high and low of the 07:00-09:00 New York window, graded into eighths and carried forward across the session.
The range locks when the window closes and is then projected right. The 50% line is equilibrium: above it the market is in premium, below it in discount. The 25% and 75% lines are the quadrants, and the remaining 12.5% steps are the octants. Each line is drawn separately so the grid can be thinned to taste — extremes only, extremes plus equilibrium, or the full eight.
The point of the module is that premium and discount are measured against THIS range specifically, not against the regular-session range and not against the daily range. A rally that looks like strength on the day can be a rally into premium of the premarket range, which is a different reading.
The grid is fractal and the same treatment already appears elsewhere in the script: module 7 draws quadrants on the opening range gap by the same logic, and the same eighths can be applied to any range worth grading.
Window and colours are configurable, the window itself can be shaded, and a chosen number of prior days can be retained. Intraday timeframes only — on daily and above the window cannot resolve.
MODULE 9 — BODY / WICK LAW
A test of whether candle BODIES respect the 50% of a level or zone, ignoring what the wicks do.
The rule is directional. A demand zone holds while bodies stay in its upper half; a supply zone holds while bodies stay in its lower half. Wicks are free to trade through the midpoint — only a closed body crossing it counts as a violation. The module evaluates on confirmed bars only, because an intrabar body is not a body.
Three things are tested, each switchable:
- The module 8 grid. A wick that pierces a level while the body fails to reach it is a rejection at that level. Sustained across a configurable number of interactions it is marked, and a body closing through the level resets the count — as does price clearing the level outright. Which levels may signal is set separately from which levels are drawn, and by default each one signals once per session: nine levels all free to re-fire produces more markers on a rangebound day than a chart can carry, which is a lesson learned rather than a guess.
- The first presented FVG from module 6. Polarity comes from the direction of the gap itself.
- The opening range gap from module 7. Polarity is decided at first touch from the direction price approached from, since a gap can act as either side depending on where price is when it gets there.
A zone that has been violated is recoloured and stops being tested; a zone that has survived the configured number of interactions is recoloured and marked confirmed. Both states fire alerts.
This is a filter, not a signal. It says whether a zone already on the chart is still behaving, not whether to take a trade at it.
MODULE 10 — AM REGIME CLASSIFIER
Grades the premarket window and scores how likely the morning session is to consolidate rather than expand.
READ THIS PART BEFORE ENABLING IT. The module encodes a claim — that a trending premarket implies a consolidating morning — which is not established fact. It is shipped as a measurement instrument, not as a rule, and the defaults are starting guesses rather than findings. The gate that would let the score suppress other modules' alerts is off by default and should stay off until the score has been checked against real sessions.
"Trending" is judged by eye in the material this comes from, so it is scored here from three independent measures rather than asserted:
- Directional efficiency: net displacement divided by distance actually travelled, multiplied by the square root of the bar count. That normalisation matters — a random walk sits near 1.0 on any timeframe, so one threshold works whether the window is graded on one-minute or five-minute bars.
- Close location: where the 09:00 close sits inside the window range. This is the measure closest to what the eye calls a trend.
- Range against its own 20-day median, which stops a quiet directional drift being read as expansion.
A configurable number of those three must agree. Two further tests add to the score: whether the window traded to a level from module 5, and whether it only just got there — a shallow penetration implying unfinished business and a likely revisit.
A level merely lying inside the window range does not count. It has to be in the outer portion of the range, measured from whichever extreme is relevant, on the reasoning that a level price blew through on its way elsewhere was not the destination. The nearest level is reported either way so the distinction is visible. Weights and thresholds are all exposed.
The module then records what the morning session ACTUALLY did, graded with the same efficiency measure. That makes the comparison direct rather than impressionistic: does a high premarket reading predict a low morning one? Until enough sessions have accumulated to answer that, the score is a hypothesis with a number attached.
DASHBOARD
Three levels of detail, because a readout you consult mid-session and a record you study afterwards are different jobs.
COMPACT, the default, is two lines: the call and which side of premarket equilibrium price is on. STANDARD adds what drove the call — trending or not, the key level, the realised figure once the morning closes. FULL shows every factor with its pass or fail, which is more than anyone can read on the fly and is meant for review.
Underneath sits the calibration summary: every logged session split by its premarket classification, reporting the MEDIAN realised morning efficiency of each group with sample sizes, and flagged as a thin sample below twenty per group. Median rather than mean, so one violent morning cannot carry the verdict. If the underlying claim holds, the trending group sits well below the other and below 1.0. If it does not, that shows up here too — which is the point of building it this way.
An optional session log lists the individual rows behind that summary.
History accumulates only over bars the chart has actually loaded, so sample size is set by the timeframe: a one-minute chart loads days, a five-minute chart loads months. The efficiency measure is normalised to be timeframe-independent specifically so those samples stay comparable.
MODULE 12 — SUSPENSION BLOCKS
A fair value gap carrying a volume imbalance at BOTH ends: the middle candle's body is gapped away from its neighbour's body above and below.
An ordinary gap leaves one span of price with no body trade across it. A suspension block leaves three stacked spans. The test is the two body-gap conditions the geometry rules below already compute, required simultaneously rather than individually.
Detected on the chart timeframe rather than sourced from one minute. Module 6 goes to one minute regardless of what is being viewed because a "first presented" gap has one true formation time; a suspension block makes no such claim and is a property of the candles in front of you.
The classification is independent of the geometry switch below. Whether a gap carries an imbalance is a fact about the candles, so it does not change when the extension stops being drawn.
Scope, minimum size, retention and colours are configurable. Blocks are wider than ordinary gaps by construction, since they include both imbalances — the 50% is the more useful reference than the far edge. A first presented gap or displacement marker that also qualifies is drawn with a heavier border rather than duplicated as a separate zone.
MODULE 13 — NEW DAY AND NEW WEEK OPENING GAPS
The span from a session's settlement print to the next session's open, drawn as a solid block. NWOG is the weekend gap, Friday settlement to Sunday open; NDOG covers the other nights.
Monday's new-day gap IS the new-week gap — the same span — so by default the NWOG owns Monday and the NDOG skips it rather than drawing the identical block twice in two colours.
The close side is the final print of the settlement window, not the session close. That window ARMS a value which is CONSUMED when the gap is drawn, so a window that never prints — holiday, half day, a hole in the data — produces no gap for that day rather than one measured against a stale close carried over from some earlier session.
These are deliberately NOT retired when filled, and there is no mitigation state or fade. Price returns to them repeatedly, long after the first pass, which is the reason to carry them at all. A block stays as drawn until retention pushes it off the back. Separate retention counts for each type, five by default.
On daily and higher timeframes there is no settlement window to resolve, so the gap is taken from the previous bar's close to the current bar's open. That is close to the settlement definition but not identical, and the intraday reading is the one to trust.
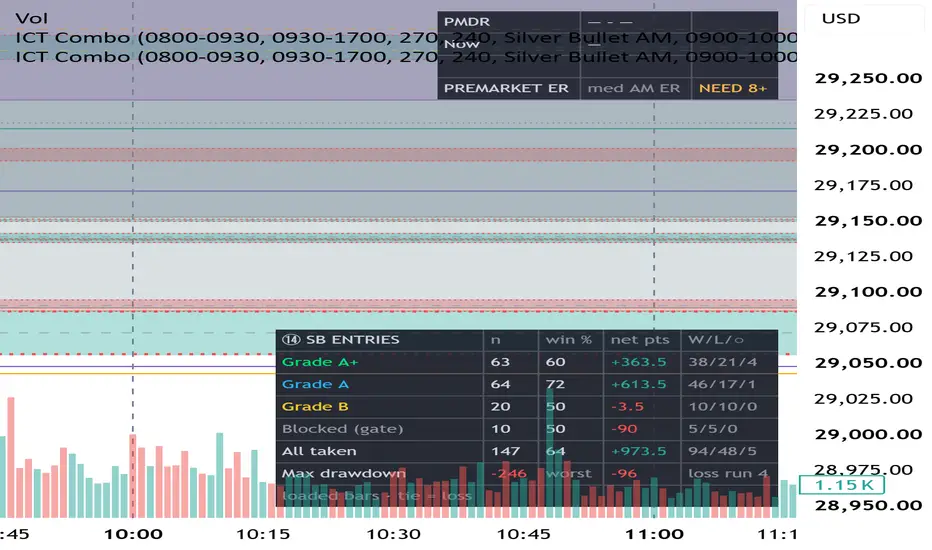
MODULE 14 — SILVER BULLET ENTRIES
The one module that marks entries. Everything above it describes what the chart has done. This module takes those same pieces and puts a marker where they line up inside a Silver Bullet window, with a grade.
Three setups arm it:
- RAID, THEN FVG. Price trades beyond the extreme of a recent range, or sweeps a module 5 level, and an FVG then forms the other way. If the candle that made the gap is a module 4 displacement candle the setup is graded A+. A plain gap is graded A.
- RAID, THEN INVERSION. After the raid a candle body closes through an opposing FVG, inverting it. That inverted gap is the zone. A+.
- FIRST PRESENTED FVG FLIP. A body closes cleanly through today's module 6 gap, from one side to the other. That covers a straight inversion and a reclaim after an inversion. No raid is needed. A+.
The entry is the retest of the zone, at its near edge or its 50%. By default the retest candle must also close back out on the trade side of that level, and the entry is taken at its close. That is the body/wick reading applied to the entry itself, and it stops thin zones whipsawing a position in and out during chop. A plain resting limit on first touch is available instead. The retest must happen inside the window. By default the raid and the zone must also form inside the window. They can be allowed to form a few minutes earlier, to catch the raids and displacements that print at 09:57–10:00. In testing on NQ, though, setups formed entirely inside the window did better, so that allowance is off unless you turn it on. A zone expires if a body closes through its far edge, if it goes unretested for too long, or when the window ends.
Two filters grade what survives.
The opening range gap gate. While today's module 7 gap has not had its 50% tagged, and price is still within a set distance of it (150 points by default), a setup that fades the draw to that level is blocked. A gap up draws price down, so longs are blocked. A gap down draws price up, so shorts are blocked. Once the 50% trades, the objective is complete and the gate lifts. Blocked setups are still drawn, as a grey X, and still scored, so the gate can be judged rather than trusted.
An opposing first presented gap in the path. A short with a bullish first presented gap between entry and target, or a long with a bearish one, is downgraded to B. The gap ahead is resistance.
Every signal is followed to target, stop, break-even or a time exit and tallied by grade in a scorecard. The scoring is conservative: a bar that touches both stop and target counts as a loss, fills assume a resting limit at the entry level, and only loaded bars are covered. The stop sits beyond the raid wick by default, or beyond the zone's far edge. First presented flips have no raid, and their gaps are often narrow, so they have their own stop setting: beyond the swing extreme of the last few bars (the default), the gap's far edge, or a fixed distance from the entry. For accounts with tight risk limits, both setups can instead place the stop just beyond the wick of the retest candle itself, and the stop can be moved to break-even as soon as the candle after entry closes in profit. The scorecard also reports maximum drawdown, the worst single trade and the longest run of consecutive losses.
A Prop profile locks one configuration aimed at funded-account rules: the morning window only, limit entries at the near edge of the zone, a 35-point target, no setup whose stop would be wider than 40 points, the opening range gap gate on, and no new trades after two losses in a day. It switches on in one step instead of being rebuilt setting by setting, and the default Custom profile leaves every setting under your control. The target is a fixed number of points or a multiple of risk, with optional break-even.
This module is a test bed for a discretionary playbook, not a trading system. The scorecard exists so the grading rules can be checked against the chart before anyone relies on them.
FVG GEOMETRY — VOLUME IMBALANCE
An FVG boundary is a wick. Where the neighbouring candle's BODY does not reach that wick, the space left between them is a volume imbalance and belongs to the same inefficiency.
With this enabled, each edge moves from the wick to the neighbouring candle's body extreme whenever a body gap exists between the two candles. Body extreme means the greater or lesser of open and close, whichever way the candle closed — comparing against close alone silently assumes candle direction and produces the wrong edge on an opposite-coloured candle. Boundaries only ever widen, never narrow.
This governs the first presented FVG, the displacement marker and the suspension block test always. Whether it also reaches the zones inside modules 1, 2 and 3 is a separate switch, off by default.
Those zones come from an external library which draws them wick to wick. The consequence is that the same three-candle gap gets different boundaries depending on which module happens to draw it. The switch corrects that, and how it does so is worth stating: the library is left to perform its own detection and filtering, and only the coordinates are adjusted. Each edge is verified against the raw wick it ought to be before being widened, and an edge that does not verify is passed through exactly as the library drew it. A mismatch therefore degrades to the previous behaviour rather than to a wrong zone.
It is off by default because it changes zones users have already been reading. A diagnostic counter reports how many library gaps were offered to the widening logic, how many had an edge moved, and how many were declined — so the switch can be verified rather than assumed.
HOW TO USE IT
Start by switching modules OFF. Thirteen modules, three CISD engines, ten liquidity levels and twenty retained gaps is a great deal of chart furniture, and all of it on at once is unreadable. Most users want one or two windows and a subset of the levels.
It helps to know that the modules answer four different questions, and that only two of the four groups produce anything to act on directly. Modules 5, 7, 8 and 13 say where price is. Modules 4, 6 and 12 say what formed. Modules 1, 2, 3 and 9 say whether it is confirmed or has died. Module 10 says whether to trust the session at all.
A reasonable order to switch things on:
1. Module 5 for context — which pools are still resting, which have just been taken.
2. Module 8 for the premarket range. It is useful on its own: it tells you whether the morning is trading in premium or discount of the range that set up the day, which is a different reading from premium or discount of the session or the day.
3. Module 6 for the first presented gap. Modules 5, 6 and 8 together are a complete framework and a reasonable place to stop.
4. One session engine — Venom, or a single Silver Bullet window — for the mechanical trigger, with module 4 as a strength filter.
5. Module 9 once zones are on the chart, to see whether they are still behaving.
6. Modules 12 and 13 when the above is comfortable. Module 13 in particular adds long-lived blocks that persist for weeks.
7. Module 10 last, and read its note below before trusting it.
The modules are deliberately independent, so any subset works.
Zones are drawn where the model says a reaction is plausible. They are not entries. Nothing here manages risk, sizes a position, or knows anything about your account.
On module 10 specifically: leave it in measurement mode. Its gate is off by default. Run it for a couple of months, watch the calibration summary, and only then decide whether the score deserves to influence anything. If the two medians never separate on your instrument, that is a useful result and the honest response is to leave the module switched off.
Alerts are provided per window for CISD and for CISD with an unmitigated FVG present, per displacement direction, per liquidity level plus aggregate buy-side and sell-side sweep conditions, for the first presented FVG and opening range gap on formation, retest, CE tap and fill, for the premarket range locking and for price crossing into premium or discount, for every body/wick outcome — grid rejection either way, and each tested zone holding or being violated — for a suspension block forming in either direction or either, for a first presented gap that is itself a suspension block, for the new day and new week opening gaps being set, and for Silver Bullet entries — long or short at any grade, or A+ only, plus a dynamic alert carrying the entry, stop and target prices.
There is deliberately no alert for price tapping a new day or new week gap. Those levels are revisited repeatedly, so a one-shot flag would be wrong and a fire-every-touch alert would be noise.
CREDITS AND WHAT IS ORIGINAL HERE
This script reuses open-source work and it is worth being precise about which parts.
From TFlab, taken from "ICT Venom Trading Model" and "Silver Bullet ICT Strategy" under the Mozilla Public License 2.0: the CISD level-detection routine, the opening-range break state machine, and the order block and FVG zone handling. This script also calls TFlab's public libraries OrderBlockRefiner_TradingFinder, OrderBlockDrawing_TradingFinder and FVGDetectorLibrary, which perform the zone refinement, drawing and FVG detection. The engine behind modules 1, 2 and 3 is substantially TFlab's work.
From tradeforopp (TFO): the displacement measure in module 4 — comparing candle range against a rolling standard deviation of range — is TFO's approach.
From fadizeidan, taken from "ICT Open Range Gap & 1st FVG": the volume-imbalance-aware FVG geometry using body extremes, the practice of always sourcing the first presented FVG from the one-minute chart, the middle-candle session test that excludes the opening candle, and the Opening Range Gap definition together with its quadrant lines and minimum-size filter.
What this version adds:
- TFlab's two scripts are the same engine with different session wiring. That engine is parameterised once here and instantiated three times, so multiple overlapping windows run independently — something neither original could do.
- The entire liquidity module is new: the higher-timeframe and session levels, and the raid-and-rejection sweep test.
- The first presented FVG is extended with an afternoon session, and with multi-day retention and carry rules that keep prior days' gaps live on the chart.
- Session handling is preset-driven and preset-agnostic rather than hardcoded, and session framing is drawn from actual session boundaries instead of assumed one-hour offsets.
- Several defects in the source scripts are corrected. The opening range absorbed the first bar of the trading window, which made a break on that bar undetectable. A "Bar Back Check" input existed but was overridden by a hardcoded value. Four colour inputs were declared and never referenced. A dead conditional invoked a series function from inside a local scope. Box count was left at the default while a library drew boxes. An uninitialised level compared against zero could fire a spurious signal at the start of a chart.
- The displacement module's bar colouring and alert now evaluate on confirmed bars, removing an intrabar repaint present in the original.
- The premarket dealing range and its quadrant/octant grid are new, as is the body/wick test that runs against it and against the two gap modules.
- The suspension block module is new. The two body-gap conditions were already being computed to widen FVG edges; requiring both at once, exposing the result, and marking gaps that qualify is this script's addition.
- The new day and new week opening gap module is new, including the arm-and-consume handling of the settlement print that produces no gap rather than a wrong one when the settlement window fails to print.
- The unified FVG geometry is new, and so is the way it is applied: the external library keeps its own detection and filtering, each coordinate is verified against the wick it should be before being widened, and an edge that does not verify is left untouched. A diagnostic counter makes the switch checkable rather than a matter of trust.
- The regime classifier and its calibration record are new. So is the decision to ship a claim with the means of checking it attached, rather than as a setting that is simply on.
- All colour and size inputs are wired through and actually take effect.
The concepts themselves — fair value gaps, consequent encroachment, inversion, displacement, liquidity raids, the first presented gap, the opening range gap, premium and discount, the premarket dealing range and the body/wick reading of a PD array — are ICT's (Michael J. Huddleston) and are not claimed as original here. What is original is the mechanical definition of each one: the specific thresholds, the tie-breaks, and the choices about what counts and what does not. Those decisions are documented above and exposed as inputs precisely because reasonable people would make some of them differently.
Published under the Mozilla Public License 2.0, consistent with the sources.
LIMITATIONS
- Session logic is intraday. On daily and higher timeframes the session windows cannot resolve and the model produces no signals.
- Charts set to regular trading hours are supported. The opening range gap still finds the prior close, and the liquidity levels — prior day, week and month, Asia and London — are read from the extended session, so they match an extended-hours chart exactly. The premarket range and the regime classifier are the exception: they grade the 07:00-09:00 window, and an RTH chart has no bars there, so both stay empty. The new day and new week opening gaps measure to the 09:30 open on such a chart rather than the 18:00 open.
- The first presented FVG module requires a minute-based chart, because it requests one-minute data. On lower-tier TradingView plans the amount of lower-timeframe history available is limited, so the gap history will not extend as far back.
- Displacement uses a standard-deviation threshold, which adapts to recent volatility. After a quiet stretch it will flag smaller candles than it would after an active one.
- Zones, levels and retained gaps are all drawn subject to TradingView's 500-drawing limits. With every module enabled and a long retention window, older drawings will be purged from the chart.
- Signals confirm on bar close. This is deliberate, and it means confirmation arrives one bar after the move that caused it.
- The new day and new week opening gaps resolve their settlement print only on intraday timeframes. On daily and above the gap is approximated from the previous bar's close, which is close to the settlement definition but not the same number.
- The first presented FVG stops populating beyond the limit of available one-minute history, and does so silently. An older day showing no gap may mean the data was unavailable rather than that no gap formed.
- The regime classifier's thresholds and weights are untested defaults. It is a way to measure a claim, not evidence for one, and its dashboard log is there so the claim can be checked rather than believed. Its history accumulates only over loaded bars, so it starts empty on a fresh chart.
WHAT THIS IS
Fourteen independent ICT modules in one overlay, each with its own on/off switch. It exists to replace four or five separate scripts on a single chart, which is why the modules are switchable rather than fused together.
Nothing here predicts price. Every module is a mechanical description of something that has already happened on the chart, drawn so it can be seen at a glance.
MODULES 1, 2 AND 3 — THE SESSION MODEL
Three independent instances of the same engine: a Venom NY instance with its own sessions, and two Silver Bullet windows defaulting to 10:00-11:00 and 14:00-15:00 New York. The sequence each one runs is:
1. Build an opening range. During the opening-range session the highest high and lowest low are tracked. The range seals the instant that session ends — the first bar of the trading window does not extend it.
2. Wait for a directional raid. During the trading window, the first side of the range taken out arms the model in the opposite direction: a high taken arms the bearish case, a low taken arms the bullish case. If both sides get taken the model stands down for that session, because the range was not respected and there is no clean directional read.
3. Locate the CISD level. On the raid bar the script scans back up to "Bar Back Check" bars for the most recent candle whose body opposed the raid — a down-body candle for a high raid. That candle's open becomes the change-in-state-of-delivery level. Where two consecutive opposing candles exist the more conservative of the two opens is used. A dotted line runs from that candle forward, extending while price stays on the raid side.
4. Confirm. When a candle CLOSES BACK THROUGH the level, the model confirms and a triangle marks the bar. Body close, not wick — a wick through the level is not a change in state of delivery. A level left untouched longer than the staleness setting is abandoned.
5. Mark the zone. On confirmation the order block anchored at the session extreme is drawn and refined. In parallel the script tracks fair value gaps formed while the model was armed, discards any price has already mitigated, and draws the most recent survivor. Mitigation level is selectable for both zone types — proximal edge, 50%, or distal edge.
Why three instances: the engine holds per-session state, so one copy cannot track two overlapping windows. Three independent instances let a broad session model and two narrow windows coexist without interfering. All sessions are editable and a London Silver Bullet preset is included. Times are America/New_York and follow daylight saving automatically.
MODULE 4 — DISPLACEMENT
Flags candles whose range is unusually large relative to recent behaviour and that leave an unfilled gap behind them.
The measure is either the absolute open-to-close distance or the high-to-low range, compared against a rolling standard deviation of that same measure multiplied by a strength factor. A candle qualifying on size AND producing a three-bar fair value gap is coloured, and a short marker box is drawn over the gap.
Everything here evaluates on confirmed bars only. The gap test reads the third bar of the pattern, which is still forming in real time, so an unconfirmed signal could otherwise appear and then vanish. By default the module only marks candles inside an active trading window rather than painting all session.
MODULE 5 — LIQUIDITY LEVELS AND SWEEPS
Draws prior-day, prior-week, prior-month, Asia-session and London-session highs and lows, and marks when one is swept.
Higher-timeframe levels use the previously closed period, requested in a way that reveals nothing early. Asia and London use the most recently completed session range, so both are sealed before the New York open.
A sweep here means RAID AND REJECTION, not a break. Price must trade through the level and close back on the original side within the same candle. A candle closing beyond the level is treated as acceptance, not a sweep, and is not marked. Each level fires once and re-arms only when the level itself updates.
Marks name every level taken on that bar, so a candle raiding several pools at once is visible as exactly that.
MODULE 6 — FIRST PRESENTED FVG
The first fair value gap to form in the morning and afternoon windows, with Consequent Encroachment (the 50% midpoint) drawn as a dashed line and the gap labelled with its formation time.
Two details matter here.
First, the gap is always sourced from the ONE-MINUTE chart regardless of the timeframe being viewed. The first presented gap is a one-minute event; detecting it on a 15-minute chart would find a different gap at a different price. Zones are anchored by timestamp, so they land correctly even when the gap forms mid-bar on a higher timeframe.
Second, the session window is tested against the MIDDLE candle of the three — the candle that creates the gap. A 09:31 start therefore means the 09:30 opening candle is never the gap-forming candle. Testing the confirming candle instead would let the pattern reach back to 09:29, before the open.
Gaps are retained across days rather than cleared nightly, because they stay relevant long after the session that made them. Up to thirty days can be kept, ten by default, and there are two carry rules: carry every retained gap to the current bar, and always carry Monday's gap through its own week. With both off, a gap simply stops at the end of its own day. A Friday chart with carry-all enabled therefore still shows the whole week plus the tail of the week before.
Retest and CE alerts fire only for the current day's gap. Ten retained gaps each re-arming would produce a stream of alerts from stale levels.
MODULE 7 — OPENING RANGE GAP
The gap between the prior day's regular-session close and today's regular-session open, with the 50% midpoint marked as Consequent Encroachment and optional quadrant lines at 25% and 75%.
The default session ends at 16:15 to match CME index-futures settlement; use 09:30-16:00 for cash equities and indices. Gaps narrower than a configurable minimum are ignored. The gap is reported as filled when price trades back across it to the prior close — the direction of the fill test follows whether the day gapped up or down.
MODULE 8 — PREMARKET DEALING RANGE
The high and low of the 07:00-09:00 New York window, graded into eighths and carried forward across the session.
The range locks when the window closes and is then projected right. The 50% line is equilibrium: above it the market is in premium, below it in discount. The 25% and 75% lines are the quadrants, and the remaining 12.5% steps are the octants. Each line is drawn separately so the grid can be thinned to taste — extremes only, extremes plus equilibrium, or the full eight.
The point of the module is that premium and discount are measured against THIS range specifically, not against the regular-session range and not against the daily range. A rally that looks like strength on the day can be a rally into premium of the premarket range, which is a different reading.
The grid is fractal and the same treatment already appears elsewhere in the script: module 7 draws quadrants on the opening range gap by the same logic, and the same eighths can be applied to any range worth grading.
Window and colours are configurable, the window itself can be shaded, and a chosen number of prior days can be retained. Intraday timeframes only — on daily and above the window cannot resolve.
MODULE 9 — BODY / WICK LAW
A test of whether candle BODIES respect the 50% of a level or zone, ignoring what the wicks do.
The rule is directional. A demand zone holds while bodies stay in its upper half; a supply zone holds while bodies stay in its lower half. Wicks are free to trade through the midpoint — only a closed body crossing it counts as a violation. The module evaluates on confirmed bars only, because an intrabar body is not a body.
Three things are tested, each switchable:
- The module 8 grid. A wick that pierces a level while the body fails to reach it is a rejection at that level. Sustained across a configurable number of interactions it is marked, and a body closing through the level resets the count — as does price clearing the level outright. Which levels may signal is set separately from which levels are drawn, and by default each one signals once per session: nine levels all free to re-fire produces more markers on a rangebound day than a chart can carry, which is a lesson learned rather than a guess.
- The first presented FVG from module 6. Polarity comes from the direction of the gap itself.
- The opening range gap from module 7. Polarity is decided at first touch from the direction price approached from, since a gap can act as either side depending on where price is when it gets there.
A zone that has been violated is recoloured and stops being tested; a zone that has survived the configured number of interactions is recoloured and marked confirmed. Both states fire alerts.
This is a filter, not a signal. It says whether a zone already on the chart is still behaving, not whether to take a trade at it.
MODULE 10 — AM REGIME CLASSIFIER
Grades the premarket window and scores how likely the morning session is to consolidate rather than expand.
READ THIS PART BEFORE ENABLING IT. The module encodes a claim — that a trending premarket implies a consolidating morning — which is not established fact. It is shipped as a measurement instrument, not as a rule, and the defaults are starting guesses rather than findings. The gate that would let the score suppress other modules' alerts is off by default and should stay off until the score has been checked against real sessions.
"Trending" is judged by eye in the material this comes from, so it is scored here from three independent measures rather than asserted:
- Directional efficiency: net displacement divided by distance actually travelled, multiplied by the square root of the bar count. That normalisation matters — a random walk sits near 1.0 on any timeframe, so one threshold works whether the window is graded on one-minute or five-minute bars.
- Close location: where the 09:00 close sits inside the window range. This is the measure closest to what the eye calls a trend.
- Range against its own 20-day median, which stops a quiet directional drift being read as expansion.
A configurable number of those three must agree. Two further tests add to the score: whether the window traded to a level from module 5, and whether it only just got there — a shallow penetration implying unfinished business and a likely revisit.
A level merely lying inside the window range does not count. It has to be in the outer portion of the range, measured from whichever extreme is relevant, on the reasoning that a level price blew through on its way elsewhere was not the destination. The nearest level is reported either way so the distinction is visible. Weights and thresholds are all exposed.
The module then records what the morning session ACTUALLY did, graded with the same efficiency measure. That makes the comparison direct rather than impressionistic: does a high premarket reading predict a low morning one? Until enough sessions have accumulated to answer that, the score is a hypothesis with a number attached.
DASHBOARD
Three levels of detail, because a readout you consult mid-session and a record you study afterwards are different jobs.
COMPACT, the default, is two lines: the call and which side of premarket equilibrium price is on. STANDARD adds what drove the call — trending or not, the key level, the realised figure once the morning closes. FULL shows every factor with its pass or fail, which is more than anyone can read on the fly and is meant for review.
Underneath sits the calibration summary: every logged session split by its premarket classification, reporting the MEDIAN realised morning efficiency of each group with sample sizes, and flagged as a thin sample below twenty per group. Median rather than mean, so one violent morning cannot carry the verdict. If the underlying claim holds, the trending group sits well below the other and below 1.0. If it does not, that shows up here too — which is the point of building it this way.
An optional session log lists the individual rows behind that summary.
History accumulates only over bars the chart has actually loaded, so sample size is set by the timeframe: a one-minute chart loads days, a five-minute chart loads months. The efficiency measure is normalised to be timeframe-independent specifically so those samples stay comparable.
MODULE 12 — SUSPENSION BLOCKS
A fair value gap carrying a volume imbalance at BOTH ends: the middle candle's body is gapped away from its neighbour's body above and below.
An ordinary gap leaves one span of price with no body trade across it. A suspension block leaves three stacked spans. The test is the two body-gap conditions the geometry rules below already compute, required simultaneously rather than individually.
Detected on the chart timeframe rather than sourced from one minute. Module 6 goes to one minute regardless of what is being viewed because a "first presented" gap has one true formation time; a suspension block makes no such claim and is a property of the candles in front of you.
The classification is independent of the geometry switch below. Whether a gap carries an imbalance is a fact about the candles, so it does not change when the extension stops being drawn.
Scope, minimum size, retention and colours are configurable. Blocks are wider than ordinary gaps by construction, since they include both imbalances — the 50% is the more useful reference than the far edge. A first presented gap or displacement marker that also qualifies is drawn with a heavier border rather than duplicated as a separate zone.
MODULE 13 — NEW DAY AND NEW WEEK OPENING GAPS
The span from a session's settlement print to the next session's open, drawn as a solid block. NWOG is the weekend gap, Friday settlement to Sunday open; NDOG covers the other nights.
Monday's new-day gap IS the new-week gap — the same span — so by default the NWOG owns Monday and the NDOG skips it rather than drawing the identical block twice in two colours.
The close side is the final print of the settlement window, not the session close. That window ARMS a value which is CONSUMED when the gap is drawn, so a window that never prints — holiday, half day, a hole in the data — produces no gap for that day rather than one measured against a stale close carried over from some earlier session.
These are deliberately NOT retired when filled, and there is no mitigation state or fade. Price returns to them repeatedly, long after the first pass, which is the reason to carry them at all. A block stays as drawn until retention pushes it off the back. Separate retention counts for each type, five by default.
On daily and higher timeframes there is no settlement window to resolve, so the gap is taken from the previous bar's close to the current bar's open. That is close to the settlement definition but not identical, and the intraday reading is the one to trust.
MODULE 14 — SILVER BULLET ENTRIES
The one module that marks entries. Everything above it describes what the chart has done. This module takes those same pieces and puts a marker where they line up inside a Silver Bullet window, with a grade.
Three setups arm it:
- RAID, THEN FVG. Price trades beyond the extreme of a recent range, or sweeps a module 5 level, and an FVG then forms the other way. If the candle that made the gap is a module 4 displacement candle the setup is graded A+. A plain gap is graded A.
- RAID, THEN INVERSION. After the raid a candle body closes through an opposing FVG, inverting it. That inverted gap is the zone. A+.
- FIRST PRESENTED FVG FLIP. A body closes cleanly through today's module 6 gap, from one side to the other. That covers a straight inversion and a reclaim after an inversion. No raid is needed. A+.
The entry is the retest of the zone, at its near edge or its 50%. By default the retest candle must also close back out on the trade side of that level, and the entry is taken at its close. That is the body/wick reading applied to the entry itself, and it stops thin zones whipsawing a position in and out during chop. A plain resting limit on first touch is available instead. The retest must happen inside the window. By default the raid and the zone must also form inside the window. They can be allowed to form a few minutes earlier, to catch the raids and displacements that print at 09:57–10:00. In testing on NQ, though, setups formed entirely inside the window did better, so that allowance is off unless you turn it on. A zone expires if a body closes through its far edge, if it goes unretested for too long, or when the window ends.
Two filters grade what survives.
The opening range gap gate. While today's module 7 gap has not had its 50% tagged, and price is still within a set distance of it (150 points by default), a setup that fades the draw to that level is blocked. A gap up draws price down, so longs are blocked. A gap down draws price up, so shorts are blocked. Once the 50% trades, the objective is complete and the gate lifts. Blocked setups are still drawn, as a grey X, and still scored, so the gate can be judged rather than trusted.
An opposing first presented gap in the path. A short with a bullish first presented gap between entry and target, or a long with a bearish one, is downgraded to B. The gap ahead is resistance.
Every signal is followed to target, stop, break-even or a time exit and tallied by grade in a scorecard. The scoring is conservative: a bar that touches both stop and target counts as a loss, fills assume a resting limit at the entry level, and only loaded bars are covered. The stop sits beyond the raid wick by default, or beyond the zone's far edge. First presented flips have no raid, and their gaps are often narrow, so they have their own stop setting: beyond the swing extreme of the last few bars (the default), the gap's far edge, or a fixed distance from the entry. For accounts with tight risk limits, both setups can instead place the stop just beyond the wick of the retest candle itself, and the stop can be moved to break-even as soon as the candle after entry closes in profit. The scorecard also reports maximum drawdown, the worst single trade and the longest run of consecutive losses.
A Prop profile locks one configuration aimed at funded-account rules: the morning window only, limit entries at the near edge of the zone, a 35-point target, no setup whose stop would be wider than 40 points, the opening range gap gate on, and no new trades after two losses in a day. It switches on in one step instead of being rebuilt setting by setting, and the default Custom profile leaves every setting under your control. The target is a fixed number of points or a multiple of risk, with optional break-even.
This module is a test bed for a discretionary playbook, not a trading system. The scorecard exists so the grading rules can be checked against the chart before anyone relies on them.
FVG GEOMETRY — VOLUME IMBALANCE
An FVG boundary is a wick. Where the neighbouring candle's BODY does not reach that wick, the space left between them is a volume imbalance and belongs to the same inefficiency.
With this enabled, each edge moves from the wick to the neighbouring candle's body extreme whenever a body gap exists between the two candles. Body extreme means the greater or lesser of open and close, whichever way the candle closed — comparing against close alone silently assumes candle direction and produces the wrong edge on an opposite-coloured candle. Boundaries only ever widen, never narrow.
This governs the first presented FVG, the displacement marker and the suspension block test always. Whether it also reaches the zones inside modules 1, 2 and 3 is a separate switch, off by default.
Those zones come from an external library which draws them wick to wick. The consequence is that the same three-candle gap gets different boundaries depending on which module happens to draw it. The switch corrects that, and how it does so is worth stating: the library is left to perform its own detection and filtering, and only the coordinates are adjusted. Each edge is verified against the raw wick it ought to be before being widened, and an edge that does not verify is passed through exactly as the library drew it. A mismatch therefore degrades to the previous behaviour rather than to a wrong zone.
It is off by default because it changes zones users have already been reading. A diagnostic counter reports how many library gaps were offered to the widening logic, how many had an edge moved, and how many were declined — so the switch can be verified rather than assumed.
HOW TO USE IT
Start by switching modules OFF. Thirteen modules, three CISD engines, ten liquidity levels and twenty retained gaps is a great deal of chart furniture, and all of it on at once is unreadable. Most users want one or two windows and a subset of the levels.
It helps to know that the modules answer four different questions, and that only two of the four groups produce anything to act on directly. Modules 5, 7, 8 and 13 say where price is. Modules 4, 6 and 12 say what formed. Modules 1, 2, 3 and 9 say whether it is confirmed or has died. Module 10 says whether to trust the session at all.
A reasonable order to switch things on:
1. Module 5 for context — which pools are still resting, which have just been taken.
2. Module 8 for the premarket range. It is useful on its own: it tells you whether the morning is trading in premium or discount of the range that set up the day, which is a different reading from premium or discount of the session or the day.
3. Module 6 for the first presented gap. Modules 5, 6 and 8 together are a complete framework and a reasonable place to stop.
4. One session engine — Venom, or a single Silver Bullet window — for the mechanical trigger, with module 4 as a strength filter.
5. Module 9 once zones are on the chart, to see whether they are still behaving.
6. Modules 12 and 13 when the above is comfortable. Module 13 in particular adds long-lived blocks that persist for weeks.
7. Module 10 last, and read its note below before trusting it.
The modules are deliberately independent, so any subset works.
Zones are drawn where the model says a reaction is plausible. They are not entries. Nothing here manages risk, sizes a position, or knows anything about your account.
On module 10 specifically: leave it in measurement mode. Its gate is off by default. Run it for a couple of months, watch the calibration summary, and only then decide whether the score deserves to influence anything. If the two medians never separate on your instrument, that is a useful result and the honest response is to leave the module switched off.
Alerts are provided per window for CISD and for CISD with an unmitigated FVG present, per displacement direction, per liquidity level plus aggregate buy-side and sell-side sweep conditions, for the first presented FVG and opening range gap on formation, retest, CE tap and fill, for the premarket range locking and for price crossing into premium or discount, for every body/wick outcome — grid rejection either way, and each tested zone holding or being violated — for a suspension block forming in either direction or either, for a first presented gap that is itself a suspension block, for the new day and new week opening gaps being set, and for Silver Bullet entries — long or short at any grade, or A+ only, plus a dynamic alert carrying the entry, stop and target prices.
There is deliberately no alert for price tapping a new day or new week gap. Those levels are revisited repeatedly, so a one-shot flag would be wrong and a fire-every-touch alert would be noise.
CREDITS AND WHAT IS ORIGINAL HERE
This script reuses open-source work and it is worth being precise about which parts.
From TFlab, taken from "ICT Venom Trading Model" and "Silver Bullet ICT Strategy" under the Mozilla Public License 2.0: the CISD level-detection routine, the opening-range break state machine, and the order block and FVG zone handling. This script also calls TFlab's public libraries OrderBlockRefiner_TradingFinder, OrderBlockDrawing_TradingFinder and FVGDetectorLibrary, which perform the zone refinement, drawing and FVG detection. The engine behind modules 1, 2 and 3 is substantially TFlab's work.
From tradeforopp (TFO): the displacement measure in module 4 — comparing candle range against a rolling standard deviation of range — is TFO's approach.
From fadizeidan, taken from "ICT Open Range Gap & 1st FVG": the volume-imbalance-aware FVG geometry using body extremes, the practice of always sourcing the first presented FVG from the one-minute chart, the middle-candle session test that excludes the opening candle, and the Opening Range Gap definition together with its quadrant lines and minimum-size filter.
What this version adds:
- TFlab's two scripts are the same engine with different session wiring. That engine is parameterised once here and instantiated three times, so multiple overlapping windows run independently — something neither original could do.
- The entire liquidity module is new: the higher-timeframe and session levels, and the raid-and-rejection sweep test.
- The first presented FVG is extended with an afternoon session, and with multi-day retention and carry rules that keep prior days' gaps live on the chart.
- Session handling is preset-driven and preset-agnostic rather than hardcoded, and session framing is drawn from actual session boundaries instead of assumed one-hour offsets.
- Several defects in the source scripts are corrected. The opening range absorbed the first bar of the trading window, which made a break on that bar undetectable. A "Bar Back Check" input existed but was overridden by a hardcoded value. Four colour inputs were declared and never referenced. A dead conditional invoked a series function from inside a local scope. Box count was left at the default while a library drew boxes. An uninitialised level compared against zero could fire a spurious signal at the start of a chart.
- The displacement module's bar colouring and alert now evaluate on confirmed bars, removing an intrabar repaint present in the original.
- The premarket dealing range and its quadrant/octant grid are new, as is the body/wick test that runs against it and against the two gap modules.
- The suspension block module is new. The two body-gap conditions were already being computed to widen FVG edges; requiring both at once, exposing the result, and marking gaps that qualify is this script's addition.
- The new day and new week opening gap module is new, including the arm-and-consume handling of the settlement print that produces no gap rather than a wrong one when the settlement window fails to print.
- The unified FVG geometry is new, and so is the way it is applied: the external library keeps its own detection and filtering, each coordinate is verified against the wick it should be before being widened, and an edge that does not verify is left untouched. A diagnostic counter makes the switch checkable rather than a matter of trust.
- The regime classifier and its calibration record are new. So is the decision to ship a claim with the means of checking it attached, rather than as a setting that is simply on.
- All colour and size inputs are wired through and actually take effect.
The concepts themselves — fair value gaps, consequent encroachment, inversion, displacement, liquidity raids, the first presented gap, the opening range gap, premium and discount, the premarket dealing range and the body/wick reading of a PD array — are ICT's (Michael J. Huddleston) and are not claimed as original here. What is original is the mechanical definition of each one: the specific thresholds, the tie-breaks, and the choices about what counts and what does not. Those decisions are documented above and exposed as inputs precisely because reasonable people would make some of them differently.
Published under the Mozilla Public License 2.0, consistent with the sources.
LIMITATIONS
- Session logic is intraday. On daily and higher timeframes the session windows cannot resolve and the model produces no signals.
- Charts set to regular trading hours are supported. The opening range gap still finds the prior close, and the liquidity levels — prior day, week and month, Asia and London — are read from the extended session, so they match an extended-hours chart exactly. The premarket range and the regime classifier are the exception: they grade the 07:00-09:00 window, and an RTH chart has no bars there, so both stay empty. The new day and new week opening gaps measure to the 09:30 open on such a chart rather than the 18:00 open.
- The first presented FVG module requires a minute-based chart, because it requests one-minute data. On lower-tier TradingView plans the amount of lower-timeframe history available is limited, so the gap history will not extend as far back.
- Displacement uses a standard-deviation threshold, which adapts to recent volatility. After a quiet stretch it will flag smaller candles than it would after an active one.
- Zones, levels and retained gaps are all drawn subject to TradingView's 500-drawing limits. With every module enabled and a long retention window, older drawings will be purged from the chart.
- Signals confirm on bar close. This is deliberate, and it means confirmation arrives one bar after the move that caused it.
- The new day and new week opening gaps resolve their settlement print only on intraday timeframes. On daily and above the gap is approximated from the previous bar's close, which is close to the settlement definition but not the same number.
- The first presented FVG stops populating beyond the limit of available one-minute history, and does so silently. An older day showing no gap may mean the data was unavailable rather than that no gap formed.
- The regime classifier's thresholds and weights are untested defaults. It is a way to measure a claim, not evidence for one, and its dashboard log is there so the claim can be checked rather than believed. Its history accumulates only over loaded bars, so it starts empty on a fresh chart.

คำจำกัดสิทธิ์ความรับผิดชอบ
ข้อมูลและบทความไม่ได้มีวัตถุประสงค์เพื่อก่อให้เกิดกิจกรรมทางการเงิน, การลงทุน, การซื้อขาย, ข้อเสนอแนะ หรือคำแนะนำประเภทอื่น ๆ ที่ให้หรือรับรองโดย TradingView อ่านเพิ่มเติมใน ข้อกำหนดการใช้งาน
คำจำกัดสิทธิ์ความรับผิดชอบ
ข้อมูลและบทความไม่ได้มีวัตถุประสงค์เพื่อก่อให้เกิดกิจกรรมทางการเงิน, การลงทุน, การซื้อขาย, ข้อเสนอแนะ หรือคำแนะนำประเภทอื่น ๆ ที่ให้หรือรับรองโดย TradingView อ่านเพิ่มเติมใน ข้อกำหนดการใช้งาน