OPEN-SOURCE SCRIPT
Bucket 3 Momentum
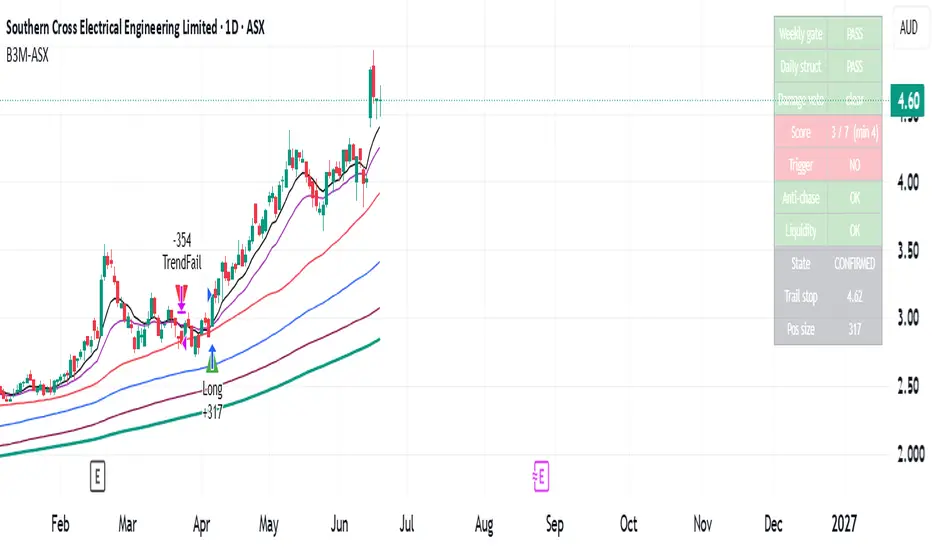
Bucket 3 Momentum
A backtestable daily-chart momentum strategy for ASX equities, built on a four-layer confirmation model: a trade fires only when the weekly trend grants permission, daily structure is intact, a price trigger confirms demand, and risk/extension checks pass.
The weekly layer is the gatekeeper — price above a rising 30-week SMA with healthy weekly RSI — so it won't buy dips in stocks that have quietly left a Stage-2 uptrend. The daily layer confirms the structure (price above the 50/150 DMAs, 50DMA flat-to-rising) with a damage veto for collapsing RSI, fresh 20-day lows, or bearish DMI. Entry triggers on a 5-day breakout with a strong close, but only once a tunable setup score is met (RSI curl + signal cross, fast-MACD turn, DMI recovery, improving RS vs XJO). An anti-chase filter blocks entries stretched too far above the 20EMA.
Positions are sized by defined risk (default 1.5% per trade), with the initial stop below the pullback swing low, floored at 1 ATR. Three exits execute: initial hard stop, a 1.5×ATR trailing stop that ratchets up only, and a structural trend-failure exit.
Built to be backtest-honest — weekly data uses the completed-bar pattern to avoid repaint/lookahead bias, structural decisions act on bar close, protective stops fill intrabar. An on-chart table shows each layer's status, live score, and current state. Tunable throughout; benchmarked against the XJO, so other universes need the benchmark and liquidity floor adjusted.
For education only — not financial advice. Past backtested performance does not guarantee future results.
A backtestable daily-chart momentum strategy for ASX equities, built on a four-layer confirmation model: a trade fires only when the weekly trend grants permission, daily structure is intact, a price trigger confirms demand, and risk/extension checks pass.
The weekly layer is the gatekeeper — price above a rising 30-week SMA with healthy weekly RSI — so it won't buy dips in stocks that have quietly left a Stage-2 uptrend. The daily layer confirms the structure (price above the 50/150 DMAs, 50DMA flat-to-rising) with a damage veto for collapsing RSI, fresh 20-day lows, or bearish DMI. Entry triggers on a 5-day breakout with a strong close, but only once a tunable setup score is met (RSI curl + signal cross, fast-MACD turn, DMI recovery, improving RS vs XJO). An anti-chase filter blocks entries stretched too far above the 20EMA.
Positions are sized by defined risk (default 1.5% per trade), with the initial stop below the pullback swing low, floored at 1 ATR. Three exits execute: initial hard stop, a 1.5×ATR trailing stop that ratchets up only, and a structural trend-failure exit.
Built to be backtest-honest — weekly data uses the completed-bar pattern to avoid repaint/lookahead bias, structural decisions act on bar close, protective stops fill intrabar. An on-chart table shows each layer's status, live score, and current state. Tunable throughout; benchmarked against the XJO, so other universes need the benchmark and liquidity floor adjusted.
For education only — not financial advice. Past backtested performance does not guarantee future results.
สคริปต์แบบโอเพนซอร์ส
ด้วยเจตนารมณ์หลักของ TradingView ผู้สร้างสคริปต์นี้ได้ทำให้เป็นโอเพนซอร์ส เพื่อให้เทรดเดอร์สามารถตรวจสอบและยืนยันฟังก์ชันการทำงานของมันได้ ขอชื่นชมผู้เขียน! แม้ว่าคุณจะใช้งานได้ฟรี แต่โปรดจำไว้ว่าการเผยแพร่โค้ดซ้ำจะต้องเป็นไปตาม กฎระเบียบการใช้งาน ของเรา

คำจำกัดสิทธิ์ความรับผิดชอบ
ข้อมูลและบทความไม่ได้มีวัตถุประสงค์เพื่อก่อให้เกิดกิจกรรมทางการเงิน, การลงทุน, การซื้อขาย, ข้อเสนอแนะ หรือคำแนะนำประเภทอื่น ๆ ที่ให้หรือรับรองโดย TradingView อ่านเพิ่มเติมใน ข้อกำหนดการใช้งาน
สคริปต์แบบโอเพนซอร์ส
ด้วยเจตนารมณ์หลักของ TradingView ผู้สร้างสคริปต์นี้ได้ทำให้เป็นโอเพนซอร์ส เพื่อให้เทรดเดอร์สามารถตรวจสอบและยืนยันฟังก์ชันการทำงานของมันได้ ขอชื่นชมผู้เขียน! แม้ว่าคุณจะใช้งานได้ฟรี แต่โปรดจำไว้ว่าการเผยแพร่โค้ดซ้ำจะต้องเป็นไปตาม กฎระเบียบการใช้งาน ของเรา
คำจำกัดสิทธิ์ความรับผิดชอบ
ข้อมูลและบทความไม่ได้มีวัตถุประสงค์เพื่อก่อให้เกิดกิจกรรมทางการเงิน, การลงทุน, การซื้อขาย, ข้อเสนอแนะ หรือคำแนะนำประเภทอื่น ๆ ที่ให้หรือรับรองโดย TradingView อ่านเพิ่มเติมใน ข้อกำหนดการใช้งาน