ที่อัปเดต:
SMC Supply & Demand Zones - H4 / H1 / M10
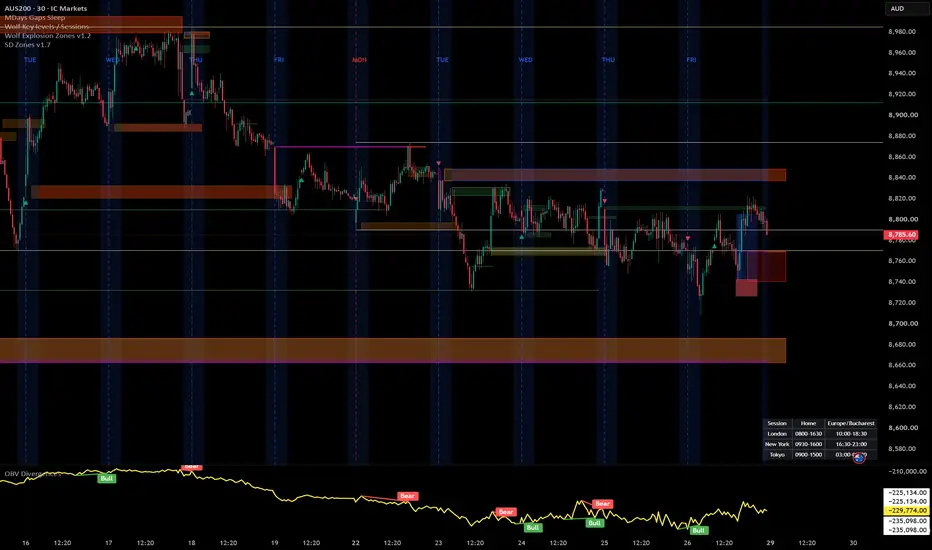
Automatically identifies and draws supply and demand zones across three timeframes (H4, H1, and M10) simultaneously on any chart, using a strict volume-confirmed impulse candle definition rooted in Smart Money Concepts (SMC).
How zones are built
A zone is created only when all three conditions are met on the same candle:
Body size ≥ 1.5 × ATR(14) — filters out indecision candles
Close breaks beyond the prior 5 candles' high (demand) or low (supply) — confirms impulsive intent
Volume ≥ 1.5 × SMA(volume, 20) — requires institutional-level participation
Zone boundaries follow the SMC base candle rule: demand zones span from the impulse candle's open down to its low; supply zones span from its high down to its open.
Visual design
Each timeframe uses a distinct colour family so you can read confluence at a glance — H4 in blue, H1 in orange, M10 in green. Lighter shades mark demand, darker shades mark supply. When price closes fully through a zone, it fades to grey and is tagged with [m] (mitigated) — it stays on the chart for context but is visually de-emphasised. Each zone carries a label (e.g. "H4 D", "H1 S") pinned to its right edge.
Settings
Toggle each timeframe on/off independently
Adjust the body multiplier, prior-bar lookback, and volume multiplier to match the instrument
Set separate caps for active and mitigated zones per timeframe (FIFO — oldest removed first)
Full colour control per timeframe and direction
Toggle labels and borders separately
Non-repainting
All three timeframe feeds use request.security() with lookahead = barmerge.lookahead_off and gaps = barmerge.gaps_off. Zones are created only on the bar where an impulse candle's close is first confirmed — no bar-0 data is used.
Recommended use
Load on your entry timeframe (M10 or M5) and use the H4/H1 zones as bias and confluence levels. Look for price to sweep into a higher-TF zone and react — that is your area of interest for entry confirmation on the lower timeframe.
How zones are built
A zone is created only when all three conditions are met on the same candle:
Body size ≥ 1.5 × ATR(14) — filters out indecision candles
Close breaks beyond the prior 5 candles' high (demand) or low (supply) — confirms impulsive intent
Volume ≥ 1.5 × SMA(volume, 20) — requires institutional-level participation
Zone boundaries follow the SMC base candle rule: demand zones span from the impulse candle's open down to its low; supply zones span from its high down to its open.
Visual design
Each timeframe uses a distinct colour family so you can read confluence at a glance — H4 in blue, H1 in orange, M10 in green. Lighter shades mark demand, darker shades mark supply. When price closes fully through a zone, it fades to grey and is tagged with [m] (mitigated) — it stays on the chart for context but is visually de-emphasised. Each zone carries a label (e.g. "H4 D", "H1 S") pinned to its right edge.
Settings
Toggle each timeframe on/off independently
Adjust the body multiplier, prior-bar lookback, and volume multiplier to match the instrument
Set separate caps for active and mitigated zones per timeframe (FIFO — oldest removed first)
Full colour control per timeframe and direction
Toggle labels and borders separately
Non-repainting
All three timeframe feeds use request.security() with lookahead = barmerge.lookahead_off and gaps = barmerge.gaps_off. Zones are created only on the bar where an impulse candle's close is first confirmed — no bar-0 data is used.
Recommended use
Load on your entry timeframe (M10 or M5) and use the H4/H1 zones as bias and confluence levels. Look for price to sweep into a higher-TF zone and react — that is your area of interest for entry confirmation on the lower timeframe.
Release Note
Added behaviour for mitigated zonesRelease Note
Changed default valuesAdded Custom value for SMA Volume (default 8 instead of 20)
Release Note
Added H2, M30 zones and alerts for touching the zonesRelease Note
I've made ATR as an input and changed some defaultsRelease Note
added M5 / M1 zonesRelease Note
Added custom Volume SMA length for M5 , M1 .Fixed Replay mode.
Release Note
Added custom SMA/WMA Volume Improved Zone Touched Alert
Release Note
Updates:1.Extended Supply/Demand zones to the right
2.Mitigated zones colored

คำจำกัดสิทธิ์ความรับผิดชอบ
ข้อมูลและบทความไม่ได้มีวัตถุประสงค์เพื่อก่อให้เกิดกิจกรรมทางการเงิน, การลงทุน, การซื้อขาย, ข้อเสนอแนะ หรือคำแนะนำประเภทอื่น ๆ ที่ให้หรือรับรองโดย TradingView อ่านเพิ่มเติมใน ข้อกำหนดการใช้งาน
คำจำกัดสิทธิ์ความรับผิดชอบ
ข้อมูลและบทความไม่ได้มีวัตถุประสงค์เพื่อก่อให้เกิดกิจกรรมทางการเงิน, การลงทุน, การซื้อขาย, ข้อเสนอแนะ หรือคำแนะนำประเภทอื่น ๆ ที่ให้หรือรับรองโดย TradingView อ่านเพิ่มเติมใน ข้อกำหนดการใช้งาน