

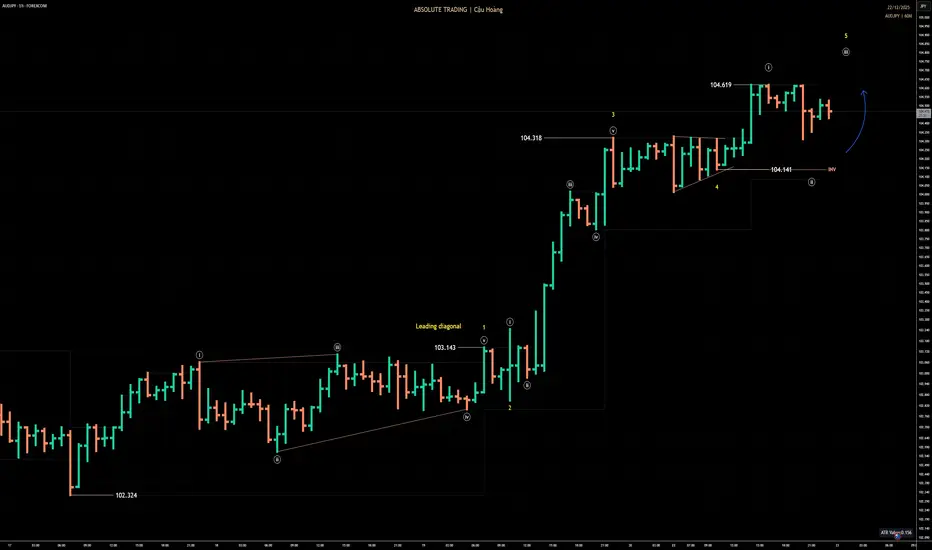
### 🔎 AUD/JPY — H1 | 22-12-2025 — Wave (ii) white correction, preparing for continuation of wave (iii) white within wave 5 yellow
• On the H1 timeframe, AUDJPY is trading within a **bullish Elliott Wave structure**, unfolding as an **impulsive sequence (i)–(ii)–(iii)–(iv)–(v) in white**.
• The initial **wave 1 in yellow** formed as a **leading diagonal**, setting the stage for a strong advance in **wave 3 in yellow** with clear bullish momentum.
• After completing **wave 3 in yellow** around the **104.318** area, the market entered a corrective phase in **wave 4 in yellow**, characterized by a shallow correction, indicating weakening selling pressure.
• As long as price holds firmly above the **104.141** level, the bullish structure remains intact, and **wave 5 in yellow** is expected to continue unfolding in the upcoming sessions.
### 📌 Preferred scenario (Bullish):
• Wait for **wave (ii) white** to complete and look for confirmation signals on lower timeframes to **buy in alignment with wave (iii) white of wave 5 yellow**, prioritizing trades that align with both structure and momentum.
### ⛔ Invalidation:
• A break below **104.141** invalidates the scenario and requires a full wave recount.
### 🧭 Trade tips:
*“Trade the structure — let the market confirm the wave.”*
• On the H1 timeframe, AUDJPY is trading within a **bullish Elliott Wave structure**, unfolding as an **impulsive sequence (i)–(ii)–(iii)–(iv)–(v) in white**.
• The initial **wave 1 in yellow** formed as a **leading diagonal**, setting the stage for a strong advance in **wave 3 in yellow** with clear bullish momentum.
• After completing **wave 3 in yellow** around the **104.318** area, the market entered a corrective phase in **wave 4 in yellow**, characterized by a shallow correction, indicating weakening selling pressure.
• As long as price holds firmly above the **104.141** level, the bullish structure remains intact, and **wave 5 in yellow** is expected to continue unfolding in the upcoming sessions.
### 📌 Preferred scenario (Bullish):
• Wait for **wave (ii) white** to complete and look for confirmation signals on lower timeframes to **buy in alignment with wave (iii) white of wave 5 yellow**, prioritizing trades that align with both structure and momentum.
### ⛔ Invalidation:
• A break below **104.141** invalidates the scenario and requires a full wave recount.
### 🧭 Trade tips:
*“Trade the structure — let the market confirm the wave.”*

Cậu Hoàng
t.me/cauhoang4554
t.me/cauhoang4554
Feragatname
Bilgiler ve yayınlar, TradingView tarafından sağlanan veya onaylanan finansal, yatırım, alım satım veya diğer türden tavsiye veya öneriler anlamına gelmez ve teşkil etmez. Kullanım Koşulları bölümünde daha fazlasını okuyun.
Cậu Hoàng
t.me/cauhoang4554
t.me/cauhoang4554
Feragatname
Bilgiler ve yayınlar, TradingView tarafından sağlanan veya onaylanan finansal, yatırım, alım satım veya diğer türden tavsiye veya öneriler anlamına gelmez ve teşkil etmez. Kullanım Koşulları bölümünde daha fazlasını okuyun.