DENT – Long-Term Descending Channel at Major Demand
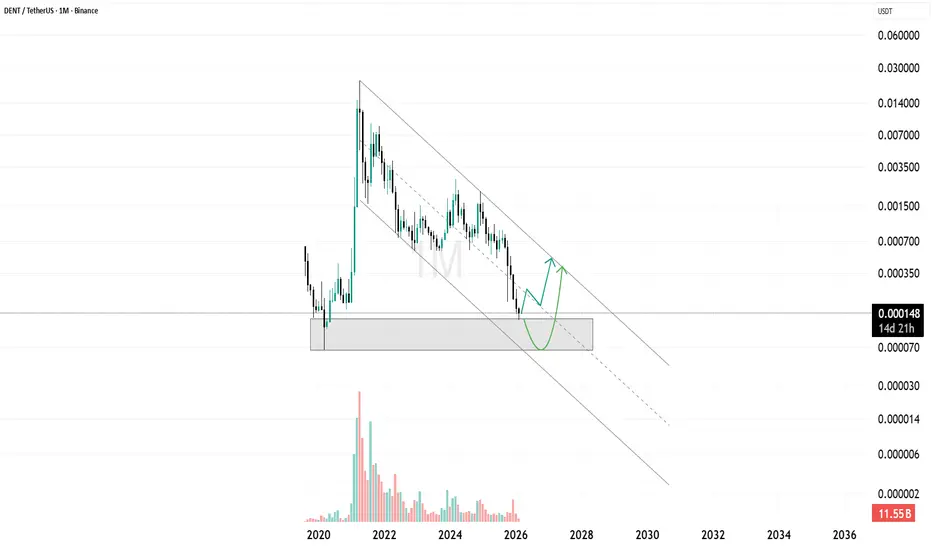
On the monthly timeframe, DENT has been trading inside a clear descending channel since its macro top. The structure shows consistent lower highs and lower lows, with price respecting both channel boundaries multiple times.
Currently, price has dropped into a major historical demand zone around 0.00010 – 0.00015, which previously acted as accumulation before the large upside expansion. This area aligns with the lower region of the channel, making it a high confluence support zone.
The recent reaction from this demand suggests potential short term relief. If buyers step in strongly here, price could move toward the mid-channel region, and eventually attempt a retest of the upper channel boundary.
However, the overall trend on the higher timeframe is still bearish until a confirmed breakout above the descending channel occurs.
Key scenarios:
• Holding the demand zone → gradual recovery toward mid and upper channel
• Break below demand → continuation toward deeper macro lows
• Break above channel → structural trend reversal
This is a critical decision area on the macro chart. The reaction here will likely define the next multi-month move.
Currently, price has dropped into a major historical demand zone around 0.00010 – 0.00015, which previously acted as accumulation before the large upside expansion. This area aligns with the lower region of the channel, making it a high confluence support zone.
The recent reaction from this demand suggests potential short term relief. If buyers step in strongly here, price could move toward the mid-channel region, and eventually attempt a retest of the upper channel boundary.
However, the overall trend on the higher timeframe is still bearish until a confirmed breakout above the descending channel occurs.
Key scenarios:
• Holding the demand zone → gradual recovery toward mid and upper channel
• Break below demand → continuation toward deeper macro lows
• Break above channel → structural trend reversal
This is a critical decision area on the macro chart. The reaction here will likely define the next multi-month move.

Market Structure • Price Action • Crypto Updates
🔗 Telegram: t.me/Coach
🔗 Telegram: t.me/Coach
Feragatname
Bilgiler ve yayınlar, TradingView tarafından sağlanan veya onaylanan finansal, yatırım, alım satım veya diğer türden tavsiye veya öneriler anlamına gelmez ve teşkil etmez. Kullanım Koşulları bölümünde daha fazlasını okuyun.
Market Structure • Price Action • Crypto Updates
🔗 Telegram: t.me/Coach
🔗 Telegram: t.me/Coach
Feragatname
Bilgiler ve yayınlar, TradingView tarafından sağlanan veya onaylanan finansal, yatırım, alım satım veya diğer türden tavsiye veya öneriler anlamına gelmez ve teşkil etmez. Kullanım Koşulları bölümünde daha fazlasını okuyun.