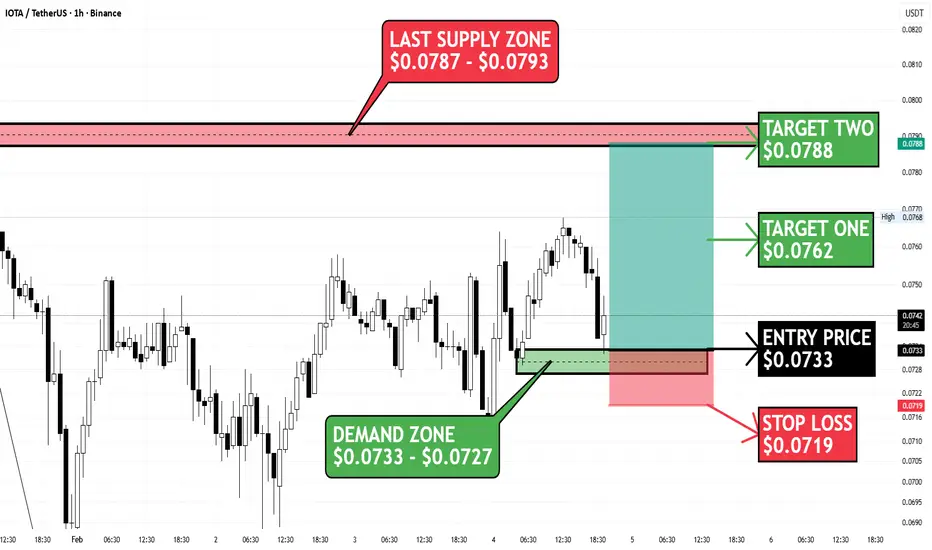

 IOTAUSDT is currently displaying a bullish continuation setup on the 1H timeframe, with price reacting from a clearly defined demand zone between $0.0733 and $0.0727. This zone has acted as a strong support area, signaling active buyer interest and increasing the probability of a short-term upside move.
Recent exchange liquidation data strengthens this setup, showing that over 90% of liquidations were long positions. This indicates a long-side liquidity flush, where weak hands were forced out near support. Such events often precede price reversals or continuation rallies, provided the demand zone holds.
The entry price is $0.0733, with price currently holding above the demand zone, reinforcing the bullish bias. On the upside, Target One is $0.0762, followed by Target Two at $0.0788, which aligns with the previous supply zone ($0.0787–$0.0793)—the last major area of selling pressure and a logical profit-taking zone.
A stop loss at $0.0719 is placed below the demand zone to invalidate the setup if support fails. As long as price remains above this zone, the market structure favors higher highs, bullish momentum, and a favorable risk-to-reward profile.
⚠️ Entry Condition (LONG Setup)
Wait for price to tap the DEMAND ZONE ($0.0733–$0.0727) and confirm with:
Strong bullish candle close from the zone
Clear rejection wicks showing buyer absorption
Lower-timeframe bullish structure shift (HH / HL)
Volume expansion or momentum confirmation (optional but ideal)
👉 Enter only after confirmation to avoid fake bounces and capitalize on post-liquidation momentum.
İşlem aktif
TRADE IS ACTIVATED ON THE CONFORMED BUYING CANDLE ON 1 HOUR TIMEFRAME, LET'S SEE WHAT WE WILL GET.Not
LET'S GO TARGET ONE HITİşlem kapandı: hedefe ulaştı
TARGETS SMASHEDNot
LOOK AT THE PRICE COMING FROM THE "LAST SUPPLY ZONE"
Feragatname
Bilgiler ve yayınlar, TradingView tarafından sağlanan veya onaylanan finansal, yatırım, alım satım veya diğer türden tavsiye veya öneriler anlamına gelmez ve teşkil etmez. Kullanım Koşulları bölümünde daha fazlasını okuyun.
Feragatname
Bilgiler ve yayınlar, TradingView tarafından sağlanan veya onaylanan finansal, yatırım, alım satım veya diğer türden tavsiye veya öneriler anlamına gelmez ve teşkil etmez. Kullanım Koşulları bölümünde daha fazlasını okuyun.