
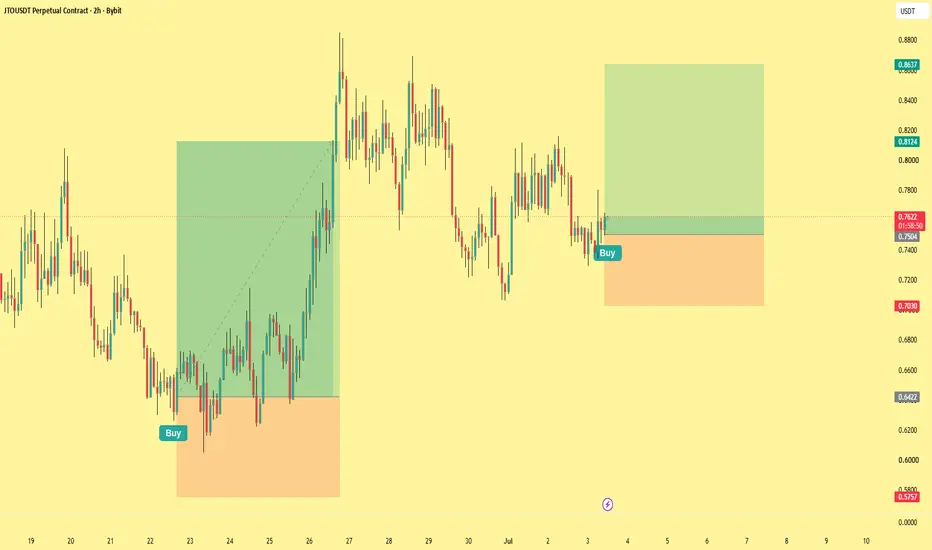
JTO rallied off the 0.642 demand all the way to 0.88, then pulled back into a wide balance between 0.72 and 0.82. Price has now retraced into a higher demand shelf near 0.7500 and reacted, firing the Buy. This is a continuation long: the larger structure is a series of higher lows off the base, and the play is to buy the pullback into demand and ride the next leg back toward the range highs.
Why this setup works — three confluences:
Demand rejection at a higher low. Price pulled back into the demand zone and held instead of breaking down. This is where buyers step back in — the reaction printed on the tap, giving a defined floor to lean risk against rather than chasing mid-range.
Higher-low structure intact. The pullback is holding above the prior swing, keeping the bullish sequence alive off the 0.642 base. Buying here sits with the dominant direction of the last two weeks rather than fighting a fresh trend.
Clean room back to the range highs. Above entry there's an air pocket up to the 0.81 shelf, then the 0.86 zone sitting as the logical draw. Defined risk below demand, asymmetric room up to structure.
Trade management:
Entry: 0.7500 (rejection off demand)
SL: 0.7250 (below the zone)
TP1: 0.8120 — take 50% off, move stop to breakeven
TP2: 0.8600 — 100% exit at the range highs
R:R: ~4.4:1 to full target
Invalidation:
A 2h close back below 0.7250. That breaks the demand shelf and the higher-low structure — sellers in control, continuation thesis dead, just out.
The lesson:
Buying pullbacks beats chasing breakouts. When a market makes a strong impulsive leg and then retraces into demand, the disciplined entry is at the level — not at the top of the move where you're paying up and stopping into every wick. Let price come back to a zone that matters, wait for the hold, and set your risk below structure so a failed pullback costs one clean R.
Signal fired. We took it. Update coming.
Disclaimer: Not financial advice. This idea is shared for educational purposes only. Trading leveraged instruments carries substantial risk. Past performance is not indicative of future results. Always do your own research and manage your own risk.
Why this setup works — three confluences:
Demand rejection at a higher low. Price pulled back into the demand zone and held instead of breaking down. This is where buyers step back in — the reaction printed on the tap, giving a defined floor to lean risk against rather than chasing mid-range.
Higher-low structure intact. The pullback is holding above the prior swing, keeping the bullish sequence alive off the 0.642 base. Buying here sits with the dominant direction of the last two weeks rather than fighting a fresh trend.
Clean room back to the range highs. Above entry there's an air pocket up to the 0.81 shelf, then the 0.86 zone sitting as the logical draw. Defined risk below demand, asymmetric room up to structure.
Trade management:
Entry: 0.7500 (rejection off demand)
SL: 0.7250 (below the zone)
TP1: 0.8120 — take 50% off, move stop to breakeven
TP2: 0.8600 — 100% exit at the range highs
R:R: ~4.4:1 to full target
Invalidation:
A 2h close back below 0.7250. That breaks the demand shelf and the higher-low structure — sellers in control, continuation thesis dead, just out.
The lesson:
Buying pullbacks beats chasing breakouts. When a market makes a strong impulsive leg and then retraces into demand, the disciplined entry is at the level — not at the top of the move where you're paying up and stopping into every wick. Let price come back to a zone that matters, wait for the hold, and set your risk below structure so a failed pullback costs one clean R.
Signal fired. We took it. Update coming.
Disclaimer: Not financial advice. This idea is shared for educational purposes only. Trading leveraged instruments carries substantial risk. Past performance is not indicative of future results. Always do your own research and manage your own risk.

The institutional Edge: Indicators, Strategies & a Free Academy. quantum-algo.com
Feragatname
Bilgiler ve yayınlar, TradingView tarafından sağlanan veya onaylanan finansal, yatırım, alım satım veya diğer türden tavsiye veya öneriler anlamına gelmez ve teşkil etmez. Kullanım Koşulları bölümünde daha fazlasını okuyun.
The institutional Edge: Indicators, Strategies & a Free Academy. quantum-algo.com
Feragatname
Bilgiler ve yayınlar, TradingView tarafından sağlanan veya onaylanan finansal, yatırım, alım satım veya diğer türden tavsiye veya öneriler anlamına gelmez ve teşkil etmez. Kullanım Koşulları bölümünde daha fazlasını okuyun.