

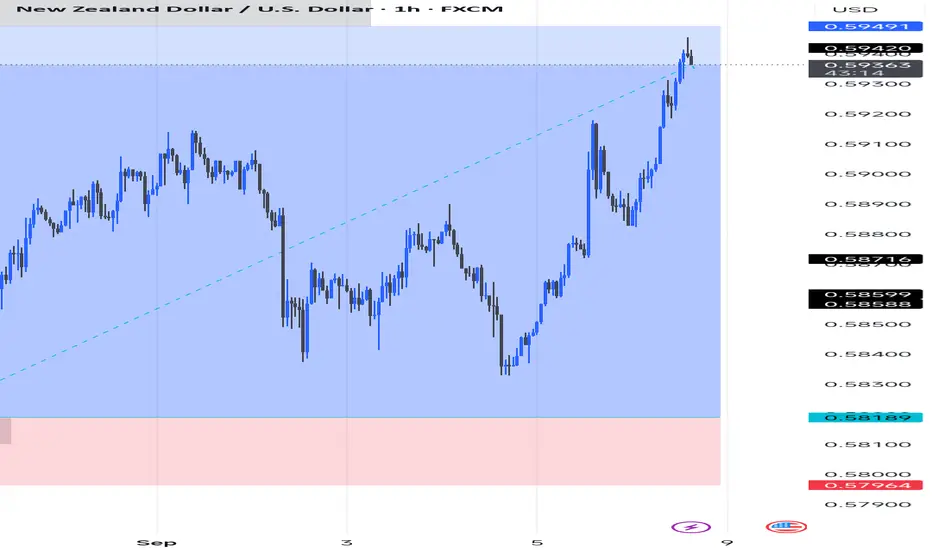
This setup wasn’t the cleanest, but sometimes calculated risk pays off.
📉 Setup:
Price was in a clear downtrend, making this buy counter-trend.
Demand zone around 0.5818 offered a possible bounce.
Break of the descending trendline gave early confirmation.
✅ Entry: 0.58189
❌ SL: 0.57964
🎯 TP: 0.59420 – 0.59490 supply zone
📊 Outcome:
Despite the risk of fading the trend, price respected demand, broke structure, and ran straight into my supply target at 0.5940+ for full profits.
⚠️ Not every trade will be textbook perfect — but with proper risk management, even the risky ones can pay off.
#NZDUSD #ForexTrader #RiskManagement #RiskyTrade #PriceAction #SmartMoneyConcepts #ForexJourney #MarketStructure

Feragatname
Bilgiler ve yayınlar, TradingView tarafından sağlanan veya onaylanan finansal, yatırım, alım satım veya diğer türden tavsiye veya öneriler anlamına gelmez ve teşkil etmez. Kullanım Koşulları bölümünde daha fazlasını okuyun.
Feragatname
Bilgiler ve yayınlar, TradingView tarafından sağlanan veya onaylanan finansal, yatırım, alım satım veya diğer türden tavsiye veya öneriler anlamına gelmez ve teşkil etmez. Kullanım Koşulları bölümünde daha fazlasını okuyun.