OPEN-SOURCE SCRIPT
SMC Supply and Demand Zones [Dots3Red]
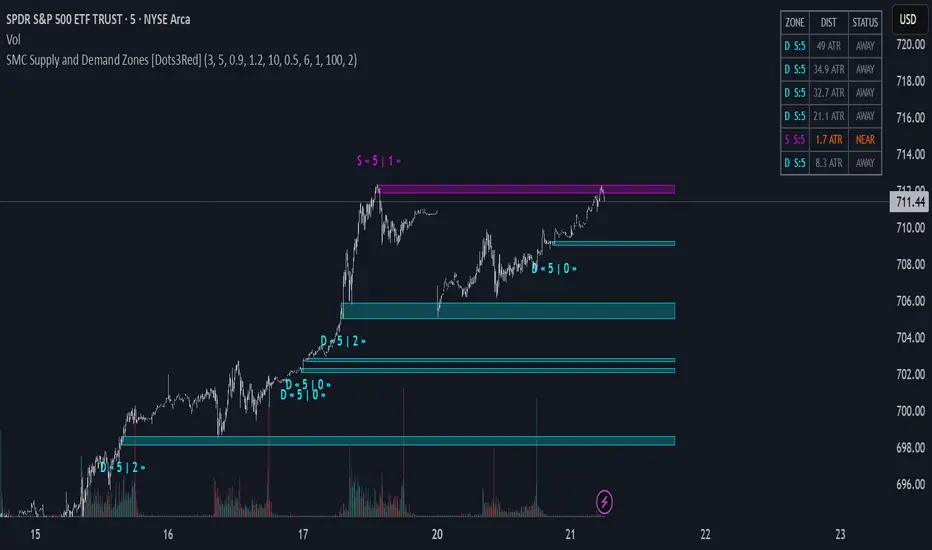
SMC Supply & Demand Zones [Dots3Red]
This script automatically detects and visualizes Smart Money Concept (SMC) Supply and Demand zones using a three-factor confirmation model: base consolidation, impulse breakout, and volume surge.
How zone detection works
The indicator looks for a tight consolidation base (price range below ATR threshold) followed by a strong impulsive candle breaking out of that base with above-average volume. The direction of the breakout determines the zone type — bullish breakout creates a Demand zone, bearish breakout creates a Supply zone. The base range itself becomes the zone, as that is where institutional activity occurred.
Zone scoring (max 5)
Each zone is scored at birth based on three factors:
Higher scoring zones render with stronger fill intensity.
Visual features
Proximity dashboard
A live table in the top-right corner shows all active zones ranked by distance from current price. Each zone displays its type, score, distance in ATR units, and status — INSIDE (gold), NEAR (orange), or AWAY (gray).
Zone invalidation
A zone is considered broken when price closes through it (configurable to wick-based) or when it has been touched too many times — both signals that the institutional order block has been absorbed.
Settings
All key parameters are tunable — base length, ATR multipliers, volume sensitivity, touch limits, score threshold, and proximity distance — making the indicator adaptable to any instrument and timeframe.

This script automatically detects and visualizes Smart Money Concept (SMC) Supply and Demand zones using a three-factor confirmation model: base consolidation, impulse breakout, and volume surge.
How zone detection works
The indicator looks for a tight consolidation base (price range below ATR threshold) followed by a strong impulsive candle breaking out of that base with above-average volume. The direction of the breakout determines the zone type — bullish breakout creates a Demand zone, bearish breakout creates a Supply zone. The base range itself becomes the zone, as that is where institutional activity occurred.
Zone scoring (max 5)
Each zone is scored at birth based on three factors:
- Base tightness — how compressed the consolidation was (1pt)
- Impulse strength — how strong the breakout candle body was relative to ATR (2pts)
- Volume confirmation — whether breakout volume exceeded the MA threshold (2pts)
Higher scoring zones render with stronger fill intensity.
Visual features
- Supply and Demand zones themselves
- Inactive zones (invalidated or max touches reached) can be shown or hidden via toggle
Proximity dashboard
A live table in the top-right corner shows all active zones ranked by distance from current price. Each zone displays its type, score, distance in ATR units, and status — INSIDE (gold), NEAR (orange), or AWAY (gray).
Zone invalidation
A zone is considered broken when price closes through it (configurable to wick-based) or when it has been touched too many times — both signals that the institutional order block has been absorbed.
Settings
All key parameters are tunable — base length, ATR multipliers, volume sensitivity, touch limits, score threshold, and proximity distance — making the indicator adaptable to any instrument and timeframe.
Açık kaynak kodlu komut dosyası
Gerçek TradingView ruhuyla, bu komut dosyasının mimarı, yatırımcıların işlevselliğini inceleyip doğrulayabilmesi için onu açık kaynaklı hale getirdi. Yazarı tebrik ederiz! Ücretsiz olarak kullanabilseniz de, kodu yeniden yayınlamanın Topluluk Kurallarımıza tabi olduğunu unutmayın.

Connect the dots to elevate your trading.
Feragatname
Bilgiler ve yayınlar, TradingView tarafından sağlanan veya onaylanan finansal, yatırım, alım satım veya diğer türden tavsiye veya öneriler anlamına gelmez ve teşkil etmez. Kullanım Koşulları bölümünde daha fazlasını okuyun.
Açık kaynak kodlu komut dosyası
Gerçek TradingView ruhuyla, bu komut dosyasının mimarı, yatırımcıların işlevselliğini inceleyip doğrulayabilmesi için onu açık kaynaklı hale getirdi. Yazarı tebrik ederiz! Ücretsiz olarak kullanabilseniz de, kodu yeniden yayınlamanın Topluluk Kurallarımıza tabi olduğunu unutmayın.
Connect the dots to elevate your trading.
Feragatname
Bilgiler ve yayınlar, TradingView tarafından sağlanan veya onaylanan finansal, yatırım, alım satım veya diğer türden tavsiye veya öneriler anlamına gelmez ve teşkil etmez. Kullanım Koşulları bölümünde daha fazlasını okuyun.