Percent Gainer - Balanced Price Range
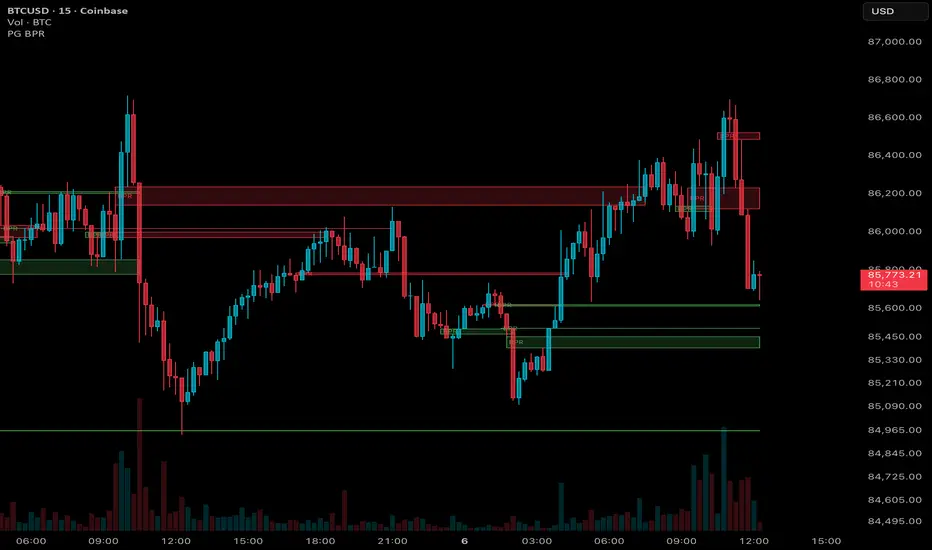
This indicator finds Balanced Price Ranges (BPRs) and draws each one as a zone that stays on the chart until price breaks it. A BPR forms when a fair value gap (FVG) in one direction is followed by an overlapping FVG in the opposite direction. The zone is only the overlapping area, which price has now moved through quickly in both directions.
How it works
Gap detection. A fair value gap is a three-candle pattern. A bullish gap forms when the low of the third candle is above the high of the first candle. A bearish gap forms when the high of the third candle is below the low of the first candle. Every qualifying gap is stored as a candidate.
Overlap. When a new gap forms, the script checks it against earlier gaps in the opposite direction that formed within the lookback window. If their price ranges overlap, the overlapping area becomes a BPR.
A bearish gap followed by an overlapping bullish gap creates a long BPR (green).
A bullish gap followed by an overlapping bearish gap creates a short BPR (red).
Zone life. Each BPR extends to the right until price goes through its far edge, meaning the bottom of a long BPR or the top of a short BPR. You choose whether a candle close or a wick ends the zone. An optional maximum life can retire zones that have not broken.
Non-repainting design
Gaps are only registered on the bar where the gap timeframe's candle closes, so a BPR appears at the same point in real time as it does in history. When the gap timeframe is higher than the chart, the script reads the last closed candle of that timeframe, with no lookahead. With "Zone Broken By" set to Close, a zone only ends when a candle actually closes beyond it. A live price dip that recovers before the close does not end the zone.
Boxes are drawn starting from the first gap's candles so you can see where the zone came from. The zone only exists from the bar where the second gap's candle closes.
Settings
BPR: Gap Detection
Gap Detection Timeframe: the timeframe both gaps are detected on. Leave blank to use the chart timeframe. Choose the chart timeframe or a higher one that divides into it evenly, such as 5 minutes on a 1-minute chart or 15 minutes on a 5-minute chart.
Min Gap Height (ATRx): each of the two gaps must be at least this many ATRs tall. 0 accepts any gap.
Gap ATR Length: the ATR length used by the height, overlap and expansion settings. The ATR is calculated on the gap timeframe.
Zone Expansion (ATRx): widens each finished BPR by ATR × this value on both sides. The overlap is always found from the raw gaps first, so expansion never creates a BPR that didn't exist. A wider zone also needs a bigger move to break. 0 turns it off.
Use Gap Formation Time Window / Gap Window (NYC time): when on, only first gaps whose third candle opens inside this New York time window are tracked. The second, overlapping gap can form at any time.
BPR: Overlap & Zone Life
Max Bars Between the Two Gaps: the opposite gap must form within this many gap-timeframe bars of the first gap, or the first gap is dropped.
Min Overlap Height (ATRx): the overlap itself must be at least this many ATRs tall. 0 accepts any overlap.
Zone Broken By: Close ends a zone when a candle closes beyond its far edge. Wick ends it when any wick trades beyond it.
Max Zone in Bars: an unbroken zone stops extending after this many gap-timeframe bars from when it formed. 0 extends it until it breaks.
Display
Show 50% Line: draws a dashed line at the middle of each BPR.
Delete Broken Zones: when on, broken zones are removed so only live BPRs stay on the chart. When off, broken zones stay as history and stop extending.
Show Candidate FVGs: also draws every raw gap that could still become half of a BPR. Candidates are aqua (bearish gaps) and red (bullish gaps).
Long / Short BPR Color, 50% Line Color: the zone and midline colors.
Max Boxes Kept: the oldest boxes and midlines are deleted once this number is exceeded.
Alerts
BPR Formed Long: fires when a new long BPR forms.
BPR Formed Short: fires when a new short BPR forms.
Both fire once, at the close of the bar that completes the BPR.
How to use it
The script marks zones only. It does not generate entries or exits. Many traders treat a BPR as an area where price may react on a return, because both sides of it have already been delivered quickly. A long BPR that holds on a pullback can act as support, and a short BPR can act as resistance. A close through the far edge means the zone has failed. Combine the zones with your own analysis, risk management and confirmation.
What sets this version apart
Gap detection on any higher timeframe, without repainting, while you trade a lower chart.
ATR-based filters for both gap size and overlap size, so small or insignificant zones can be filtered out on any instrument.
Zone Expansion that is applied after the raw overlap test, so padding never invents a zone.
An optional formation time window that applies to the first gap only.
A choice of close or wick break rules, plus an optional maximum zone life.
Limitations
A BPR can only be confirmed after its second gap's third candle closes, so zones always appear after the fact. Higher gap timeframes delay confirmation further.
Gap timeframes that don't divide evenly into the chart timeframe can miss gaps. Gap timeframes lower than the chart only register the last gap inside each chart bar.
Use standard candles. On Heikin Ashi or other non-standard chart types, gaps and breaks are calculated from synthetic prices, not real ones.
Old boxes are deleted once Max Boxes Kept is reached.
This indicator is for educational and analytical purposes only. It is not financial advice, and past zone behavior does not guarantee future reactions.
How it works
Gap detection. A fair value gap is a three-candle pattern. A bullish gap forms when the low of the third candle is above the high of the first candle. A bearish gap forms when the high of the third candle is below the low of the first candle. Every qualifying gap is stored as a candidate.
Overlap. When a new gap forms, the script checks it against earlier gaps in the opposite direction that formed within the lookback window. If their price ranges overlap, the overlapping area becomes a BPR.
A bearish gap followed by an overlapping bullish gap creates a long BPR (green).
A bullish gap followed by an overlapping bearish gap creates a short BPR (red).
Zone life. Each BPR extends to the right until price goes through its far edge, meaning the bottom of a long BPR or the top of a short BPR. You choose whether a candle close or a wick ends the zone. An optional maximum life can retire zones that have not broken.
Non-repainting design
Gaps are only registered on the bar where the gap timeframe's candle closes, so a BPR appears at the same point in real time as it does in history. When the gap timeframe is higher than the chart, the script reads the last closed candle of that timeframe, with no lookahead. With "Zone Broken By" set to Close, a zone only ends when a candle actually closes beyond it. A live price dip that recovers before the close does not end the zone.
Boxes are drawn starting from the first gap's candles so you can see where the zone came from. The zone only exists from the bar where the second gap's candle closes.
Settings
BPR: Gap Detection
Gap Detection Timeframe: the timeframe both gaps are detected on. Leave blank to use the chart timeframe. Choose the chart timeframe or a higher one that divides into it evenly, such as 5 minutes on a 1-minute chart or 15 minutes on a 5-minute chart.
Min Gap Height (ATRx): each of the two gaps must be at least this many ATRs tall. 0 accepts any gap.
Gap ATR Length: the ATR length used by the height, overlap and expansion settings. The ATR is calculated on the gap timeframe.
Zone Expansion (ATRx): widens each finished BPR by ATR × this value on both sides. The overlap is always found from the raw gaps first, so expansion never creates a BPR that didn't exist. A wider zone also needs a bigger move to break. 0 turns it off.
Use Gap Formation Time Window / Gap Window (NYC time): when on, only first gaps whose third candle opens inside this New York time window are tracked. The second, overlapping gap can form at any time.
BPR: Overlap & Zone Life
Max Bars Between the Two Gaps: the opposite gap must form within this many gap-timeframe bars of the first gap, or the first gap is dropped.
Min Overlap Height (ATRx): the overlap itself must be at least this many ATRs tall. 0 accepts any overlap.
Zone Broken By: Close ends a zone when a candle closes beyond its far edge. Wick ends it when any wick trades beyond it.
Max Zone in Bars: an unbroken zone stops extending after this many gap-timeframe bars from when it formed. 0 extends it until it breaks.
Display
Show 50% Line: draws a dashed line at the middle of each BPR.
Delete Broken Zones: when on, broken zones are removed so only live BPRs stay on the chart. When off, broken zones stay as history and stop extending.
Show Candidate FVGs: also draws every raw gap that could still become half of a BPR. Candidates are aqua (bearish gaps) and red (bullish gaps).
Long / Short BPR Color, 50% Line Color: the zone and midline colors.
Max Boxes Kept: the oldest boxes and midlines are deleted once this number is exceeded.
Alerts
BPR Formed Long: fires when a new long BPR forms.
BPR Formed Short: fires when a new short BPR forms.
Both fire once, at the close of the bar that completes the BPR.
How to use it
The script marks zones only. It does not generate entries or exits. Many traders treat a BPR as an area where price may react on a return, because both sides of it have already been delivered quickly. A long BPR that holds on a pullback can act as support, and a short BPR can act as resistance. A close through the far edge means the zone has failed. Combine the zones with your own analysis, risk management and confirmation.
What sets this version apart
Gap detection on any higher timeframe, without repainting, while you trade a lower chart.
ATR-based filters for both gap size and overlap size, so small or insignificant zones can be filtered out on any instrument.
Zone Expansion that is applied after the raw overlap test, so padding never invents a zone.
An optional formation time window that applies to the first gap only.
A choice of close or wick break rules, plus an optional maximum zone life.
Limitations
A BPR can only be confirmed after its second gap's third candle closes, so zones always appear after the fact. Higher gap timeframes delay confirmation further.
Gap timeframes that don't divide evenly into the chart timeframe can miss gaps. Gap timeframes lower than the chart only register the last gap inside each chart bar.
Use standard candles. On Heikin Ashi or other non-standard chart types, gaps and breaks are calculated from synthetic prices, not real ones.
Old boxes are deleted once Max Boxes Kept is reached.
This indicator is for educational and analytical purposes only. It is not financial advice, and past zone behavior does not guarantee future reactions.

Feragatname
Bilgiler ve yayınlar, TradingView tarafından sağlanan veya onaylanan finansal, yatırım, alım satım veya diğer türden tavsiye veya öneriler anlamına gelmez ve teşkil etmez. Kullanım Koşulları bölümünde daha fazlasını okuyun.
Feragatname
Bilgiler ve yayınlar, TradingView tarafından sağlanan veya onaylanan finansal, yatırım, alım satım veya diğer türden tavsiye veya öneriler anlamına gelmez ve teşkil etmez. Kullanım Koşulları bölümünde daha fazlasını okuyun.