Fair Value Gap Mitigation & Target Zones [PhenLabs]
🎯 Overview
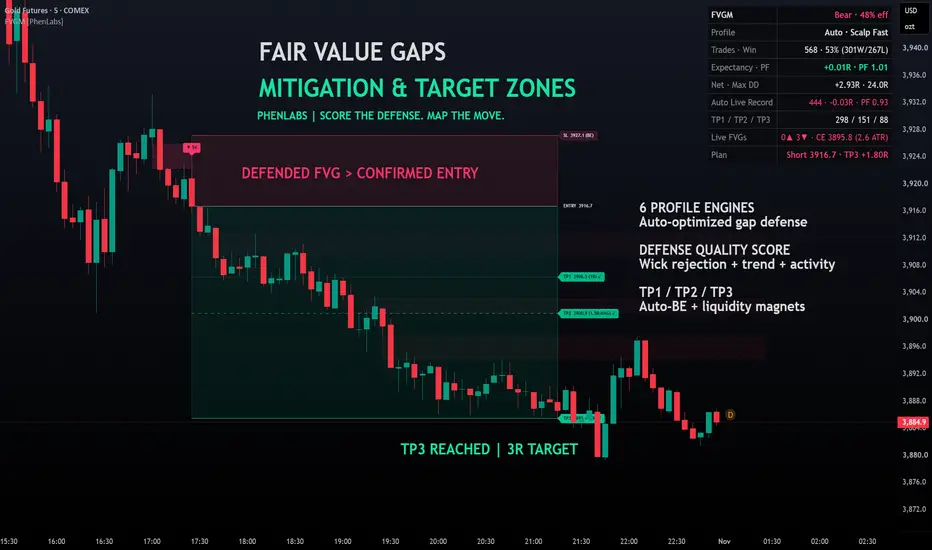
Fair Value Gap Mitigation & Target Zones [PhenLabs] is an analytical overlay and trade-planning indicator built on Pine Script v6. It tracks 3-candle institutional Fair Value Gaps (FVGs), evaluates how price reacts when returning to mitigate those imbalances, and projects a closed-bar trade plan (`ENTRY`, `SL`, `TP1`, `TP2`, `TP3`) when buyer or seller defense holds the zone.
🧠 How It Works — Non-Repainting State Machine
Every zone and trade plan is governed by a deterministic closed-bar state machine (`UNMITIGATED -> MITIGATING -> CONFIRMED PLAN / INVALIDATED`):
⚙️ Under the Hood — Mathematical Formulation
1. All-Plan Relative Activity, Kaufman Efficiency & Impulse Effort
To operate consistently across equities, crypto, futures, and volume-free forex or index feeds, relative activity uses 20-bar relative volume when `ta.sma(volume, 20) > 0` and automatically falls back to True Range normalized by `ATR(14)` when volume is absent:
Pine Script®
2. Mitigation Defense Ratio & Composite Defense Score
When price tests an active Bullish or Bearish FVG, the test candle is graded on wick rejection recovery, 10-bar Kaufman Trend Efficiency (`erNorm`), and relative participation:
Pine Script®
3. Independent 6-Profile Ledger Tournament (`Auto-Optimize`)
Instead of blending historical statistics when switching settings, the script runs six independent UDT trade-plan engines in parallel on every bar:
📊 Visual Walkthrough & Telemetry Dashboard
🛠️ Input Guide
Group 1 — 1. FVG Detection & Auto-Optimizer
Group 2 — 2. Entry, Stop Loss & TP1–TP3 Targets
Group 3 — 3. Visuals & Declutter
🚀 Built-In Alerts & Pine Screener Support
The first 8 `plot()` calls export `FVG Mitigation Signal (+1=Buy, -1=Sell)`, `Active Trade Plan (+1=Long, -1=Short)`, `Defense Quality Score % (0-100)`, `Trend Efficiency % (0-100)`, `Historical TP1+ Win Rate %`, `Cumulative Net R`, `Live Bullish Gaps`, and `Live Bearish Gaps` directly to the Pine Screener and Data Window. Seven `alertcondition()` triggers are included:
Fair Value Gap Mitigation & Target Zones [PhenLabs] is an analytical overlay and trade-planning indicator built on Pine Script v6. It tracks 3-candle institutional Fair Value Gaps (FVGs), evaluates how price reacts when returning to mitigate those imbalances, and projects a closed-bar trade plan (`ENTRY`, `SL`, `TP1`, `TP2`, `TP3`) when buyer or seller defense holds the zone.
- Unfiltered Gap Noise: Standard FVG indicators plot every minor 3-bar gap and leave dozens of stale boxes stretching across the chart. This script filters gaps by minimum `ATR(14)` height, scores the displacement effort of the impulse candle, caps live unmitigated zones per side, and automatically prunes invalidated or expired zones.
- Passive Touch vs. Defended Mitigation: Touching a Fair Value Gap does not mean price will reverse. When price enters an active FVG, the script evaluates the test candle's close recovery relative to the 50% Consequent Encroachment (`CE`) midline, directional wick rejection, Kaufman Trend Efficiency (`ER`), and relative volume or range activity before issuing a closed-bar `BUY` or `SELL` plan.
- Institutional Visual Hierarchy & Declutter Controls: To keep the chart clean when stacked with other tools, the active trade plan renders its origin `MITIGATED FVG · CE` zone alongside a bounded `ENTRY` / `SL` / `TP1`–`TP3` target ladder with right-margin level pills, while prior setups display compact single-line `BUY 89%` / `SELL 92%` badges. Independent toggles allow you to hide `ENTRY`/`SL`, `TP1`–`TP3`, the `50% CE` midline, FVG boxes, or background tint with a single click.
🧠 How It Works — Non-Repainting State Machine
Every zone and trade plan is governed by a deterministic closed-bar state machine (`UNMITIGATED -> MITIGATING -> CONFIRMED PLAN / INVALIDATED`):
- Stage 1 (`UNMITIGATED` — Impulse Gap Detection & Effort Grading):
On confirmed bar close (`barstate.isconfirmed`), the script checks for a 3-candle imbalance where `low > high[2]` (Bullish FVG) or `high < low[2]` (Bearish FVG) with height at least `Min Gap Size (× ATR)`. It records the origin timestamp (`time[2]`), computes the 50% Consequent Encroachment midline (`ce`), and grades the middle displacement candle’s effort (`0–100`) from its body-to-range ratio and relative activity. - Stage 2 (`MITIGATING` — Zone Test vs. Full Violation):
On subsequent bars, if price trades into an active FVG (`low <= top` for bullish or `high >= bot` for bearish), the zone enters the `MITIGATING` state (`TESTED`). If a bar closes beyond the distal edge of the gap by more than `0.10 * ATR(14)` (`close < bot - 0.10 * atr` for bullish or `close > top + 0.10 * atr` for bearish) or exceeds its age limit, the zone is marked `INVALIDATED` and removed from the active chart. - Stage 3 (`CONFIRMED PLAN` — Multi-Factor Mitigation Defense Gate):
While a zone is in its mitigation window (within 2 bars of a touch) and has not yet triggered a trade on the active profile, a closed-bar `BUY` or `SELL` plan fires when all profile criteria align:
• Directional Close & 50% CE Reclaim: The mitigation candle must close in the trade direction (`close > open` for longs, `close < open` for shorts) and hold above the 50% `CE` midline (or distal boundary in `Aggressive`, `Scalp Fast`, and `Swing Wide`).
• Wick Defense & Kaufman Trend Efficiency: The candle's rejection recovery (`(close - low) / barRng` for bullish or `(high - close) / barRng` for bearish) and 10-bar Kaufman Trend Efficiency (`erPct`) must clear the profile's minimum thresholds.
• Composite Defense Score & EMA Alignment: The 0–100 defense score blending wick recovery (`45%`), trend efficiency (`30%`), and normalized volume/range activity (`25%`) must clear the profile minimum, and price must align with the `Trend Filter EMA Length`. - Stage 4 (`TRADE LIFECYCLE` — Stop-First Accounting, Auto-BE & Structural Magnets):
Entry locks at the confirmed signal bar close (`close`). Stop Loss (`SL`) sits beyond the distal FVG boundary and test-bar extreme plus the profile's ATR buffer (clamped to `[minRisk, 2.8] * ATR(14)`). Targets project at `TP1`, `TP2`, and `TP3` R-multiples, with optional magnet snapping to the nearest opposing unmitigated FVG boundary or untaken 5-bar pivot high/low inside `[1.4R, 3.8R]`. On every subsequent closed bar, Stop Loss is evaluated before Take Profit for conservative accounting, and hitting `TP1` optionally moves the active stop to Breakeven (`ENTRY`).
⚙️ Under the Hood — Mathematical Formulation
1. All-Plan Relative Activity, Kaufman Efficiency & Impulse Effort
To operate consistently across equities, crypto, futures, and volume-free forex or index feeds, relative activity uses 20-bar relative volume when `ta.sma(volume, 20) > 0` and automatically falls back to True Range normalized by `ATR(14)` when volume is absent:
2. Mitigation Defense Ratio & Composite Defense Score
When price tests an active Bullish or Bearish FVG, the test candle is graded on wick rejection recovery, 10-bar Kaufman Trend Efficiency (`erNorm`), and relative participation:
3. Independent 6-Profile Ledger Tournament (`Auto-Optimize`)
Instead of blending historical statistics when switching settings, the script runs six independent UDT trade-plan engines in parallel on every bar:
- Profile 0 — Balanced (`50% CE · 58% Def`): Requires `50% CE` close hold, defense score `>= 58`, trend efficiency `>= 22%`, impulse effort `>= 35`, EMA trend alignment, and a `0.22 * ATR` stop buffer.
- Profile 1 — Conservative (`50% CE · 65% Def`): Requires `50% CE` close hold, defense score `>= 65`, trend efficiency `>= 30%`, impulse effort `>= 48`, EMA trend alignment, and a `0.28 * ATR` stop buffer.
- Profile 2 — Aggressive (`Edge Reclaim · 50% Def`): Allows distal-edge reclaim holds, defense score `>= 50`, trend efficiency `>= 15%`, counter-trend flexibility, and a `0.18 * ATR` stop buffer.
- Profile 3 — Scalp Fast (`Quick Test · 54% Def`): Focuses on fresh gaps (`0.5x` lifetime), defense score `>= 54`, trend efficiency `>= 18%`, EMA alignment, and a `0.16 * ATR` stop buffer.
- Profile 4 — Swing Wide (`Deep Imbalance · 56% Def`): Tracks extended structural gaps (`1.6x` lifetime) with impulse effort `>= 42`, defense score `>= 56`, trend efficiency `>= 24%`, and a wider `0.36 * ATR` stop buffer.
- Profile 5 — Volume Climax (`50% CE · 1.25x Vol`): Requires `50% CE` close hold, relative volume/activity `>= 1.25x`, impulse effort `>= 45`, and defense score `>= 60`.
- Auto-Optimize (Best Chart History): Evaluates all six built-in ledgers across the loaded chart history, prioritizing profiles with verified positive `Net R` and the highest combined `TP1+` Win Rate and per-trade expectancy.
📊 Visual Walkthrough & Telemetry Dashboard
- Live Fair Value Gap Zones & 50% CE Midline: Unmitigated Bullish (`#00E6A8`) and Bearish (`#FF3B69`) FVG boxes project from their 3-candle origin timestamp (`xloc.bar_time`) to the right margin, displaying `BULL FVG · CE … · UNMITIGATED` (or `TESTED` once touched) and a dashed 50% Consequent Encroachment (`CE`) equilibrium line.
- Origin Mitigated FVG + Bounded Trade Plan Ladder: The focal setup preserves its origin `MITIGATED FVG · CE` zone from gap birth to the entry bar and projects shaded risk/reward blocks (`ENTRY`, `SL`, `TP1`, `TP2`, `TP3`) with right-edge status pills (`SL … (BE ✓)`, `TP1 … (1R) ✓`, `TP2 ... (2R·MAG) ✓`). Recent prior setups display compact single-line `BUY 89%` / `SELL 92%` badges with full trade details in the hover tooltip.
- Top-Right Summary Dashboard: A compact 6-row × 2-column institutional table reporting active trend regime and efficiency (`BULL · 64% Eff`), `Unmitigated FVGs` count and nearest `CE` level, active `Filter Profile` (`Auto: ...`), closed-bar `Win Rate (TP1+)` with `W/L` and cumulative `Net R`, `Target Hits` breakdown (`TP1 · TP2 · TP3`), and current `Trade Plan` status.
🛠️ Input Guide
Group 1 — 1. FVG Detection & Auto-Optimizer
- Filter Profile: Select `Auto-Optimize (Best Chart History)` or any of the 6 specialized profiles (`Balanced`, `Conservative`, `Aggressive`, `Scalp Fast`, `Swing Wide`, `Volume Climax`).
- Min Gap Size (× ATR): Minimum 3-candle FVG height as a multiple of `ATR(14)` (`0.25`).
- Zone Lifetime (bars): Base number of bars an unmitigated gap remains eligible (`120`).
- Max Live Zones Per Side: Maximum concurrent Bullish and Bearish FVG boxes kept on screen (`3`).
- Trend Filter EMA Length: EMA period used alongside Kaufman Efficiency for directional alignment (`50`).
Group 2 — 2. Entry, Stop Loss & TP1–TP3 Targets
- Targets: TP1 / TP2 / TP3 (R): Default risk-reward target multiples (`1.0`, `2.0`, `3.0`).
- Move Stop to Breakeven After TP1: Automatically moves the active stop to `ENTRY` once `TP1` is reached (`true`).
- Snap Targets to Opposing Gaps / Swings: Snaps `TP2` or `TP3` (`·MAG`) to the nearest opposing FVG boundary or untaken 5-bar swing high/low inside `[1.4R, 3.8R]` (`true`).
- Plan Timeout (bars): Maximum bars a trade plan stays open before expiring (`60`).
Group 3 — 3. Visuals & Declutter
- Show Unmitigated FVG Zones & Show 50% CE Midline: Toggle active Fair Value Gap boxes and their 50% Consequent Encroachment line (`true`, `true`).
- Show Entry & Stop Zone / Show TP1 / TP2 / TP3 Ladder: Independently toggle the focal plan’s `ENTRY`/`SL` risk zone or `TP1`–`TP3` reward ladder (`true`, `true`).
- Keep Historical Trade Plans (Last 3): Off by default so only the latest focal trade ladder stays on price (`false`).
- Show Signal Callout Badges & Show Trend Background Tint: Toggle compact `BUY`/`SELL` score pills (`true`) or optional EMA background tint (`false`).
- Show Summary Dashboard & Table Size: Toggle the top-right 6-row telemetry table and scale text from `Tiny` to `Large` (`true`, `Small`).
🚀 Built-In Alerts & Pine Screener Support
The first 8 `plot()` calls export `FVG Mitigation Signal (+1=Buy, -1=Sell)`, `Active Trade Plan (+1=Long, -1=Short)`, `Defense Quality Score % (0-100)`, `Trend Efficiency % (0-100)`, `Historical TP1+ Win Rate %`, `Cumulative Net R`, `Live Bullish Gaps`, and `Live Bearish Gaps` directly to the Pine Screener and Data Window. Seven `alertcondition()` triggers are included:
- `1. Bullish FVG Mitigation Entry (BUY)`
- `2. Bearish FVG Mitigation Entry (SELL)`
- `3. Any Confirmed FVG Mitigation Entry (BUY or SELL)`
- `4. Trade Plan TP1 Reached`
- `5. Trade Plan TP2 Reached`
- `6. Trade Plan TP3 Reached`
- `7. Trade Plan Stop Loss Hit`
⚠️ Risk Disclaimer
This indicator is an analytical decision-support tool designed for educational and informational purposes only. Historical profile win rates and cumulative R-multiples are computed from closed-bar state-machine simulations on the active chart history and do not predict or guarantee future performance. Always validate setups within your own risk management framework.

TradingView Charting w/ Crypto Systems: phenlabs.com
Join our growing community: discord.gg/phen
All content provided by PhenLabs is for informational & educational purposes only. Past performance does not guarantee future results.
Join our growing community: discord.gg/phen
All content provided by PhenLabs is for informational & educational purposes only. Past performance does not guarantee future results.
Feragatname
Bilgiler ve yayınlar, TradingView tarafından sağlanan veya onaylanan finansal, yatırım, alım satım veya diğer türden tavsiye veya öneriler anlamına gelmez ve teşkil etmez. Kullanım Koşulları bölümünde daha fazlasını okuyun.
TradingView Charting w/ Crypto Systems: phenlabs.com
Join our growing community: discord.gg/phen
All content provided by PhenLabs is for informational & educational purposes only. Past performance does not guarantee future results.
Join our growing community: discord.gg/phen
All content provided by PhenLabs is for informational & educational purposes only. Past performance does not guarantee future results.
Feragatname
Bilgiler ve yayınlar, TradingView tarafından sağlanan veya onaylanan finansal, yatırım, alım satım veya diğer türden tavsiye veya öneriler anlamına gelmez ve teşkil etmez. Kullanım Koşulları bölümünde daha fazlasını okuyun.