OPEN-SOURCE SCRIPT
Güncellendi BK AK-Shock & Awe
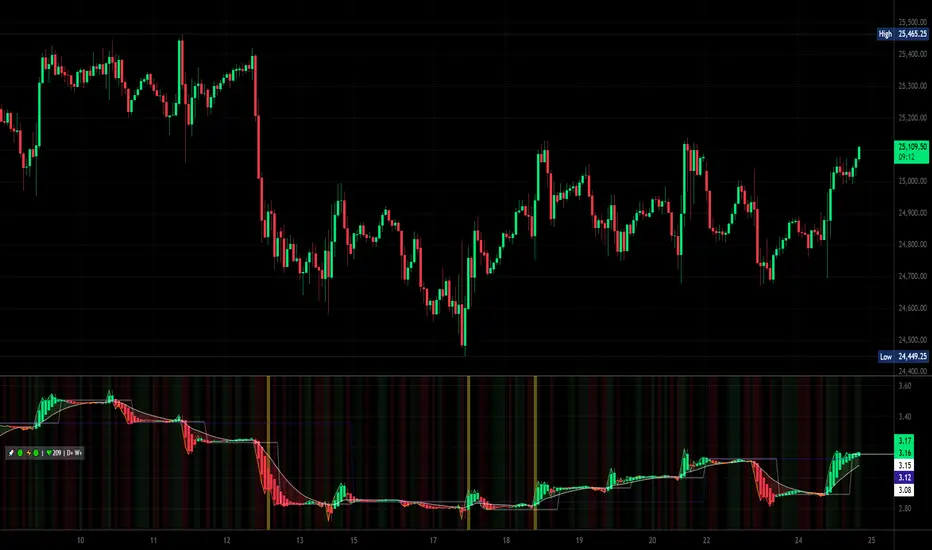
🏴☠️💣 BK AK–Shock and Awe 🏴☠️💣
All glory to G-d — the true source of wisdom, restraint, and right timing.
Respect to my mentor AK — discipline, patience, clean execution. Every indicator I publish carries that standard.
Shock and Awe is not a signal generator.
It’s an order-flow pressure tool: it turns CVD into a battlefield map so you can see who’s pushing, who’s trapped, and where the push is lying (divergence + confluence + session anchors + profile). You don’t “predict” with this — you confirm, then execute.
🧠 What it does (big picture)
Shock and Awe builds a CVD command center with one job: clarity under pressure.
1) CVD Core (the heartbeat)
Computes a CVD proxy using chart volume: up-bar volume − down-bar volume, accumulated.
Optional scaling (None / K / M) so the pane stays readable across instruments.
Multiple display modes: Line / Candles / Heikin Ashi Candles / Line + Heikin Ashi.
2) Trend + Structure on CVD (the rails)
CVD moving average (selectable type/length).
Optional extra MAs (MA2/MA3/MA4) to show “stacking” and structural alignment.
Optional MA5 “advanced” modes:
anchored session CVD,
anchored weekly CVD,
volume-weighted CVD,
price-volume CVD variant (scaled).
3) AK-9 Bands + Regime Coloring (stretch vs fair)
Smoothed CVD baseline with a standard-deviation envelope (AK-9 style bands).
Classifies state: above upper / inside / below lower.
Optional gradient engine paints the CVD by normalized slope (5-state regime), so you can see when pressure is accelerating vs fading.
4) Divergence Warfare (trap detection)
Regular divergence: price makes LL/HH while CVD makes HL/LH (warning of exhaustion/distribution).
Hidden divergence: continuation-type behavior (trend pullback absorption).
Pivot-confirmed logic (signals print after confirmation, not mid-formation).
Optional dynamic lookbacks that adapt by timeframe to reduce spam on fast charts.
🔥 Confluence System (prove it or ignore it)
Divergence alone is a rumor. Shock and Awe demands witnesses.
Confluence checks using:
OBV divergence behavior
MACD histogram divergence behavior
Minimum indicator count required (1–3).
Optional rule: only show divergences that meet confluence.
Optional confluence badge on labels so the chart stays readable.
🔗 Signal Consolidation (zones, not confetti)
Markets don’t turn once — they hammer the same level.
Merges nearby signals by level + time tolerance into consolidated zones.
Shows consolidation count and stronger “zone” badges when repeats stack up.
Built to reduce label spam while emphasizing the real battlefield levels.
📊 CVD Volume Profile (where the fight actually happened)
Not a price profile — a CVD participation profile.
Bins historical CVD into a profile weighted by participation.
Computes:
POC (highest participation node)
Value Area (~70%)
Purpose: identify magnet zones, acceptance, and where “business was done.”
Optional POC proximity logic can feed score/context.
🧱 Session Anchors (daily/weekly rails)
Shock and Awe uses session anchors like lines in the sand:
Daily and weekly CVD anchors.
Optional extended-right anchor lines (remain active forward).
Quick bias read:
Above daily/weekly = buyers controlling tape
Below = sellers controlling tape
⚠️ Background Flash (shock-event detector)
When CVD is stretched and structure says “this is serious,” it lights the room.
Dynamic intensity based on how far CVD is outside AK-9 bands.
Optional “major turning points only” mode with velocity filter + cooldown.
Designed to highlight critical moments, not entertain you.
🤖 Smart Score + Strategic Info Box (battle briefing)
A weighted “readout” built from the indicator’s own evidence:
Trend/stack state
Regular/hidden divergences
OBV/ADX alignment
Session position
Momentum (ROC)
Band position
ATR and volume regime
Optional POC proximity
Outputs:
a compact status strip for quick posture
a detailed tooltip explaining what changed, why it matters, and what to watch
This is the dashboard you check before you touch the trigger.
🧭 How to use it (execution doctrine)
Start with anchors
Daily/weekly rails tell you who owns the day. Don’t argue with the map.
Treat AK-9 bands as a stretch ruler
Outside bands = exaggeration and reversal risk. Inside bands = rotation risk unless structure confirms.
Divergence is a warning — confluence is permission
If CVD screams but OBV/MACD don’t testify, stand down.
Trade zones, not single prints
Consolidation counts mark where the market keeps returning to settle a score.
Let price confirm
Shock and Awe identifies pressure and deception — price still has to prove acceptance/rejection at the rails.
🧾 Non-repainting / real-time note
Divergence signals are based on pivot confirmation (right lookback), meaning labels only appear after the pivot is confirmed. Once printed, they do not “move around.”
Like any indicator, values can update on the currently forming candle until the bar closes.
📌 Best use cases
Intraday scalping/day trading: use dynamic divergence settings + anchors + consolidation; demand confluence in chop.
Swing trading: reduce signal count by increasing confluence requirements; rely more on weekly rails and regime state.
Works best on markets with meaningful volume. If volume is unreliable/synthetic, treat order-flow conclusions as lower confidence.
🧱 Non-negotiable rule
This tool doesn’t make you right.
It makes you harder to fool.
Respect to AK — discipline, patience, clean execution.
All glory to G-d — the source of wisdom and endurance.
🏴☠️💣 BK AK–Shock and Awe 🏴☠️💣
All glory to G-d — the true source of wisdom, restraint, and right timing.
Respect to my mentor AK — discipline, patience, clean execution. Every indicator I publish carries that standard.
Shock and Awe is not a signal generator.
It’s an order-flow pressure tool: it turns CVD into a battlefield map so you can see who’s pushing, who’s trapped, and where the push is lying (divergence + confluence + session anchors + profile). You don’t “predict” with this — you confirm, then execute.
🧠 What it does (big picture)
Shock and Awe builds a CVD command center with one job: clarity under pressure.
1) CVD Core (the heartbeat)
Computes a CVD proxy using chart volume: up-bar volume − down-bar volume, accumulated.
Optional scaling (None / K / M) so the pane stays readable across instruments.
Multiple display modes: Line / Candles / Heikin Ashi Candles / Line + Heikin Ashi.
2) Trend + Structure on CVD (the rails)
CVD moving average (selectable type/length).
Optional extra MAs (MA2/MA3/MA4) to show “stacking” and structural alignment.
Optional MA5 “advanced” modes:
anchored session CVD,
anchored weekly CVD,
volume-weighted CVD,
price-volume CVD variant (scaled).
3) AK-9 Bands + Regime Coloring (stretch vs fair)
Smoothed CVD baseline with a standard-deviation envelope (AK-9 style bands).
Classifies state: above upper / inside / below lower.
Optional gradient engine paints the CVD by normalized slope (5-state regime), so you can see when pressure is accelerating vs fading.
4) Divergence Warfare (trap detection)
Regular divergence: price makes LL/HH while CVD makes HL/LH (warning of exhaustion/distribution).
Hidden divergence: continuation-type behavior (trend pullback absorption).
Pivot-confirmed logic (signals print after confirmation, not mid-formation).
Optional dynamic lookbacks that adapt by timeframe to reduce spam on fast charts.
🔥 Confluence System (prove it or ignore it)
Divergence alone is a rumor. Shock and Awe demands witnesses.
Confluence checks using:
OBV divergence behavior
MACD histogram divergence behavior
Minimum indicator count required (1–3).
Optional rule: only show divergences that meet confluence.
Optional confluence badge on labels so the chart stays readable.
🔗 Signal Consolidation (zones, not confetti)
Markets don’t turn once — they hammer the same level.
Merges nearby signals by level + time tolerance into consolidated zones.
Shows consolidation count and stronger “zone” badges when repeats stack up.
Built to reduce label spam while emphasizing the real battlefield levels.
📊 CVD Volume Profile (where the fight actually happened)
Not a price profile — a CVD participation profile.
Bins historical CVD into a profile weighted by participation.
Computes:
POC (highest participation node)
Value Area (~70%)
Purpose: identify magnet zones, acceptance, and where “business was done.”
Optional POC proximity logic can feed score/context.
🧱 Session Anchors (daily/weekly rails)
Shock and Awe uses session anchors like lines in the sand:
Daily and weekly CVD anchors.
Optional extended-right anchor lines (remain active forward).
Quick bias read:
Above daily/weekly = buyers controlling tape
Below = sellers controlling tape
⚠️ Background Flash (shock-event detector)
When CVD is stretched and structure says “this is serious,” it lights the room.
Dynamic intensity based on how far CVD is outside AK-9 bands.
Optional “major turning points only” mode with velocity filter + cooldown.
Designed to highlight critical moments, not entertain you.
🤖 Smart Score + Strategic Info Box (battle briefing)
A weighted “readout” built from the indicator’s own evidence:
Trend/stack state
Regular/hidden divergences
OBV/ADX alignment
Session position
Momentum (ROC)
Band position
ATR and volume regime
Optional POC proximity
Outputs:
a compact status strip for quick posture
a detailed tooltip explaining what changed, why it matters, and what to watch
This is the dashboard you check before you touch the trigger.
🧭 How to use it (execution doctrine)
Start with anchors
Daily/weekly rails tell you who owns the day. Don’t argue with the map.
Treat AK-9 bands as a stretch ruler
Outside bands = exaggeration and reversal risk. Inside bands = rotation risk unless structure confirms.
Divergence is a warning — confluence is permission
If CVD screams but OBV/MACD don’t testify, stand down.
Trade zones, not single prints
Consolidation counts mark where the market keeps returning to settle a score.
Let price confirm
Shock and Awe identifies pressure and deception — price still has to prove acceptance/rejection at the rails.
🧾 Non-repainting / real-time note
Divergence signals are based on pivot confirmation (right lookback), meaning labels only appear after the pivot is confirmed. Once printed, they do not “move around.”
Like any indicator, values can update on the currently forming candle until the bar closes.
📌 Best use cases
Intraday scalping/day trading: use dynamic divergence settings + anchors + consolidation; demand confluence in chop.
Swing trading: reduce signal count by increasing confluence requirements; rely more on weekly rails and regime state.
Works best on markets with meaningful volume. If volume is unreliable/synthetic, treat order-flow conclusions as lower confidence.
🧱 Non-negotiable rule
This tool doesn’t make you right.
It makes you harder to fool.
Respect to AK — discipline, patience, clean execution.
All glory to G-d — the source of wisdom and endurance.
🏴☠️💣 BK AK–Shock and Awe 🏴☠️💣
Sürüm Notları
Upgraded FootPrintSürüm Notları
Scaling fixedAçık kaynak kodlu komut dosyası
Gerçek TradingView ruhuyla, bu komut dosyasının mimarı, yatırımcıların işlevselliğini inceleyip doğrulayabilmesi için onu açık kaynaklı hale getirdi. Yazarı tebrik ederiz! Ücretsiz olarak kullanabilseniz de, kodu yeniden yayınlamanın Topluluk Kurallarımıza tabi olduğunu unutmayın.

Feragatname
Bilgiler ve yayınlar, TradingView tarafından sağlanan veya onaylanan finansal, yatırım, alım satım veya diğer türden tavsiye veya öneriler anlamına gelmez ve teşkil etmez. Kullanım Koşulları bölümünde daha fazlasını okuyun.
Açık kaynak kodlu komut dosyası
Gerçek TradingView ruhuyla, bu komut dosyasının mimarı, yatırımcıların işlevselliğini inceleyip doğrulayabilmesi için onu açık kaynaklı hale getirdi. Yazarı tebrik ederiz! Ücretsiz olarak kullanabilseniz de, kodu yeniden yayınlamanın Topluluk Kurallarımıza tabi olduğunu unutmayın.
Feragatname
Bilgiler ve yayınlar, TradingView tarafından sağlanan veya onaylanan finansal, yatırım, alım satım veya diğer türden tavsiye veya öneriler anlamına gelmez ve teşkil etmez. Kullanım Koşulları bölümünde daha fazlasını okuyun.