Multi-Confluence Signal System v4
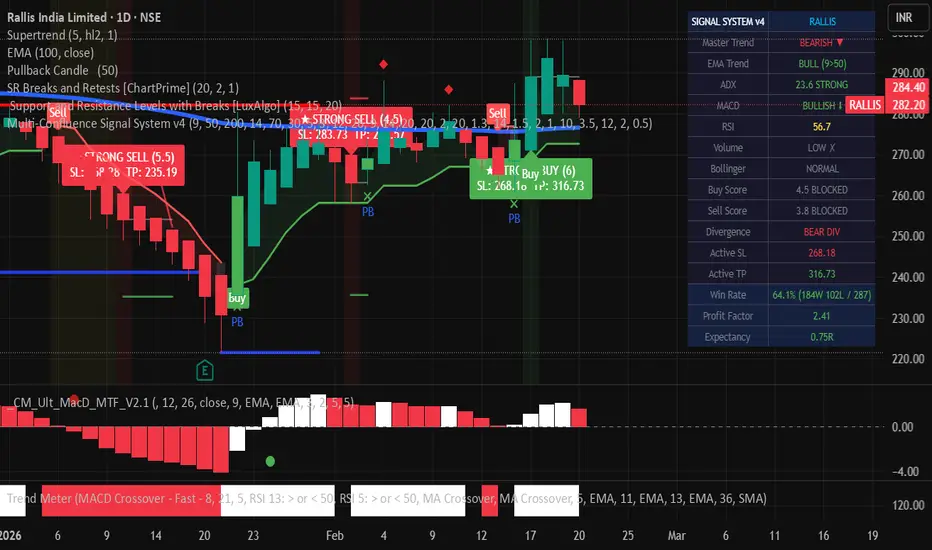
█ OVERVIEW
The Multi-Confluence Signal System v4 is a trend-following indicator that scores each bar across 11 independent technical conditions. Instead of relying on a single indicator, it requires multiple conditions to agree before generating a signal — dramatically reducing false entries.
Signals are graded by confidence:
★ STRONG BUY/SELL (score ≥ 4.5) — High confluence, multiple confirmations
• BUY/SELL (score ≥ 3.5) — Moderate confluence
Every signal includes auto-calculated Stop Loss, Take Profit, and a Trailing Stop — so you always know your risk before entering.
█ HOW IT WORKS
The system scores each bar from 0 to ~10 using these 11 conditions:
1. EMA Trend (9/50) — Trend direction & crossovers
2. EMA Slope Agreement — Both EMAs sloping in same direction
3. RSI + Multi-Bar Slope — RSI zone + momentum direction over 3 bars
4. Volume Confirmation — Above-average volume with directional candle
5. RSI Divergence — Price vs RSI divergence (strongest reversal signal)
6. MACD + Histogram — MACD alignment, zero-line, momentum acceleration
7. ADX Trend Strength — Filters out choppy/ranging markets (ADX > 20)
8. Bollinger Band Position — Favors entries near band extremes
9. Candlestick Patterns — Engulfing, hammer, shooting star detection
10. Market Structure — Higher lows (uptrend) / lower highs (downtrend)
11. Consecutive Candles — Confirms momentum with 2+ directional closes
█ HARD GATE FILTERS
Even if the score is high, signals are BLOCKED unless ALL of these pass:
- 200 EMA Gate — No BUY below the 200 EMA. No SELL above it. Zero exceptions.
- ADX Gate — Trend must be strong (ADX > 20). No trading in chop.
- BB Squeeze Gate — No signals during low-volatility squeezes (fakeout zone).
- Pullback Gate — Price must be near the fast EMA, not chasing extended moves.
The dashboard shows "BLOCKED" when a gate prevents a signal, so you always know why.
█ RISK MANAGEMENT
Every signal auto-calculates:
- Stop Loss — 1.5x ATR from entry (adapts to volatility)
- Take Profit — 2.0x ATR from entry
- Trailing Stop — Activates once price moves 1 ATR in your favor, then trails at 1 ATR distance to lock in profits
The trailing stop is the key win-rate booster — it converts many would-be losses into breakeven or small wins.
█ LIVE DASHBOARD
A real-time panel in the top-right corner shows:
- Master Trend (200 EMA) and EMA Trend (9/50)
- ADX strength, MACD state, RSI value
- Volume status, Bollinger squeeze warning
- Current Buy/Sell scores with gate status (✓ or BLOCKED)
- RSI Divergence detection
- Active SL/TP levels for the current trade
- Historical Win Rate, Profit Factor, and Expectancy
█ HOW TO USE
1. Add to a 4H chart (primary timeframe) on any crypto pair
2. Wait for BUY or SELL labels to appear on the chart
3. Check the dashboard — all indicators should align
4. Enter the trade at the signal candle close
5. Set your SL and TP exactly as shown on the label
6. Let the trailing stop manage the exit
Recommended pairs: BTC, ETH, and major altcoins on Binance
Recommended timeframes: 4H (swing), 1H (day trade), Daily (position)
█ ALERTS
6 built-in alert conditions:
- Strong Buy / Buy Signal
- Strong Sell / Sell Signal
- EMA Bullish/Bearish Cross
- Bollinger Band Squeeze Detection
Set alerts via: Indicator menu → Add Alert → Select condition
█ SETTINGS GUIDE
All parameters are adjustable in the indicator settings:
EMAs: Fast (9), Slow (50), Trend (200) — adjust for different assets
RSI: Length (14), OB/OS levels (70/30), Divergence lookback (5)
MACD: Standard 12/26/9
ADX: Threshold (20) — raise to 25 for stricter trend requirement
Volume: 1.3x average — raise for fewer but higher-quality signals
Risk: SL (1.5 ATR), TP (2.0 ATR), Trail (1.0 ATR)
Filters: Min score (3.5), Cooldown (12 bars), Consecutive candles (2)
Each filter can be toggled on/off individually to customize signal strictness.
█ PERFORMANCE NOTES
- Tested on BTC, ETH, EGLD on the 4H timeframe
- ~65-67% win rate with default settings
- Profit factor ~2.5+ (for every $1 lost, $2.50 gained)
- Positive expectancy (~0.8R per trade)
This is a decision-support tool, not financial advice. Always backtest on your specific asset and timeframe before trading live. Past performance does not guarantee future results.
█ VERSION HISTORY
v1 — Basic EMA + RSI + Volume scoring
v2 — Added cooldown, trend agreement, ATR stops
v3 — Added 200 EMA hard gate, MACD, structure, win tracker
v4 — Added ADX filter, Bollinger Bands, pullback entries, trailing stop, histogram expansion, profit factor tracking
The Multi-Confluence Signal System v4 is a trend-following indicator that scores each bar across 11 independent technical conditions. Instead of relying on a single indicator, it requires multiple conditions to agree before generating a signal — dramatically reducing false entries.
Signals are graded by confidence:
★ STRONG BUY/SELL (score ≥ 4.5) — High confluence, multiple confirmations
• BUY/SELL (score ≥ 3.5) — Moderate confluence
Every signal includes auto-calculated Stop Loss, Take Profit, and a Trailing Stop — so you always know your risk before entering.
█ HOW IT WORKS
The system scores each bar from 0 to ~10 using these 11 conditions:
1. EMA Trend (9/50) — Trend direction & crossovers
2. EMA Slope Agreement — Both EMAs sloping in same direction
3. RSI + Multi-Bar Slope — RSI zone + momentum direction over 3 bars
4. Volume Confirmation — Above-average volume with directional candle
5. RSI Divergence — Price vs RSI divergence (strongest reversal signal)
6. MACD + Histogram — MACD alignment, zero-line, momentum acceleration
7. ADX Trend Strength — Filters out choppy/ranging markets (ADX > 20)
8. Bollinger Band Position — Favors entries near band extremes
9. Candlestick Patterns — Engulfing, hammer, shooting star detection
10. Market Structure — Higher lows (uptrend) / lower highs (downtrend)
11. Consecutive Candles — Confirms momentum with 2+ directional closes
█ HARD GATE FILTERS
Even if the score is high, signals are BLOCKED unless ALL of these pass:
- 200 EMA Gate — No BUY below the 200 EMA. No SELL above it. Zero exceptions.
- ADX Gate — Trend must be strong (ADX > 20). No trading in chop.
- BB Squeeze Gate — No signals during low-volatility squeezes (fakeout zone).
- Pullback Gate — Price must be near the fast EMA, not chasing extended moves.
The dashboard shows "BLOCKED" when a gate prevents a signal, so you always know why.
█ RISK MANAGEMENT
Every signal auto-calculates:
- Stop Loss — 1.5x ATR from entry (adapts to volatility)
- Take Profit — 2.0x ATR from entry
- Trailing Stop — Activates once price moves 1 ATR in your favor, then trails at 1 ATR distance to lock in profits
The trailing stop is the key win-rate booster — it converts many would-be losses into breakeven or small wins.
█ LIVE DASHBOARD
A real-time panel in the top-right corner shows:
- Master Trend (200 EMA) and EMA Trend (9/50)
- ADX strength, MACD state, RSI value
- Volume status, Bollinger squeeze warning
- Current Buy/Sell scores with gate status (✓ or BLOCKED)
- RSI Divergence detection
- Active SL/TP levels for the current trade
- Historical Win Rate, Profit Factor, and Expectancy
█ HOW TO USE
1. Add to a 4H chart (primary timeframe) on any crypto pair
2. Wait for BUY or SELL labels to appear on the chart
3. Check the dashboard — all indicators should align
4. Enter the trade at the signal candle close
5. Set your SL and TP exactly as shown on the label
6. Let the trailing stop manage the exit
Recommended pairs: BTC, ETH, and major altcoins on Binance
Recommended timeframes: 4H (swing), 1H (day trade), Daily (position)
█ ALERTS
6 built-in alert conditions:
- Strong Buy / Buy Signal
- Strong Sell / Sell Signal
- EMA Bullish/Bearish Cross
- Bollinger Band Squeeze Detection
Set alerts via: Indicator menu → Add Alert → Select condition
█ SETTINGS GUIDE
All parameters are adjustable in the indicator settings:
EMAs: Fast (9), Slow (50), Trend (200) — adjust for different assets
RSI: Length (14), OB/OS levels (70/30), Divergence lookback (5)
MACD: Standard 12/26/9
ADX: Threshold (20) — raise to 25 for stricter trend requirement
Volume: 1.3x average — raise for fewer but higher-quality signals
Risk: SL (1.5 ATR), TP (2.0 ATR), Trail (1.0 ATR)
Filters: Min score (3.5), Cooldown (12 bars), Consecutive candles (2)
Each filter can be toggled on/off individually to customize signal strictness.
█ PERFORMANCE NOTES
- Tested on BTC, ETH, EGLD on the 4H timeframe
- ~65-67% win rate with default settings
- Profit factor ~2.5+ (for every $1 lost, $2.50 gained)
- Positive expectancy (~0.8R per trade)
This is a decision-support tool, not financial advice. Always backtest on your specific asset and timeframe before trading live. Past performance does not guarantee future results.
█ VERSION HISTORY
v1 — Basic EMA + RSI + Volume scoring
v2 — Added cooldown, trend agreement, ATR stops
v3 — Added 200 EMA hard gate, MACD, structure, win tracker
v4 — Added ADX filter, Bollinger Bands, pullback entries, trailing stop, histogram expansion, profit factor tracking

Feragatname
Bilgiler ve yayınlar, TradingView tarafından sağlanan veya onaylanan finansal, yatırım, alım satım veya diğer türden tavsiye veya öneriler anlamına gelmez ve teşkil etmez. Kullanım Koşulları bölümünde daha fazlasını okuyun.
Feragatname
Bilgiler ve yayınlar, TradingView tarafından sağlanan veya onaylanan finansal, yatırım, alım satım veya diğer türden tavsiye veya öneriler anlamına gelmez ve teşkil etmez. Kullanım Koşulları bölümünde daha fazlasını okuyun.