OPEN-SOURCE SCRIPT
Strong Gold H4 Pressure Zones | ProjectSyndicate
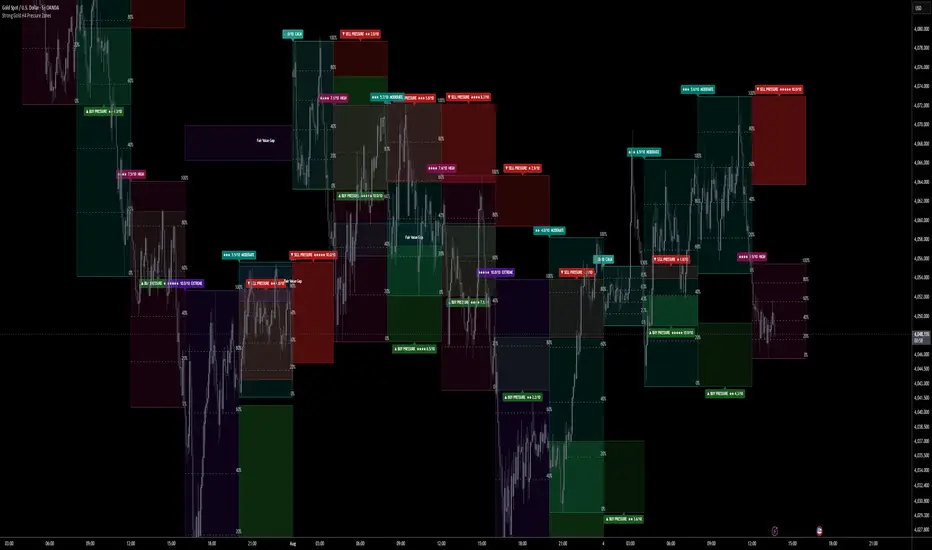
Strong Gold H4 Pressure Zones
Strong Gold H4 Pressure Zones maps the gold trading day the way it actually moves — split into its true H4 rhythm — and reads three institutional layers on every candle slot: which parts of the session run hot, where the previous candle's wick left unfinished business, and where price gapped away from value. It is built to run on the M5 timeframe — M5 is the execution resolution the whole engine is calibrated to, while it thinks in H4, so you see the higher-timeframe structure forming live on your chart. Load it on an M5 XAUUSD chart for correct slot alignment and zone behaviour.
Most session tools just draw a box around the day. This one grades every H4 slot, projects the pressure the last candle built, and marks the gaps — all anchored to the daily candle open, identical for every trader on the planet.
🕐 True Gold-Day Slot Engine — the core. The gold day (≈23h with its 1-hour technical break) is sliced into six real periods: an H3 opening block, then five H4 candles — aligned to the actual 04:00 / 08:00 / 12:00 / 16:00 / 20:00 boundaries, not a naïve 4-hour count. Every slot is drawn as a shaded box built live from that slot's own high/low, anchored to the daily candle's open so the zones are the same in Miami, Dubai or Singapore regardless of chart timezone.
⏱️ Runs on M5 — by design. This indicator is meant to be applied on the M5 timeframe. The six H4 slots are built up tick by tick from M5 candles, and the pressure, volatility and FVG zones are all calibrated to that resolution. Apply it to an M5 chart — other timeframes will not slice the gold day correctly.
📊 20% Increment Grid — read position at a glance. Each slot box is split by horizontal guides at 0 / 20 / 40 / 60 / 80 / 100% of its range, labelled on the right. Instantly see whether price is pressing the extremes of the current H4 or coiling in the middle — the exact levels institutions lean on within a candle.
🌋 30-Day Session Volatility Profile — the rhythm read. This is not the current candle's volatility. Each of the six slots is averaged over the last 30 days and the six averages are ranked against each other 0–10, printing a fixed grade on every slot — CALM, MODERATE, HIGH, EXTREME. You learn which H4 windows of the gold session typically explode and which drift, so you size and time around the day's real character instead of guessing. The rank is static and colour-graded (calm teal → extreme purple), only drifting slowly as the rolling window updates.
🧲 Prior-Candle Pressure Zones — the wick memory. The heart of the tool. The moment a slot closes, it's read as a single composite H4 candle and its dominant wick is projected forward as a fixed pressure band inside the next slot:
A strong upper wick on the prior candle → SELL PRESSURE zone near the top (rejection from above — supply left overhead).
A strong lower wick on the prior candle → BUY PRESSURE zone near the bottom (rejection from below — demand left beneath).
Each band is graded 0–10 on wick dominance and printed with its score (▲ BUY PRESSURE 8.4/10 · ▼ SELL PRESSURE 7.2/10), opacity scaling with strength. These are fixed the instant the prior candle closes — they never repaint.
🔀 Prior-Slot Fair Value Gap — the imbalance carry-over. A true three-candle FVG detected on the H4 slots themselves (the slots are the candles), projected as a clean Fair Value Gap zone into the current slot, normalized to one uniform ATR-based height so no single gap swallows the chart. An optional gap-size filter keeps the noise out. You see the imbalance the last three candles left, drawn where it matters, without the clutter.
🎨 Fully Themed & Configurable. Volatility-graded box tones, custom buy/sell pressure and FVG colours, neutral increment grid, adjustable opacities, 2× increment and rank label sizing, per-module toggles, configurable opening-block / break / slot hours, volatility lookback, wick thresholds, FVG ATR length / extend / height, and sessions-to-plot depth.
🔒 Honest, Fixed-Zone Core. The live slot box repaints in price as the candle forms — inherent to showing a real-time H4 building on M5, not a defect. But every fixed output — the pressure bands, the FVG, the volatility rank — is locked to the prior completed candle and never redraws to flatter the chart. The 0–10 scores are descriptive ranking frameworks for directing attention, not backtested signals.
🚀 Built for XAUUSD on the M5 timeframe — the slot model matches gold's 23-hour day and 1-hour break out of the box. Use it on an M5 gold chart (adjust the hour inputs for other instruments).
🎯 How To Trade It — Pressure From The Prior H4
⏱️ Load the indicator on an M5 XAUUSD chart before anything else — the entire slot model is built for M5.
Everything hinges on one read: the last H4 candle told you where price got rejected — trade the current candle expecting that pressure to hold, or break with conviction when it fails.
◾ 1) Fade into a prior-candle pressure zone (the core thesis)
Use when the previous H4 left a strong wick and the current slot rotates back into that band.
▪️ The prior candle prints a strong lower wick → a graded BUY PRESSURE zone sits in the lower portion of the current slot. Buyers already defended there once. ▪️ Wait for price to rotate down into that band inside the current slot — ideally near the 0–20% increment level. ▪️ Entry: long as price reacts inside the buy-pressure zone; the higher the score (7+), the more the prior candle insisted on that level. ▪️ Stop: below the zone — if price closes through and accepts beneath it, the demand failed; stand aside. ▪️ Target: the mid-grid (50%) first, the opposite edge / prior-candle high on extension.
The mirror applies for a strong upper wick → SELL PRESSURE zone up top: fade rallies into it, stop above, target back down through the grid.
◾ 2) Weight it with the session profile
▪️ A pressure zone landing in a HIGH / EXTREME volatility slot means the reaction can be violent — expect follow-through and give the target room. ▪️ The same zone in a CALM slot means muted rotation — take the mid-grid and don't overstay. ▪️ The volatility rank tells you how hard the day's structure usually moves in that window before you commit.
◾ 3) Read the FVG as the pull
▪️ An unfilled Fair Value Gap projected into the current slot is where price is imbalanced — it often gets revisited. A buy-pressure zone below an open bullish FVG is confluence: rejection level plus imbalance both pointing up. ▪️ When a pressure zone and the FVG point opposite ways, that's conflict — let the slot resolve before committing.
◾ 4) Stand down — the map says wait
▪️ Prior candle closed as a clean body with no dominant wick → no pressure zone drew → no edge from rejection this slot. ▪️ Price already accepted through the pressure band → the level's spent. ▪️ CALM slot with no FVG and price mid-range → nothing worth risking on; let it develop.
Rule of thumb: ⭐ Strong prior-candle wick + price rotating into that graded pressure zone + a HIGH-volatility slot or aligned FVG → trade the rejection with the pull. ⭐ No wick, consumed zone, or dead CALM mid-range → stand down until the next candle sets the map.
⚠️ IMPORTANT NOTICE: Strong Gold H4 Pressure Zones is a structure-mapping tool designed for the M5 timeframe on XAUUSD. Pressure zones are projected from the prior H4 candle's wick geometry, the volatility rank is a 30-day per-slot average, and FVGs are drawn from three-candle gap logic — a model of behaviour, not exchange order-book data. The 0–10 scores are descriptive ranking frameworks for directing attention — NOT backtested signals and NOT standalone trade triggers. Fading into prior-candle pressure still carries real risk of failed levels and stop-outs. Always combine it with your own strategy, price-action analysis and risk management. Past behaviour does not guarantee future results.
Strong Gold H4 Pressure Zones maps the gold trading day the way it actually moves — split into its true H4 rhythm — and reads three institutional layers on every candle slot: which parts of the session run hot, where the previous candle's wick left unfinished business, and where price gapped away from value. It is built to run on the M5 timeframe — M5 is the execution resolution the whole engine is calibrated to, while it thinks in H4, so you see the higher-timeframe structure forming live on your chart. Load it on an M5 XAUUSD chart for correct slot alignment and zone behaviour.
Most session tools just draw a box around the day. This one grades every H4 slot, projects the pressure the last candle built, and marks the gaps — all anchored to the daily candle open, identical for every trader on the planet.
🕐 True Gold-Day Slot Engine — the core. The gold day (≈23h with its 1-hour technical break) is sliced into six real periods: an H3 opening block, then five H4 candles — aligned to the actual 04:00 / 08:00 / 12:00 / 16:00 / 20:00 boundaries, not a naïve 4-hour count. Every slot is drawn as a shaded box built live from that slot's own high/low, anchored to the daily candle's open so the zones are the same in Miami, Dubai or Singapore regardless of chart timezone.
⏱️ Runs on M5 — by design. This indicator is meant to be applied on the M5 timeframe. The six H4 slots are built up tick by tick from M5 candles, and the pressure, volatility and FVG zones are all calibrated to that resolution. Apply it to an M5 chart — other timeframes will not slice the gold day correctly.
📊 20% Increment Grid — read position at a glance. Each slot box is split by horizontal guides at 0 / 20 / 40 / 60 / 80 / 100% of its range, labelled on the right. Instantly see whether price is pressing the extremes of the current H4 or coiling in the middle — the exact levels institutions lean on within a candle.
🌋 30-Day Session Volatility Profile — the rhythm read. This is not the current candle's volatility. Each of the six slots is averaged over the last 30 days and the six averages are ranked against each other 0–10, printing a fixed grade on every slot — CALM, MODERATE, HIGH, EXTREME. You learn which H4 windows of the gold session typically explode and which drift, so you size and time around the day's real character instead of guessing. The rank is static and colour-graded (calm teal → extreme purple), only drifting slowly as the rolling window updates.
🧲 Prior-Candle Pressure Zones — the wick memory. The heart of the tool. The moment a slot closes, it's read as a single composite H4 candle and its dominant wick is projected forward as a fixed pressure band inside the next slot:
A strong upper wick on the prior candle → SELL PRESSURE zone near the top (rejection from above — supply left overhead).
A strong lower wick on the prior candle → BUY PRESSURE zone near the bottom (rejection from below — demand left beneath).
Each band is graded 0–10 on wick dominance and printed with its score (▲ BUY PRESSURE 8.4/10 · ▼ SELL PRESSURE 7.2/10), opacity scaling with strength. These are fixed the instant the prior candle closes — they never repaint.
🔀 Prior-Slot Fair Value Gap — the imbalance carry-over. A true three-candle FVG detected on the H4 slots themselves (the slots are the candles), projected as a clean Fair Value Gap zone into the current slot, normalized to one uniform ATR-based height so no single gap swallows the chart. An optional gap-size filter keeps the noise out. You see the imbalance the last three candles left, drawn where it matters, without the clutter.
🎨 Fully Themed & Configurable. Volatility-graded box tones, custom buy/sell pressure and FVG colours, neutral increment grid, adjustable opacities, 2× increment and rank label sizing, per-module toggles, configurable opening-block / break / slot hours, volatility lookback, wick thresholds, FVG ATR length / extend / height, and sessions-to-plot depth.
🔒 Honest, Fixed-Zone Core. The live slot box repaints in price as the candle forms — inherent to showing a real-time H4 building on M5, not a defect. But every fixed output — the pressure bands, the FVG, the volatility rank — is locked to the prior completed candle and never redraws to flatter the chart. The 0–10 scores are descriptive ranking frameworks for directing attention, not backtested signals.
🚀 Built for XAUUSD on the M5 timeframe — the slot model matches gold's 23-hour day and 1-hour break out of the box. Use it on an M5 gold chart (adjust the hour inputs for other instruments).
🎯 How To Trade It — Pressure From The Prior H4
⏱️ Load the indicator on an M5 XAUUSD chart before anything else — the entire slot model is built for M5.
Everything hinges on one read: the last H4 candle told you where price got rejected — trade the current candle expecting that pressure to hold, or break with conviction when it fails.
◾ 1) Fade into a prior-candle pressure zone (the core thesis)
Use when the previous H4 left a strong wick and the current slot rotates back into that band.
▪️ The prior candle prints a strong lower wick → a graded BUY PRESSURE zone sits in the lower portion of the current slot. Buyers already defended there once. ▪️ Wait for price to rotate down into that band inside the current slot — ideally near the 0–20% increment level. ▪️ Entry: long as price reacts inside the buy-pressure zone; the higher the score (7+), the more the prior candle insisted on that level. ▪️ Stop: below the zone — if price closes through and accepts beneath it, the demand failed; stand aside. ▪️ Target: the mid-grid (50%) first, the opposite edge / prior-candle high on extension.
The mirror applies for a strong upper wick → SELL PRESSURE zone up top: fade rallies into it, stop above, target back down through the grid.
◾ 2) Weight it with the session profile
▪️ A pressure zone landing in a HIGH / EXTREME volatility slot means the reaction can be violent — expect follow-through and give the target room. ▪️ The same zone in a CALM slot means muted rotation — take the mid-grid and don't overstay. ▪️ The volatility rank tells you how hard the day's structure usually moves in that window before you commit.
◾ 3) Read the FVG as the pull
▪️ An unfilled Fair Value Gap projected into the current slot is where price is imbalanced — it often gets revisited. A buy-pressure zone below an open bullish FVG is confluence: rejection level plus imbalance both pointing up. ▪️ When a pressure zone and the FVG point opposite ways, that's conflict — let the slot resolve before committing.
◾ 4) Stand down — the map says wait
▪️ Prior candle closed as a clean body with no dominant wick → no pressure zone drew → no edge from rejection this slot. ▪️ Price already accepted through the pressure band → the level's spent. ▪️ CALM slot with no FVG and price mid-range → nothing worth risking on; let it develop.
Rule of thumb: ⭐ Strong prior-candle wick + price rotating into that graded pressure zone + a HIGH-volatility slot or aligned FVG → trade the rejection with the pull. ⭐ No wick, consumed zone, or dead CALM mid-range → stand down until the next candle sets the map.
⚠️ IMPORTANT NOTICE: Strong Gold H4 Pressure Zones is a structure-mapping tool designed for the M5 timeframe on XAUUSD. Pressure zones are projected from the prior H4 candle's wick geometry, the volatility rank is a 30-day per-slot average, and FVGs are drawn from three-candle gap logic — a model of behaviour, not exchange order-book data. The 0–10 scores are descriptive ranking frameworks for directing attention — NOT backtested signals and NOT standalone trade triggers. Fading into prior-candle pressure still carries real risk of failed levels and stop-outs. Always combine it with your own strategy, price-action analysis and risk management. Past behaviour does not guarantee future results.
Açık kaynak kodlu komut dosyası
Gerçek TradingView ruhuyla, bu komut dosyasının mimarı, yatırımcıların işlevselliğini inceleyip doğrulayabilmesi için onu açık kaynaklı hale getirdi. Yazarı tebrik ederiz! Ücretsiz olarak kullanabilseniz de, kodu yeniden yayınlamanın Topluluk Kurallarımıza tabi olduğunu unutmayın.

Institutional-desk research · 10+ yrs building trading algos stocks options FX
Algo systems for gold/FX traders · levels desk: Gold FX NQ ES JPN225
Private systems for serious traders
syndicate001.com · t.me/aisyndicate001
Algo systems for gold/FX traders · levels desk: Gold FX NQ ES JPN225
Private systems for serious traders
syndicate001.com · t.me/aisyndicate001
Feragatname
Bilgiler ve yayınlar, TradingView tarafından sağlanan veya onaylanan finansal, yatırım, alım satım veya diğer türden tavsiye veya öneriler anlamına gelmez ve teşkil etmez. Kullanım Koşulları bölümünde daha fazlasını okuyun.
Açık kaynak kodlu komut dosyası
Gerçek TradingView ruhuyla, bu komut dosyasının mimarı, yatırımcıların işlevselliğini inceleyip doğrulayabilmesi için onu açık kaynaklı hale getirdi. Yazarı tebrik ederiz! Ücretsiz olarak kullanabilseniz de, kodu yeniden yayınlamanın Topluluk Kurallarımıza tabi olduğunu unutmayın.
Institutional-desk research · 10+ yrs building trading algos stocks options FX
Algo systems for gold/FX traders · levels desk: Gold FX NQ ES JPN225
Private systems for serious traders
syndicate001.com · t.me/aisyndicate001
Algo systems for gold/FX traders · levels desk: Gold FX NQ ES JPN225
Private systems for serious traders
syndicate001.com · t.me/aisyndicate001
Feragatname
Bilgiler ve yayınlar, TradingView tarafından sağlanan veya onaylanan finansal, yatırım, alım satım veya diğer türden tavsiye veya öneriler anlamına gelmez ve teşkil etmez. Kullanım Koşulları bölümünde daha fazlasını okuyun.