

🧭 Market Structure Overview
Current price: around 0.6547
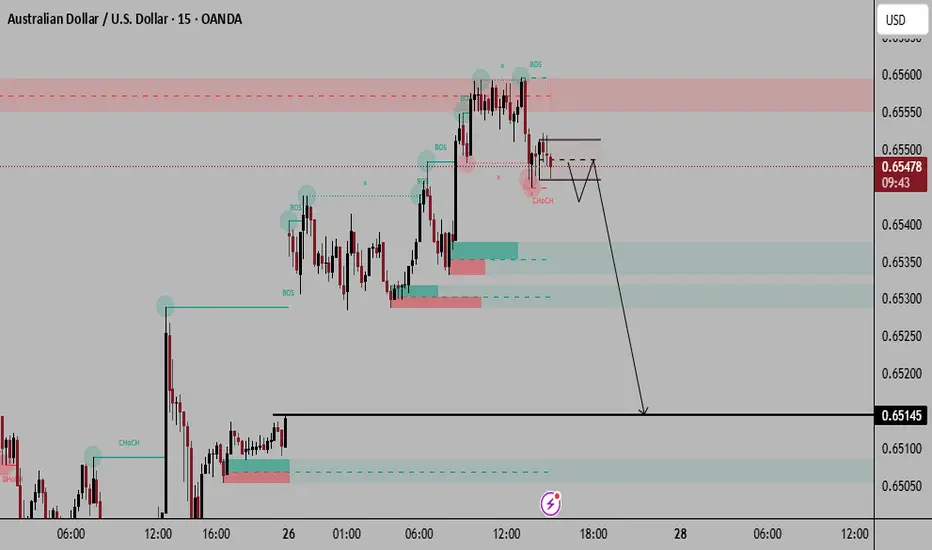
The chart shows a bearish structure shift — after price reached a high near 0.6560–0.6565, it created:
A Break of Structure (BOS) to the downside.
A Change of Character (CHoCH) confirming a transition from bullish to bearish momentum.
🧱 Key Supply and Demand Zones
Supply zone (short entry area):
Marked in red around 0.6550–0.6560
This is where sellers previously entered and broke structure — potential retest zone for short entry.
Demand zones (targets):
Minor demand: around 0.6530–0.6535
Major demand / final target: near 0.6515–0.6510
📉 Trade Plan (Sell Setup)
Bias: Bearish
Entry zone (sell):
Wait for a retracement into 0.6550–0.6555 (supply zone retest)
Confirmation:
Look for lower time frame rejection (e.g. bearish engulfing, BOS down on 1–5m chart) at that zone.
Stop loss:
Above 0.6565 (just beyond the BOS high / supply zone)
Take profit targets:
TP1: 0.6535 (first demand / liquidity pocket)
TP2: 0.6515 (main target, strong demand zone)
Risk-to-reward (approx):
1:3 to 1:4, depending on entry precision
🔍 Market Logic
Price made a lower high and broke structure to the downside.
The CHoCH confirms momentum has shifted.
The liquidity above 0.6560 has been swept — institutions likely distributed there.
Expect a retracement into supply before the next impulsive leg down.
⚠️ Trade Management Tips
If price fails to reach 0.6550 and instead breaks below 0.6535 decisively, consider waiting for a pullback to 0.6540 for re-entry.
Move SL to breakeven after TP1 is hit.
Current price: around 0.6547
The chart shows a bearish structure shift — after price reached a high near 0.6560–0.6565, it created:
A Break of Structure (BOS) to the downside.
A Change of Character (CHoCH) confirming a transition from bullish to bearish momentum.
🧱 Key Supply and Demand Zones
Supply zone (short entry area):
Marked in red around 0.6550–0.6560
This is where sellers previously entered and broke structure — potential retest zone for short entry.
Demand zones (targets):
Minor demand: around 0.6530–0.6535
Major demand / final target: near 0.6515–0.6510
📉 Trade Plan (Sell Setup)
Bias: Bearish
Entry zone (sell):
Wait for a retracement into 0.6550–0.6555 (supply zone retest)
Confirmation:
Look for lower time frame rejection (e.g. bearish engulfing, BOS down on 1–5m chart) at that zone.
Stop loss:
Above 0.6565 (just beyond the BOS high / supply zone)
Take profit targets:
TP1: 0.6535 (first demand / liquidity pocket)
TP2: 0.6515 (main target, strong demand zone)
Risk-to-reward (approx):
1:3 to 1:4, depending on entry precision
🔍 Market Logic
Price made a lower high and broke structure to the downside.
The CHoCH confirms momentum has shifted.
The liquidity above 0.6560 has been swept — institutions likely distributed there.
Expect a retracement into supply before the next impulsive leg down.
⚠️ Trade Management Tips
If price fails to reach 0.6550 and instead breaks below 0.6535 decisively, consider waiting for a pullback to 0.6540 for re-entry.
Move SL to breakeven after TP1 is hit.

免責聲明
這些資訊和出版物並非旨在提供,也不構成TradingView提供或認可的任何形式的財務、投資、交易或其他類型的建議或推薦。請閱讀使用條款以了解更多資訊。
免責聲明
這些資訊和出版物並非旨在提供,也不構成TradingView提供或認可的任何形式的財務、投資、交易或其他類型的建議或推薦。請閱讀使用條款以了解更多資訊。