
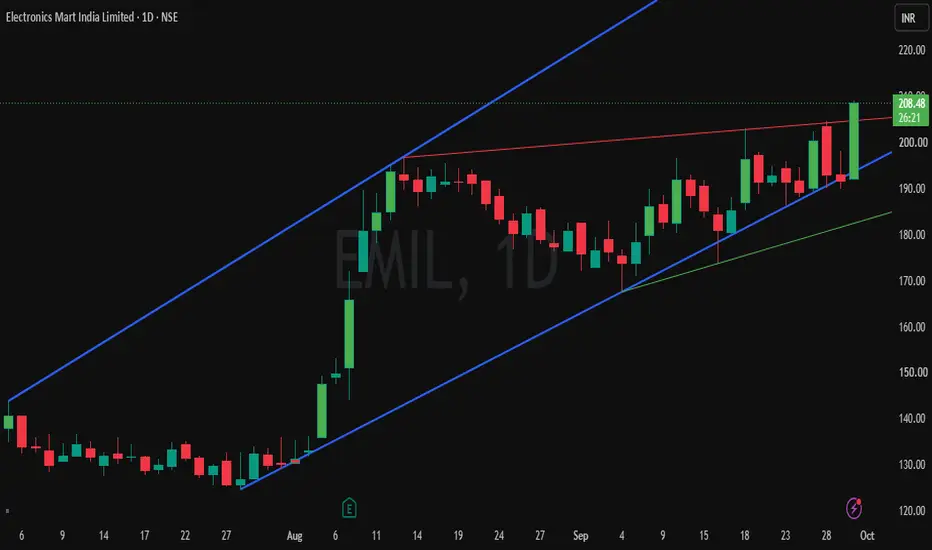
EMIL — BTST BREAKOUT SETUP
Entry, Stop Loss & Targets Are Clearly Defined — Helping You Plan Your Trade With Confidence.
📊 Stock Strength: 75/100
(Note: Higher score indicates stronger stock conditions, not guaranteed returns.)
A bullish breakout has appeared with positive price action and strong volume expansion.
🔄 Trade Type: BTST
────────────────────
🎯 TRADE LEVELS
ENTRY: ₹207
🛑 STOP LOSS
ATR SL: ₹192
🎯 TARGETS
BTST Target: 3–5%
────────────────────
📈 VOLUME
20D Volume: 282%
1D Volume: 458%
────────────────────
⏱ Timeframe: 1 Day
📌 Trade Entry: Take the trade only after 3:15 PM.
The position can be held for the next trading session if the trend remains strong.
The setup is based on breakout structure, price action, volume strength and trend analysis.
────────────────────
📈 Risk Management
Stop Loss is compulsory. Consider position sizing according to your risk and avoid risking more than you can afford to lose.
────────────────────
⚠️ Disclaimer:
This is a technical analysis setup for educational purposes only and not a buy/sell recommendation. Please do your own research and manage risk before taking any trade.

免責聲明
這些資訊和出版物並非旨在提供,也不構成TradingView提供或認可的任何形式的財務、投資、交易或其他類型的建議或推薦。請閱讀使用條款以了解更多資訊。
免責聲明
這些資訊和出版物並非旨在提供,也不構成TradingView提供或認可的任何形式的財務、投資、交易或其他類型的建議或推薦。請閱讀使用條款以了解更多資訊。