

The Big Picture:
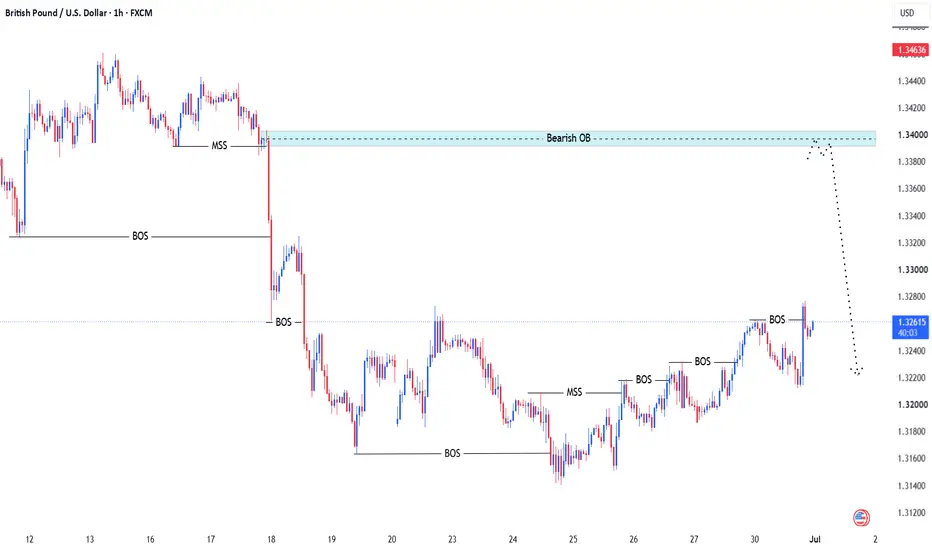
The pound has been in a dominant bearish trend for some time. Even though we saw a small upward move recently, this appears to be nothing more than a classic Buy Side Liquidity grab — a trap for buyers before the real move lower resumes.
Key Technical Confluences at 1.34000:Strong Bearish Order Block sitting at this level (institutional supply area)
Multiple previous rejections from this zone
Overall market structure remains bearish with lower highs and lower lows
The recent minor bullish structure is losing momentum fast
Expected Scenario: Price is likely to reject from the 1.34000 region and continue the downtrend. This is one of the cleanest sell setups we’ve seen in recent sessions because of the strong confluence between the Bearish OB and the higher-timeframe bearish trend.
Trade Plan: Sell Entry: Around 1.34000
Stop Loss: Above 1.3425
Targets: First Target: 1.3360
Second Target: 1.3320
Final Target: 1.3280 – 1.3250
This setup offers excellent risk-to-reward with clear invalidation level.
This is not financial advice. Always do your own analysis and manage risk carefully.
The pound has been in a dominant bearish trend for some time. Even though we saw a small upward move recently, this appears to be nothing more than a classic Buy Side Liquidity grab — a trap for buyers before the real move lower resumes.
Key Technical Confluences at 1.34000:Strong Bearish Order Block sitting at this level (institutional supply area)
Multiple previous rejections from this zone
Overall market structure remains bearish with lower highs and lower lows
The recent minor bullish structure is losing momentum fast
Expected Scenario: Price is likely to reject from the 1.34000 region and continue the downtrend. This is one of the cleanest sell setups we’ve seen in recent sessions because of the strong confluence between the Bearish OB and the higher-timeframe bearish trend.
Trade Plan: Sell Entry: Around 1.34000
Stop Loss: Above 1.3425
Targets: First Target: 1.3360
Second Target: 1.3320
Final Target: 1.3280 – 1.3250
This setup offers excellent risk-to-reward with clear invalidation level.
This is not financial advice. Always do your own analysis and manage risk carefully.
交易進行
註釋
TP1 HIT註釋
TP2 HIT
✅ ACCOUNT MANAGEMENT
t.me/Traderr5757
✅ XAUUSD MARKET UPDATE
t.me/+UamB2uCTUtkzMmQ0
✅ XAUUSD BACKUP CHANNEL
t.me/+mDhkrPtwZ4o1ZTE0
XM BROKER
PARTNER CODE : K4HPT
t.me/Traderr5757
✅ XAUUSD MARKET UPDATE
t.me/+UamB2uCTUtkzMmQ0
✅ XAUUSD BACKUP CHANNEL
t.me/+mDhkrPtwZ4o1ZTE0
XM BROKER
PARTNER CODE : K4HPT
免責聲明
這些資訊和出版物並非旨在提供,也不構成TradingView提供或認可的任何形式的財務、投資、交易或其他類型的建議或推薦。請閱讀使用條款以了解更多資訊。
✅ ACCOUNT MANAGEMENT
t.me/Traderr5757
✅ XAUUSD MARKET UPDATE
t.me/+UamB2uCTUtkzMmQ0
✅ XAUUSD BACKUP CHANNEL
t.me/+mDhkrPtwZ4o1ZTE0
XM BROKER
PARTNER CODE : K4HPT
t.me/Traderr5757
✅ XAUUSD MARKET UPDATE
t.me/+UamB2uCTUtkzMmQ0
✅ XAUUSD BACKUP CHANNEL
t.me/+mDhkrPtwZ4o1ZTE0
XM BROKER
PARTNER CODE : K4HPT
免責聲明
這些資訊和出版物並非旨在提供,也不構成TradingView提供或認可的任何形式的財務、投資、交易或其他類型的建議或推薦。請閱讀使用條款以了解更多資訊。