
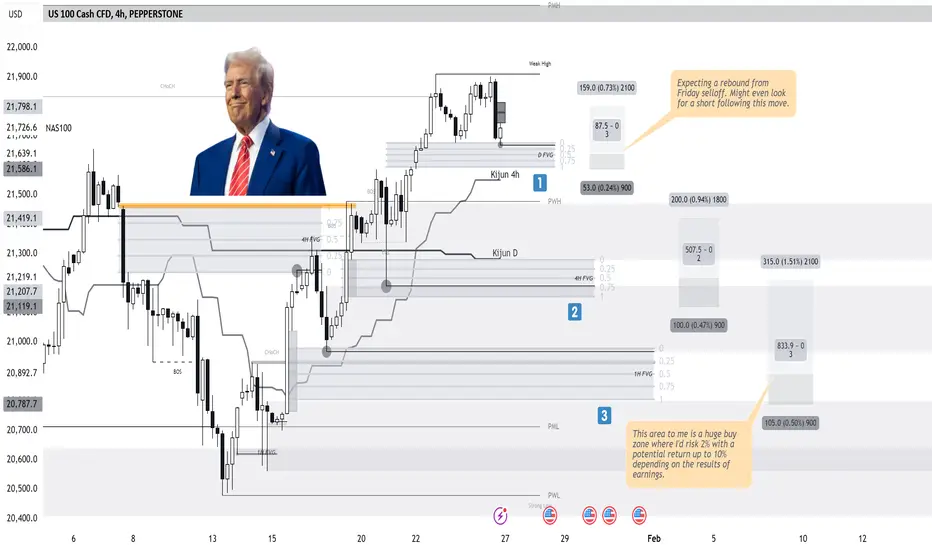
US100 analysis: Three "buy zones" identified for potential entries with distinct risk levels.
1. "Zone 1": Near the "4H Kijun" and prior weak high, aiming for short-term rebound with controlled risk.
2. "Zone 2": Aligns with deeper "4H FVG" support. This setup offers a higher conviction for a reversal targeting the mid-range.
3. "Zone 3": Major buy zone with strong confluence at the "PML" and "1H FVG". Willing to risk 2% for a potential return of up to 10%, depending on upcoming earnings.
Each zone represents escalating risk-reward setups, ensuring precise risk management across macro support structures. Consider macro headwinds and earnings season's volatility.
1. "Zone 1": Near the "4H Kijun" and prior weak high, aiming for short-term rebound with controlled risk.
2. "Zone 2": Aligns with deeper "4H FVG" support. This setup offers a higher conviction for a reversal targeting the mid-range.
3. "Zone 3": Major buy zone with strong confluence at the "PML" and "1H FVG". Willing to risk 2% for a potential return of up to 10%, depending on upcoming earnings.
Each zone represents escalating risk-reward setups, ensuring precise risk management across macro support structures. Consider macro headwinds and earnings season's volatility.
交易結束:達到停損點
Got killed lol
免責聲明
這些資訊和出版物並非旨在提供,也不構成TradingView提供或認可的任何形式的財務、投資、交易或其他類型的建議或推薦。請閱讀使用條款以了解更多資訊。