HTF 5+1 | Sattam
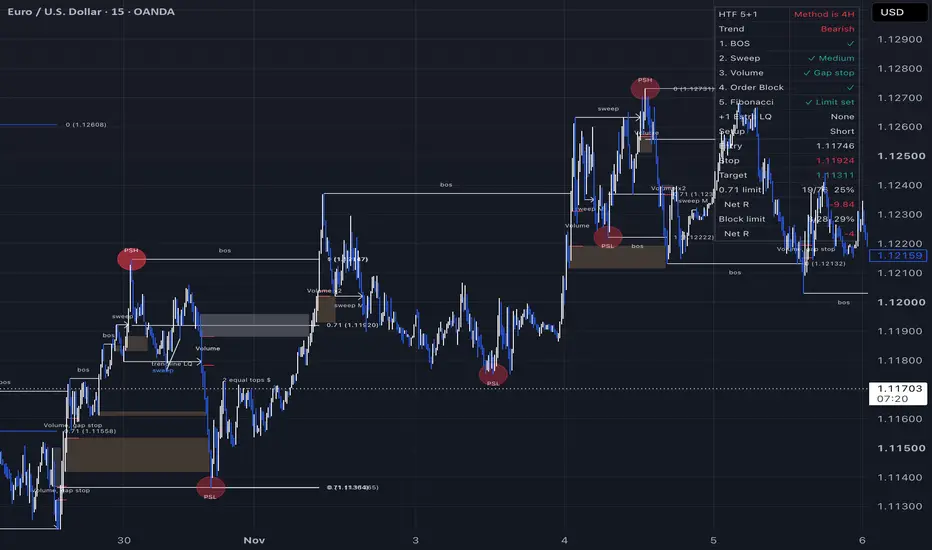
HTF 5+1 is a rule-based price action checklist for the 4-hour chart. It follows one sequence: break of structure, liquidity sweep, volume gap, Order Block, and a Fibonacci limit, with an optional sixth confirmation for extra resting liquidity. A setup is marked only when the first four steps exist on the same move. The Fibonacci levels appear after the swing has formed.

WHY THESE COMPONENTS ARE COMBINED
The steps are one sequential model, not separate tools placed on one chart. The break defines direction. The sweep shows that resting orders were taken before that break. The volume gap shows that the break was made with displacement. The Order Block is located from that same gap, and the Fibonacci range is measured from the swing that took the liquidity. Each step uses the output of the step before it. The script was written from scratch and does not call any other script.
1. BREAK OF STRUCTURE
A break needs a candle body to close beyond the last structural high or low. A wick alone is not a break. Breaks are labeled "bos", and a break with no volume gap is labeled "no volume bos". A break can continue the trend or reverse it.

2. LIQUIDITY SWEEP
A sweep is taken when price trades through the structural point that created the last break, and structure then breaks again in the original direction. The sweep is drawn with an arrow when that later break confirms it. The swing that took the liquidity is marked PSL (protected structural low) or PSH (protected structural high) when the setup is valid.


The script also handles these cases:
- Opposite break with volume: treated as a reversal, and the previous break is relabeled "sweep".
- Opposite break without volume: treated as a sweep and the trend stays. A second opposite break in a row changes the trend even without volume, but it cannot form a setup without volume.
- Wick beyond the last level with no close, followed by a break of the minor swing with volume: treated as a sweep and a reversal.
- Sweep of a subordinate swing that failed to break structure: lower probability, labeled "sweep M", and it requires volume.

3. VOLUME GAP
Volume here means a price gap, not exchange volume. It exists when the high of the first candle and the low of the third candle do not overlap in a bullish push, and the opposite in a bearish push. Red lines mark the gap. "Volume x3" means three consecutive gaps. "Volume, gap stop" means one gap followed by overlap. Both are information only and do not change whether a setup is valid. A break with no gap cannot form an Order Block or a setup.

4. ORDER BLOCK
The Order Block is the last candle before the volume push, whichever color it is. When the first volume candle wicks past that candle in the direction of the push, the block is placed on that wick, and volume is measured from the body of that candle to the next candle. A block counts once: it stops extending at the first touch.
5. FIBONACCI LIMIT
The range runs from the protected swing (level 1) to the retracement swing (level 0). The limit sits at 0.71, the stop at level 1, and the target at level 0, which is about 2.45 times the risk by geometry. A level marked "M" comes from a medium-probability sweep.


If a new break happens before the limit is touched, the levels are removed and redrawn on the new swing. A new valid setup replaces an untouched limit on the same side. If level 1 is broken while waiting for the swing, the setup is cancelled. If price has already passed 0.71 when the swing is confirmed, no limit is placed and the panel shows "Entry passed".
An optional second limit uses the closest unmitigated Order Block beyond 0.71, with the same stop and a 2R target. If the near edge of the block matches 0.71 the limit moves to 50% of the block, and if 50% of the block matches 0.71 both limits sit on the level. This second limit is tracked in the panel and alerts and has no drawing.
6. EXTRA LIQUIDITY (+1, OPTIONAL)
A setup stays valid without this step. The script looks for resting liquidity between the entry and the target, from weakest to strongest: MNR (a reversal that did not mitigate the block), equal highs or lows, and trendline liquidity.


INTERNAL SETUPS (OFF BY DEFAULT)
While a main limit waits, the script can look for counter-trend setups inside the pullback using a shorter swing length. They need the same steps, are labeled "ibos" in blue, and carry lower probability because they trade against the main direction.

HOW TO USE IT
Use a 4-hour chart. The panel warns on any other timeframe. Read the panel from top to bottom: rows 1 to 5 must be complete before a limit exists, and +1 is an extra confirmation. Choose entries, risk and position size yourself. Alerts are available for a limit being placed, a limit being filled, and a stop or target being reached.
SETTINGS
Structure: swing confirmation bars, medium-probability sweeps, internal setups, internal swing bars.
Entries: entry level, second limit on the closest block, block target in R, block match tolerance, liquidity swing bars, equal highs and lows tolerance.
Drawing: show or hide breaks and sweeps, volume gaps, blocks, Fibonacci levels and extra liquidity; volume on every break; how far from price a block keeps extending.
Panel: show or hide, language, position.
DRAWING BEHAVIOR AND LIMITATIONS
- All events are calculated on closed bars only.
- A break is finalized one bar after it closes, because the volume check needs the third candle.
- A swing is accepted after 2 closed bars with no new extreme and at least one candle closing beyond the opposite end of the candle before it. Swing points, sweeps and break lines are therefore drawn back in time on the bar that confirms them.
- Fibonacci levels of a cancelled or recalibrated setup are deleted from the chart.
- Blocks further than the chosen ATR distance from price stop extending to keep the chart scale readable.
- TradingView keeps the most recent 500 lines, boxes and labels, so older drawings disappear on long histories.
- The panel counts are a simple historical tally on the loaded bars. They exclude spread, commission and slippage. When a stop and target are touched in the same candle the stop is counted first. They are not a forecast, and they change with the symbol and the amount of history.
This script is an analysis tool for education. It does not predict price and it is not financial advice. Past behavior does not indicate future results.
--------------------------------------------------
HTF 5+1 | Sattam (العربية)
مؤشر HTF 5+1 قائمة تحقق لحركة السعر مبنية على قواعد ومصممة لفريم 4 ساعات. يتبع تسلسلاً واحداً: كسر الهيكل، ثم سحب السيولة، ثم فجوة الحجم، ثم الأوردر بلوك، ثم حد فيبوناتشي، مع تأكيد سادس اختياري للسيولة الإضافية. لا يظهر الإعداد إلا إذا اجتمعت الخطوات الأربع الأولى في الحركة نفسها، ولا تظهر مستويات فيبوناتشي إلا بعد تشكل القمة أو القاع.
لماذا جمعت هذه العناصر
هذه الخطوات منهج واحد متسلسل وليست أدوات منفصلة على شارت واحد. الكسر يحدد الاتجاه، والسحب يبيّن أن الأوامر المتراكمة أُخذت قبل الكسر، وفجوة الحجم تبيّن أن الكسر حدث باندفاع، والأوردر بلوك يُحدَّد من الفجوة نفسها، ونطاق فيبوناتشي يقاس من النقطة التي أخذت السيولة. كل خطوة تعتمد على نتيجة التي قبلها. والمؤشر مكتوب من الصفر ولا يستدعي أي سكربت آخر.
1. كسر الهيكل
يلزم أن يغلق جسم الشمعة وراء آخر قمة أو قاع هيكلي، والفتيل وحده لا يعد كسراً. يكتب على الكسر bos، وإذا لم توجد فجوة حجم يكتب no volume bos. وقد يكون الكسر استمراراً للاتجاه أو انعكاساً له.
2. سحب السيولة
يتحقق السحب عندما يتجاوز السعر النقطة الهيكلية التي صنعت آخر كسر، ثم يكسر الهيكل مرة أخرى في الاتجاه الأصلي. يرسم السحب بسهم عند تأكده بذلك الكسر. وتوضع علامة PSL للقاع المحمي أو PSH للقمة المحمية على النقطة التي أخذت السيولة عندما يكون الإعداد صالحاً.
ويعالج المؤشر أيضاً هذه الحالات:
- كسر معاكس بحجم: يعد انعكاساً، ويتحول الكسر السابق إلى sweep.
- كسر معاكس بدون حجم: يعد سحباً ويبقى الاتجاه. والكسر المعاكس الثاني على التوالي يغيّر الاتجاه ولو بدون حجم، لكنه لا يكوّن إعداداً بدون حجم.
- فتيل وراء آخر مستوى بدون إغلاق، يتبعه كسر النقطة الفرعية بحجم: يعد سحباً وانعكاساً.
- سحب نقطة فرعية فشلت في كسر الهيكل: احتماله أقل، ويكتب عليه sweep M، ويشترط الحجم.
3. فجوة الحجم
الحجم هنا فجوة سعرية وليس حجم التداول. تتحقق عندما لا يتداخل أعلى الشمعة الأولى مع أسفل الشمعة الثالثة في الدفعة الصاعدة، والعكس في الهابطة. تحددها خطوط حمراء. وVolume x3 تعني ثلاث فجوات متتالية، وVolume, gap stop تعني فجوة واحدة تلاها تداخل، وكلاهما معلومة فقط ولا يغيّر صلاحية الإعداد. والكسر بلا فجوة لا يكوّن أوردر بلوك ولا إعداداً.
4. الأوردر بلوك
الأوردر بلوك هو آخر شمعة قبل دفعة الحجم، أياً كان لونها. وإذا تجاوز فتيل أول شمعة حجم تلك الشمعة باتجاه الدفعة، يوضع البلوك على هذا الفتيل، ويقاس الحجم من جسم تلك الشمعة إلى الشمعة التالية. والبلوك يحتسب مرة واحدة، فيتوقف امتداده عند أول لمسة.
5. حد فيبوناتشي
يمتد النطاق من النقطة المحمية عند المستوى 1 إلى نقطة التراجع عند المستوى 0. يوضع الحد عند 0.71، والوقف عند 1، والهدف عند 0، أي نحو 2.45 ضعف المخاطرة هندسياً. والحرف M بجانب المستوى يعني أن الإعداد من سحب متوسط الاحتمال.
إذا حدث كسر جديد قبل لمس الحد، تحذف المستويات وتعاد على النقطة الجديدة. والإعداد الصالح الجديد يحل محل الحد غير الملموس في الجهة نفسها. وإذا كُسر المستوى 1 أثناء انتظار النقطة يلغى الإعداد. وإذا كان السعر قد تجاوز 0.71 عند تأكيد النقطة فلا يوضع حد، وتعرض اللوحة «فات مستوى الدخول».
ويوجد حد ثانٍ اختياري على أقرب أوردر بلوك غير مخفف بعد 0.71، بنفس الوقف وهدف 2R. إذا طابقت حافة البلوك القريبة مستوى 0.71 ينتقل الحد إلى 50% من البلوك، وإذا طابق منتصف البلوك مستوى 0.71 يوضع الحدان على المستوى. وهذا الحد يظهر في اللوحة والتنبيهات فقط وليس له رسم.
6. السيولة الإضافية (+1، اختيارية)
يبقى الإعداد صالحاً بدون هذه الخطوة. يبحث المؤشر عن سيولة متراكمة بين الدخول والهدف، من الأضعف إلى الأقوى: MNR وهو انعكاس بدون تخفيف البلوك، ثم القمم أو القيعان المتساوية، ثم سيولة خط الاتجاه.
الإعدادات الداخلية (مطفأة افتراضياً)
أثناء انتظار الحد الأساسي، يمكن للمؤشر البحث عن إعدادات عكس الاتجاه داخل التراجع بطول نقاط أقصر. تحتاج الخطوات نفسها، ويكتب عليها ibos باللون الأزرق، واحتمالها أقل لأنها عكس الاتجاه الأساسي.
طريقة الاستخدام
استخدمه على فريم 4 ساعات، وتظهر اللوحة تنبيهاً على أي فريم آخر. اقرأ اللوحة من الأعلى إلى الأسفل: يجب اكتمال الصفوف من 1 إلى 5 قبل وجود الحد، و+1 تأكيد إضافي. وتحديد الدخول والمخاطرة وحجم المركز قرارك أنت. وتتوفر تنبيهات عند وضع الحد، وعند تنفيذه، وعند الوصول إلى الوقف أو الهدف.
الإعدادات
الهيكل: شموع تأكيد القمة والقاع، والسحب متوسط الاحتمال، والإعدادات الداخلية، وشموع الهيكل الداخلي.
الدخول: مستوى الدخول، والحد الثاني على أقرب بلوك، وهدف حد البلوك، وسماحية تطابق البلوك، وشموع نقاط السيولة، وسماحية القمم والقيعان المتساوية.
الرسم: إظهار أو إخفاء الكسور والسحب وفجوات الحجم والبلوكات ومستويات فيبوناتشي والسيولة الإضافية، والحجم على كل كسر، والمسافة التي يستمر عندها امتداد البلوك.
اللوحة: الإظهار، واللغة، والموضع.
سلوك الرسم والقيود
- كل الأحداث تحسب على الشموع المغلقة فقط.
- يُحسم الكسر بعد شمعة واحدة من إغلاقه، لأن فحص الحجم يحتاج الشمعة الثالثة.
- تعتمد النقطة بعد شمعتين مغلقتين بلا قمة أو قاع جديد، وبشرط إغلاق شمعة واحدة على الأقل وراء الطرف المقابل للشمعة التي قبلها. لذلك تُرسم النقاط والسحب وخطوط الكسر إلى الخلف عند الشمعة التي تؤكدها.
- تحذف مستويات فيبوناتشي للإعداد الملغى أو المعاد ضبطه من الشارت.
- البلوك الأبعد عن السعر من مسافة ATR المختارة يتوقف عن الامتداد للحفاظ على وضوح مقياس الشارت.
- يحتفظ TradingView بآخر 500 خط وصندوق وليبل، فتختفي الرسوم الأقدم في التاريخ الطويل.
- أرقام اللوحة إحصاء تاريخي بسيط للشموع المحملة، لا يشمل السبريد والعمولة والانزلاق. وعند لمس الوقف والهدف في الشمعة نفسها يحتسب الوقف أولاً. وهي ليست توقعاً، وتتغير حسب الرمز وطول التاريخ.
هذا المؤشر أداة تحليل تعليمية، لا يتنبأ بالسعر وليس نصيحة مالية. والسلوك السابق لا يدل على النتائج المستقبلية.
WHY THESE COMPONENTS ARE COMBINED
The steps are one sequential model, not separate tools placed on one chart. The break defines direction. The sweep shows that resting orders were taken before that break. The volume gap shows that the break was made with displacement. The Order Block is located from that same gap, and the Fibonacci range is measured from the swing that took the liquidity. Each step uses the output of the step before it. The script was written from scratch and does not call any other script.
1. BREAK OF STRUCTURE
A break needs a candle body to close beyond the last structural high or low. A wick alone is not a break. Breaks are labeled "bos", and a break with no volume gap is labeled "no volume bos". A break can continue the trend or reverse it.
2. LIQUIDITY SWEEP
A sweep is taken when price trades through the structural point that created the last break, and structure then breaks again in the original direction. The sweep is drawn with an arrow when that later break confirms it. The swing that took the liquidity is marked PSL (protected structural low) or PSH (protected structural high) when the setup is valid.
The script also handles these cases:
- Opposite break with volume: treated as a reversal, and the previous break is relabeled "sweep".
- Opposite break without volume: treated as a sweep and the trend stays. A second opposite break in a row changes the trend even without volume, but it cannot form a setup without volume.
- Wick beyond the last level with no close, followed by a break of the minor swing with volume: treated as a sweep and a reversal.
- Sweep of a subordinate swing that failed to break structure: lower probability, labeled "sweep M", and it requires volume.
3. VOLUME GAP
Volume here means a price gap, not exchange volume. It exists when the high of the first candle and the low of the third candle do not overlap in a bullish push, and the opposite in a bearish push. Red lines mark the gap. "Volume x3" means three consecutive gaps. "Volume, gap stop" means one gap followed by overlap. Both are information only and do not change whether a setup is valid. A break with no gap cannot form an Order Block or a setup.
4. ORDER BLOCK
The Order Block is the last candle before the volume push, whichever color it is. When the first volume candle wicks past that candle in the direction of the push, the block is placed on that wick, and volume is measured from the body of that candle to the next candle. A block counts once: it stops extending at the first touch.
5. FIBONACCI LIMIT
The range runs from the protected swing (level 1) to the retracement swing (level 0). The limit sits at 0.71, the stop at level 1, and the target at level 0, which is about 2.45 times the risk by geometry. A level marked "M" comes from a medium-probability sweep.
If a new break happens before the limit is touched, the levels are removed and redrawn on the new swing. A new valid setup replaces an untouched limit on the same side. If level 1 is broken while waiting for the swing, the setup is cancelled. If price has already passed 0.71 when the swing is confirmed, no limit is placed and the panel shows "Entry passed".
An optional second limit uses the closest unmitigated Order Block beyond 0.71, with the same stop and a 2R target. If the near edge of the block matches 0.71 the limit moves to 50% of the block, and if 50% of the block matches 0.71 both limits sit on the level. This second limit is tracked in the panel and alerts and has no drawing.
6. EXTRA LIQUIDITY (+1, OPTIONAL)
A setup stays valid without this step. The script looks for resting liquidity between the entry and the target, from weakest to strongest: MNR (a reversal that did not mitigate the block), equal highs or lows, and trendline liquidity.
INTERNAL SETUPS (OFF BY DEFAULT)
While a main limit waits, the script can look for counter-trend setups inside the pullback using a shorter swing length. They need the same steps, are labeled "ibos" in blue, and carry lower probability because they trade against the main direction.
HOW TO USE IT
Use a 4-hour chart. The panel warns on any other timeframe. Read the panel from top to bottom: rows 1 to 5 must be complete before a limit exists, and +1 is an extra confirmation. Choose entries, risk and position size yourself. Alerts are available for a limit being placed, a limit being filled, and a stop or target being reached.
SETTINGS
Structure: swing confirmation bars, medium-probability sweeps, internal setups, internal swing bars.
Entries: entry level, second limit on the closest block, block target in R, block match tolerance, liquidity swing bars, equal highs and lows tolerance.
Drawing: show or hide breaks and sweeps, volume gaps, blocks, Fibonacci levels and extra liquidity; volume on every break; how far from price a block keeps extending.
Panel: show or hide, language, position.
DRAWING BEHAVIOR AND LIMITATIONS
- All events are calculated on closed bars only.
- A break is finalized one bar after it closes, because the volume check needs the third candle.
- A swing is accepted after 2 closed bars with no new extreme and at least one candle closing beyond the opposite end of the candle before it. Swing points, sweeps and break lines are therefore drawn back in time on the bar that confirms them.
- Fibonacci levels of a cancelled or recalibrated setup are deleted from the chart.
- Blocks further than the chosen ATR distance from price stop extending to keep the chart scale readable.
- TradingView keeps the most recent 500 lines, boxes and labels, so older drawings disappear on long histories.
- The panel counts are a simple historical tally on the loaded bars. They exclude spread, commission and slippage. When a stop and target are touched in the same candle the stop is counted first. They are not a forecast, and they change with the symbol and the amount of history.
This script is an analysis tool for education. It does not predict price and it is not financial advice. Past behavior does not indicate future results.
--------------------------------------------------
HTF 5+1 | Sattam (العربية)
مؤشر HTF 5+1 قائمة تحقق لحركة السعر مبنية على قواعد ومصممة لفريم 4 ساعات. يتبع تسلسلاً واحداً: كسر الهيكل، ثم سحب السيولة، ثم فجوة الحجم، ثم الأوردر بلوك، ثم حد فيبوناتشي، مع تأكيد سادس اختياري للسيولة الإضافية. لا يظهر الإعداد إلا إذا اجتمعت الخطوات الأربع الأولى في الحركة نفسها، ولا تظهر مستويات فيبوناتشي إلا بعد تشكل القمة أو القاع.
لماذا جمعت هذه العناصر
هذه الخطوات منهج واحد متسلسل وليست أدوات منفصلة على شارت واحد. الكسر يحدد الاتجاه، والسحب يبيّن أن الأوامر المتراكمة أُخذت قبل الكسر، وفجوة الحجم تبيّن أن الكسر حدث باندفاع، والأوردر بلوك يُحدَّد من الفجوة نفسها، ونطاق فيبوناتشي يقاس من النقطة التي أخذت السيولة. كل خطوة تعتمد على نتيجة التي قبلها. والمؤشر مكتوب من الصفر ولا يستدعي أي سكربت آخر.
1. كسر الهيكل
يلزم أن يغلق جسم الشمعة وراء آخر قمة أو قاع هيكلي، والفتيل وحده لا يعد كسراً. يكتب على الكسر bos، وإذا لم توجد فجوة حجم يكتب no volume bos. وقد يكون الكسر استمراراً للاتجاه أو انعكاساً له.
2. سحب السيولة
يتحقق السحب عندما يتجاوز السعر النقطة الهيكلية التي صنعت آخر كسر، ثم يكسر الهيكل مرة أخرى في الاتجاه الأصلي. يرسم السحب بسهم عند تأكده بذلك الكسر. وتوضع علامة PSL للقاع المحمي أو PSH للقمة المحمية على النقطة التي أخذت السيولة عندما يكون الإعداد صالحاً.
ويعالج المؤشر أيضاً هذه الحالات:
- كسر معاكس بحجم: يعد انعكاساً، ويتحول الكسر السابق إلى sweep.
- كسر معاكس بدون حجم: يعد سحباً ويبقى الاتجاه. والكسر المعاكس الثاني على التوالي يغيّر الاتجاه ولو بدون حجم، لكنه لا يكوّن إعداداً بدون حجم.
- فتيل وراء آخر مستوى بدون إغلاق، يتبعه كسر النقطة الفرعية بحجم: يعد سحباً وانعكاساً.
- سحب نقطة فرعية فشلت في كسر الهيكل: احتماله أقل، ويكتب عليه sweep M، ويشترط الحجم.
3. فجوة الحجم
الحجم هنا فجوة سعرية وليس حجم التداول. تتحقق عندما لا يتداخل أعلى الشمعة الأولى مع أسفل الشمعة الثالثة في الدفعة الصاعدة، والعكس في الهابطة. تحددها خطوط حمراء. وVolume x3 تعني ثلاث فجوات متتالية، وVolume, gap stop تعني فجوة واحدة تلاها تداخل، وكلاهما معلومة فقط ولا يغيّر صلاحية الإعداد. والكسر بلا فجوة لا يكوّن أوردر بلوك ولا إعداداً.
4. الأوردر بلوك
الأوردر بلوك هو آخر شمعة قبل دفعة الحجم، أياً كان لونها. وإذا تجاوز فتيل أول شمعة حجم تلك الشمعة باتجاه الدفعة، يوضع البلوك على هذا الفتيل، ويقاس الحجم من جسم تلك الشمعة إلى الشمعة التالية. والبلوك يحتسب مرة واحدة، فيتوقف امتداده عند أول لمسة.
5. حد فيبوناتشي
يمتد النطاق من النقطة المحمية عند المستوى 1 إلى نقطة التراجع عند المستوى 0. يوضع الحد عند 0.71، والوقف عند 1، والهدف عند 0، أي نحو 2.45 ضعف المخاطرة هندسياً. والحرف M بجانب المستوى يعني أن الإعداد من سحب متوسط الاحتمال.
إذا حدث كسر جديد قبل لمس الحد، تحذف المستويات وتعاد على النقطة الجديدة. والإعداد الصالح الجديد يحل محل الحد غير الملموس في الجهة نفسها. وإذا كُسر المستوى 1 أثناء انتظار النقطة يلغى الإعداد. وإذا كان السعر قد تجاوز 0.71 عند تأكيد النقطة فلا يوضع حد، وتعرض اللوحة «فات مستوى الدخول».
ويوجد حد ثانٍ اختياري على أقرب أوردر بلوك غير مخفف بعد 0.71، بنفس الوقف وهدف 2R. إذا طابقت حافة البلوك القريبة مستوى 0.71 ينتقل الحد إلى 50% من البلوك، وإذا طابق منتصف البلوك مستوى 0.71 يوضع الحدان على المستوى. وهذا الحد يظهر في اللوحة والتنبيهات فقط وليس له رسم.
6. السيولة الإضافية (+1، اختيارية)
يبقى الإعداد صالحاً بدون هذه الخطوة. يبحث المؤشر عن سيولة متراكمة بين الدخول والهدف، من الأضعف إلى الأقوى: MNR وهو انعكاس بدون تخفيف البلوك، ثم القمم أو القيعان المتساوية، ثم سيولة خط الاتجاه.
الإعدادات الداخلية (مطفأة افتراضياً)
أثناء انتظار الحد الأساسي، يمكن للمؤشر البحث عن إعدادات عكس الاتجاه داخل التراجع بطول نقاط أقصر. تحتاج الخطوات نفسها، ويكتب عليها ibos باللون الأزرق، واحتمالها أقل لأنها عكس الاتجاه الأساسي.
طريقة الاستخدام
استخدمه على فريم 4 ساعات، وتظهر اللوحة تنبيهاً على أي فريم آخر. اقرأ اللوحة من الأعلى إلى الأسفل: يجب اكتمال الصفوف من 1 إلى 5 قبل وجود الحد، و+1 تأكيد إضافي. وتحديد الدخول والمخاطرة وحجم المركز قرارك أنت. وتتوفر تنبيهات عند وضع الحد، وعند تنفيذه، وعند الوصول إلى الوقف أو الهدف.
الإعدادات
الهيكل: شموع تأكيد القمة والقاع، والسحب متوسط الاحتمال، والإعدادات الداخلية، وشموع الهيكل الداخلي.
الدخول: مستوى الدخول، والحد الثاني على أقرب بلوك، وهدف حد البلوك، وسماحية تطابق البلوك، وشموع نقاط السيولة، وسماحية القمم والقيعان المتساوية.
الرسم: إظهار أو إخفاء الكسور والسحب وفجوات الحجم والبلوكات ومستويات فيبوناتشي والسيولة الإضافية، والحجم على كل كسر، والمسافة التي يستمر عندها امتداد البلوك.
اللوحة: الإظهار، واللغة، والموضع.
سلوك الرسم والقيود
- كل الأحداث تحسب على الشموع المغلقة فقط.
- يُحسم الكسر بعد شمعة واحدة من إغلاقه، لأن فحص الحجم يحتاج الشمعة الثالثة.
- تعتمد النقطة بعد شمعتين مغلقتين بلا قمة أو قاع جديد، وبشرط إغلاق شمعة واحدة على الأقل وراء الطرف المقابل للشمعة التي قبلها. لذلك تُرسم النقاط والسحب وخطوط الكسر إلى الخلف عند الشمعة التي تؤكدها.
- تحذف مستويات فيبوناتشي للإعداد الملغى أو المعاد ضبطه من الشارت.
- البلوك الأبعد عن السعر من مسافة ATR المختارة يتوقف عن الامتداد للحفاظ على وضوح مقياس الشارت.
- يحتفظ TradingView بآخر 500 خط وصندوق وليبل، فتختفي الرسوم الأقدم في التاريخ الطويل.
- أرقام اللوحة إحصاء تاريخي بسيط للشموع المحملة، لا يشمل السبريد والعمولة والانزلاق. وعند لمس الوقف والهدف في الشمعة نفسها يحتسب الوقف أولاً. وهي ليست توقعاً، وتتغير حسب الرمز وطول التاريخ.
هذا المؤشر أداة تحليل تعليمية، لا يتنبأ بالسعر وليس نصيحة مالية. والسلوك السابق لا يدل على النتائج المستقبلية.

免責聲明
這些資訊和出版物並非旨在提供,也不構成TradingView提供或認可的任何形式的財務、投資、交易或其他類型的建議或推薦。請閱讀使用條款以了解更多資訊。