OPEN-SOURCE SCRIPT
Sweep Entry Zone [Zen]
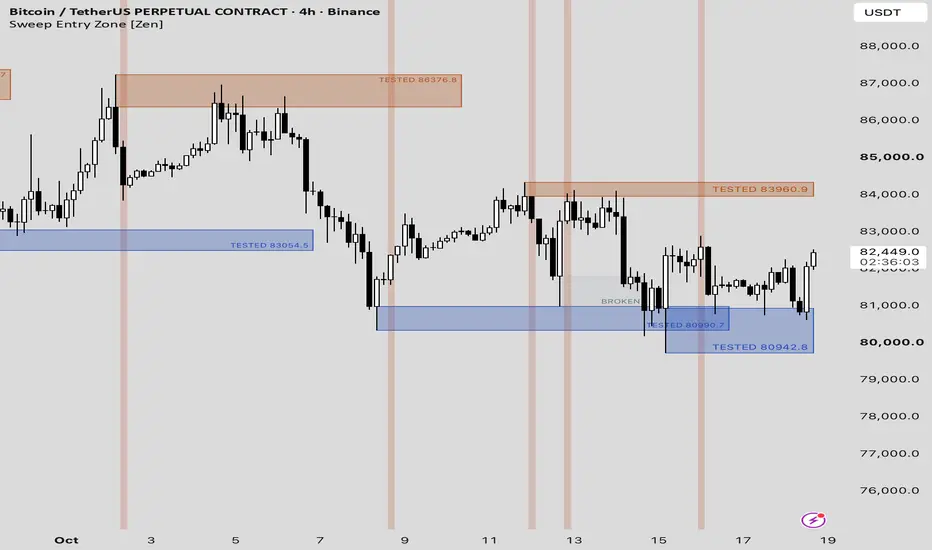
Sweep Entry Zone [Zen] draws one thing: the wick of a sweep candle as a zone, once a later candle has confirmed the sweep by a break of structure. When a candle sweeps the high of the previous 20 candles and closes back inside, the script waits for a later candle to close below the low of that sweep candle; when a candle sweeps the low, it waits for a close above its high. On that close a box is drawn back to the sweep candle, between the swept extreme and the near edge of the sweep candle's body. From then on the box reports what the price did with it: untested, tested (a wick came back into it) or broken (a candle closed beyond its far edge). Nothing is drawn until the break of structure has closed.
The 20-candle pool and the 48-candle zone life are default settings and can be changed in Inputs.
WHAT IS DIFFERENT HERE
Pools and sweeps are standard building blocks, and the same 20-candle pool and sweep rule is used in my other open-source scripts. What this script adds is a zone fixed by the sweep candle itself and drawn only after the break of structure:
- the zone is not a chosen level: its edges are the extreme and the body of the sweep candle, so every confirmed sweep has exactly one zone that was known at the moment of the sweep;
- the zone exists only after a break of structure, decided by one close: below the low of the sweep candle after a high sweep, above its high after a low sweep;
- the zone has three states and nothing else is measured: untested, tested by a wick, broken by a close. No entry, no stop, no position is modelled, and the script does not place, suggest or rate entries; "entry" in the name is the common name for such an area.
It is not a version of my other sweep scripts. Sweep Target Hit [Zen] measures whether the price reached the opposite pool (its box spans the path from the sweep candle to that pool); Sweep Volume Shock [Zen] classifies sweeps by volume; Sweep Hour Heatmap [Zen] counts them by hour; Sweep Lead Lag [Zen] groups basket sweeps into waves; Cross-Exchange Sweep [Zen] checks a sweep against other exchanges; Liquidity Sweep Breadth [Zen] counts basket coins that swept on one candle. None of them draws the range of the sweep candle itself. Unlike Liquidity Zones [Zen], which plots the nearest unswept swing levels and marks the grabs on them, this script plots no levels at all: its only drawings are the zone box and a background mark on the candle that confirmed it, and only after a break of structure.
HOW IT WORKS
- Pool: the highest high and the lowest low of the previous 20 closed candles. The first 20 candles of the chart have no pool.
- Sweep: a closed candle whose wick goes beyond the pool and whose close comes back to or inside it (high above the high pool with a close at or below it; low below the low pool with a close at or above it). A candle that sweeps both pools is skipped.
- Waiting for the break: after a high sweep the script waits for a candle that closes below the low of the sweep candle; after a low sweep, for a close above its high. One sweep is waiting per side; a new sweep on the same side replaces the waiting one. The wait is cancelled if the price goes beyond the extreme of the sweep candle first (above its high after a high sweep, below its low after a low sweep), or if 48 candles pass without a break. A candle that both goes beyond the extreme and closes beyond the opposite end cancels: without intrabar data the order of the two is unknown, so the rule errs on the side of no zone.
- Zone: drawn on the close of the breaking candle, from the sweep candle to the right. After a high sweep it spans from the high of the sweep candle down to the top of its body; after a low sweep, from the low up to the bottom of its body. If the sweep candle has no gap between wick and body, the zone is one tick tall. The edge nearest to the price (the body side) is the price shown in the tag.
- Tested: from the candle after the break, the first candle whose wick reaches the zone (high at or above the lower edge of a zone above the price; low at or below the upper edge of a zone below it). The state is kept; later touches do not change it.
- Broken: a candle closes beyond the far edge of the zone, above the swept high or below the swept low. Checked before the test on the same candle, so a candle that closes through the zone counts as broken, not tested.
- Life: 48 candles after the break. After that the zone stops extending and keeps its last state. The same 48-candle setting is the longest wait for the break. 48 candles means 8 days on 4H, 2 days on 1H and 12 hours on 15m.
- Everything is decided on closed candles of the chart symbol only; no other symbol or timeframe is requested.
WHAT YOU SEE
- Box: from the sweep candle to the current candle while the zone is live, then frozen at the candle of its break or expiry. Orange after a high sweep (zone above the price), blue after a low sweep (zone below). Pale while untested, denser after a test.
- Tag inside the box, at its right end on the far edge: the price of the near edge while the zone is untested, "TESTED" with that price after the first touch; the tag gets smaller when the zone freezes.
- Broken zones: removed by default. With "Keep broken zones" on, the box turns grey, stops at the breaking candle and gets a small grey "BROKEN" tag.
- Background: the candle whose close drew the zone is marked with a soft background colour, so the zone and the candle that confirmed it are read together.
ALERTS
Every alert is evaluated on the close of a candle; create alerts with the frequency "Once per bar close".
- "Any alert() function call": one message per candle, for example "Zone set: high sweep | edge <price>", "Zone tested: low sweep | <price>" or "Zone broken: high sweep | <lower edge> – <upper edge>", followed by the ticker and timeframe; several events on one candle go into one message.
- Three alert conditions: "Zone set", "Zone tested" and "Zone broken", with the messages "Zone set on <ticker> <interval>" and so on.
- Use one of the two ways; if you create both, you get two messages for the same event.
HOW TO READ IT
- The zone is the wick of the sweep candle on the swept side: from its extreme to the near edge of its body. After the break of structure, a return to it is the question the script asks; tested means only that a wick came back, broken means a candle closed through it.
- Tested says nothing about what happened after the touch: no reaction, stop or profit is measured. The state alone is thin information; the price of the near edge and where on the chart the touch came carry more.
- The zone is a reference area after the fact, not a trade recommendation. This is context for your own analysis, not an entry signal.
INPUTS (defaults; all inputs are hidden from the status line)
- Pool length (candles): 20
- Zone life (candles): 48. One limit for two waits: how long a sweep waits for its break, and how long the zone stays live after it.
- Keep broken zones: off
REALTIME BEHAVIOUR AND LIMITS
- No repainting: every state changes only on a closed candle. The zone is drawn back to the sweep candle once the breaking candle closes and does not change after a reload. A live zone extends its right edge with each new candle and its state can still change until it freezes; nothing already decided is changed.
- The most recent 50 zones are kept, frozen ones included; older ones are removed. On low timeframes zones accumulate faster, so the chart shows a shorter history there.
- Nothing is drawn while a sweep is waiting for its break; a sweep that is never broken leaves no mark.
- The pool is taken from the chart symbol itself, so the script works on any symbol and timeframe; it was built and tested on crypto perpetuals.
- Built for standard candles. Heikin Ashi, Renko and other synthetic charts change the prices the script reads.
- Colours follow the chart background (light or dark).
Not financial advice.
開源腳本
秉持TradingView一貫精神,這個腳本的創作者將其設為開源,以便交易者檢視並驗證其功能。向作者致敬!您可以免費使用此腳本,但請注意,重新發佈代碼需遵守我們的社群規範。

Open-source: Untouched Levels [Zen] → tradingview.com/script/9cwR0ZIw-Untouched-Levels-Zen/ | Free: Liquidity Zones [Zen] → tradingview.com/script/aSdm5wX3-Liquidity-Zones-Zen/
免責聲明
這些資訊和出版物並非旨在提供,也不構成TradingView提供或認可的任何形式的財務、投資、交易或其他類型的建議或推薦。請閱讀使用條款以了解更多資訊。
開源腳本
秉持TradingView一貫精神,這個腳本的創作者將其設為開源,以便交易者檢視並驗證其功能。向作者致敬!您可以免費使用此腳本,但請注意,重新發佈代碼需遵守我們的社群規範。
Open-source: Untouched Levels [Zen] → tradingview.com/script/9cwR0ZIw-Untouched-Levels-Zen/ | Free: Liquidity Zones [Zen] → tradingview.com/script/aSdm5wX3-Liquidity-Zones-Zen/
免責聲明
這些資訊和出版物並非旨在提供,也不構成TradingView提供或認可的任何形式的財務、投資、交易或其他類型的建議或推薦。請閱讀使用條款以了解更多資訊。