OPEN-SOURCE SCRIPT
AetherEdge - Consensus Council
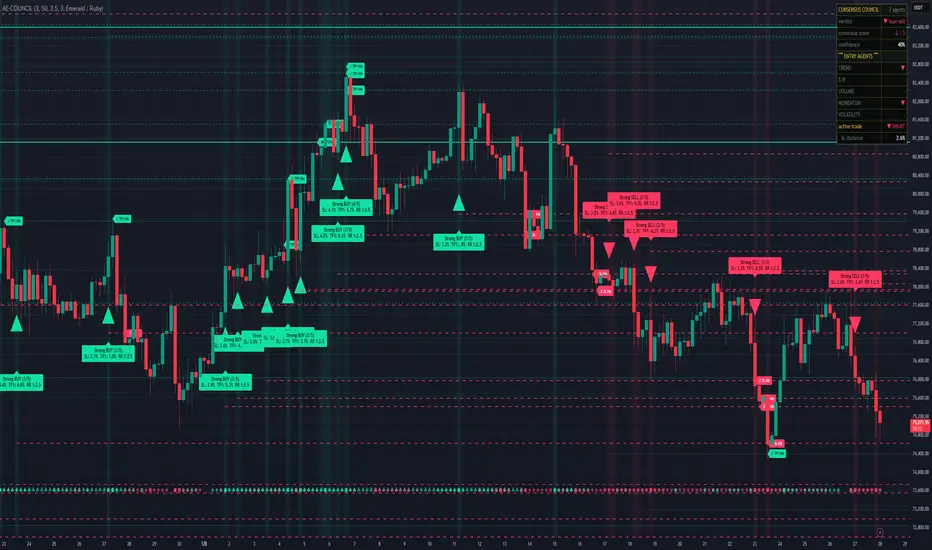
🖊️ Overview
AE-COUNCIL is a next-generation signal system where seven specialized agents collaborate. Five entry agents (Trend, S/R, Volume, Momentum, Volatility) vote on direction, and two risk-management agents (Risk Manager, Reward Manager) dynamically compute SL and three-tier TPs. Entry arrows print alongside SL/TP1/TP2/TP3 horizontal lines, and Hit labels fire automatically on touch — a fully automated decision system.
🔶 Key Features
7-agent collaborative design: 5 entry + 2 risk-management agents
Dynamic TP/SL: auto-computed from ATR, volatility regime, structure, momentum
3-tier TP: TP1/TP2/TP3 multi-target take-profit management
Strong-signal double-lock: requires threshold + Trend/S/R agreement
Auto Hit tracking: real-time labels on SL/TP touches
Optional trailing: SL trails only while Momentum agrees
Detailed dashboard: per-agent votes, consensus score, confidence, active trade status
Optional individual-agent display for full transparency
Background tint by consensus
Per-event alerts: Strong Buy/Sell/TP Hit/SL Hit
🧠 Technical Architecture
This is a consensus system of seven independent rule-based agents. Trend votes on 3-EMA stack ordering, ADX > 20, and HH/LL breaks. S/R votes when within 0.8 ATR of a confirmed swing (Order-Block proxy). Volume votes when volume z-score ≥ 1.0 and OBV direction matches candle direction. Momentum votes on RSI / MACD-histogram / Stochastic K alignment. Volatility identifies expansion/squeeze via Bollinger band width and votes only during expansion. Risk Manager computes SL = ATR × 1.5 × volMul × structMul; Reward Manager places TP2 = SL × RR × momentumBoost, TP1 from structure, TP3 = TP2 × 1.6. The Strong condition fires only when voteSum ≥ threshold AND Trend agrees AND S/R agrees or is neutral, structurally suppressing false signals. Active trades are tracked in parallel arrays, with SL/TP checks and trailing updated per bar.
⚙️ Recommended Settings & Tuning Guide
Tuned with crypto in mind. Consensus Threshold 3 (recommended) demands 3-of-5 alignment — raise to 4 for strictness or lower to 2 for laxness. Default RR Ratio 2.5 anchors TP2; choose 1.5 conservative or 4.0 aggressive. Use Trailing Stop helps in trend-following regimes but can exit early in ranges. Max TP Levels caps how many TP lines display. Show Individual Agents reveals each vote at the bottom of the chart for full transparency.
💡 How to Use in Practice
When a Strong arrow prints, read the summary bubble: "Strong BUY (4/5)" means four agents agreed, with SL/TP1/RR shown at a glance. The horizontal lines persist on the chart, so you can exit on SL approach, partial-take at TP1, hold to TP2/TP3 with intuitive staged exits. Check per-agent votes in the dashboard — if Momentum and Volume also align, conviction is higher; during a Squeeze, stand aside. The HUD's SL distance % tracks live risk on active trades.
⚠️ Important Notes
This is multi-agent-style, not true multi-agent reinforcement learning. Each agent is an independent classical rule; there is no inter-agent communication or deep-learning co-optimization. Volume Profile and Order Block are proxy implementations (volume z-score + OBV; confirmed swings as OB stand-in), not full versions. SL/TP levels are probabilistic estimates, not guaranteed touches. Trailing operates only while Momentum agrees, working best during sustained trends.
🚨 Disclaimer
This indicator is provided for educational and informational purposes only and does not constitute financial or investment advice. No signal or SL/TP level guarantees future profit, and past performance does not indicate future results. All trading decisions are made at your own risk.
AE-COUNCIL is a next-generation signal system where seven specialized agents collaborate. Five entry agents (Trend, S/R, Volume, Momentum, Volatility) vote on direction, and two risk-management agents (Risk Manager, Reward Manager) dynamically compute SL and three-tier TPs. Entry arrows print alongside SL/TP1/TP2/TP3 horizontal lines, and Hit labels fire automatically on touch — a fully automated decision system.
🔶 Key Features
7-agent collaborative design: 5 entry + 2 risk-management agents
Dynamic TP/SL: auto-computed from ATR, volatility regime, structure, momentum
3-tier TP: TP1/TP2/TP3 multi-target take-profit management
Strong-signal double-lock: requires threshold + Trend/S/R agreement
Auto Hit tracking: real-time labels on SL/TP touches
Optional trailing: SL trails only while Momentum agrees
Detailed dashboard: per-agent votes, consensus score, confidence, active trade status
Optional individual-agent display for full transparency
Background tint by consensus
Per-event alerts: Strong Buy/Sell/TP Hit/SL Hit
🧠 Technical Architecture
This is a consensus system of seven independent rule-based agents. Trend votes on 3-EMA stack ordering, ADX > 20, and HH/LL breaks. S/R votes when within 0.8 ATR of a confirmed swing (Order-Block proxy). Volume votes when volume z-score ≥ 1.0 and OBV direction matches candle direction. Momentum votes on RSI / MACD-histogram / Stochastic K alignment. Volatility identifies expansion/squeeze via Bollinger band width and votes only during expansion. Risk Manager computes SL = ATR × 1.5 × volMul × structMul; Reward Manager places TP2 = SL × RR × momentumBoost, TP1 from structure, TP3 = TP2 × 1.6. The Strong condition fires only when voteSum ≥ threshold AND Trend agrees AND S/R agrees or is neutral, structurally suppressing false signals. Active trades are tracked in parallel arrays, with SL/TP checks and trailing updated per bar.
⚙️ Recommended Settings & Tuning Guide
Tuned with crypto in mind. Consensus Threshold 3 (recommended) demands 3-of-5 alignment — raise to 4 for strictness or lower to 2 for laxness. Default RR Ratio 2.5 anchors TP2; choose 1.5 conservative or 4.0 aggressive. Use Trailing Stop helps in trend-following regimes but can exit early in ranges. Max TP Levels caps how many TP lines display. Show Individual Agents reveals each vote at the bottom of the chart for full transparency.
💡 How to Use in Practice
When a Strong arrow prints, read the summary bubble: "Strong BUY (4/5)" means four agents agreed, with SL/TP1/RR shown at a glance. The horizontal lines persist on the chart, so you can exit on SL approach, partial-take at TP1, hold to TP2/TP3 with intuitive staged exits. Check per-agent votes in the dashboard — if Momentum and Volume also align, conviction is higher; during a Squeeze, stand aside. The HUD's SL distance % tracks live risk on active trades.
⚠️ Important Notes
This is multi-agent-style, not true multi-agent reinforcement learning. Each agent is an independent classical rule; there is no inter-agent communication or deep-learning co-optimization. Volume Profile and Order Block are proxy implementations (volume z-score + OBV; confirmed swings as OB stand-in), not full versions. SL/TP levels are probabilistic estimates, not guaranteed touches. Trailing operates only while Momentum agrees, working best during sustained trends.
🚨 Disclaimer
This indicator is provided for educational and informational purposes only and does not constitute financial or investment advice. No signal or SL/TP level guarantees future profit, and past performance does not indicate future results. All trading decisions are made at your own risk.
開源腳本
秉持TradingView一貫精神,這個腳本的創作者將其設為開源,以便交易者檢視並驗證其功能。向作者致敬!您可以免費使用此腳本,但請注意,重新發佈代碼需遵守我們的社群規範。

免責聲明
這些資訊和出版物並非旨在提供,也不構成TradingView提供或認可的任何形式的財務、投資、交易或其他類型的建議或推薦。請閱讀使用條款以了解更多資訊。
開源腳本
秉持TradingView一貫精神,這個腳本的創作者將其設為開源,以便交易者檢視並驗證其功能。向作者致敬!您可以免費使用此腳本,但請注意,重新發佈代碼需遵守我們的社群規範。
免責聲明
這些資訊和出版物並非旨在提供,也不構成TradingView提供或認可的任何形式的財務、投資、交易或其他類型的建議或推薦。請閱讀使用條款以了解更多資訊。