OPEN-SOURCE SCRIPT
Bucket 3 Momentum
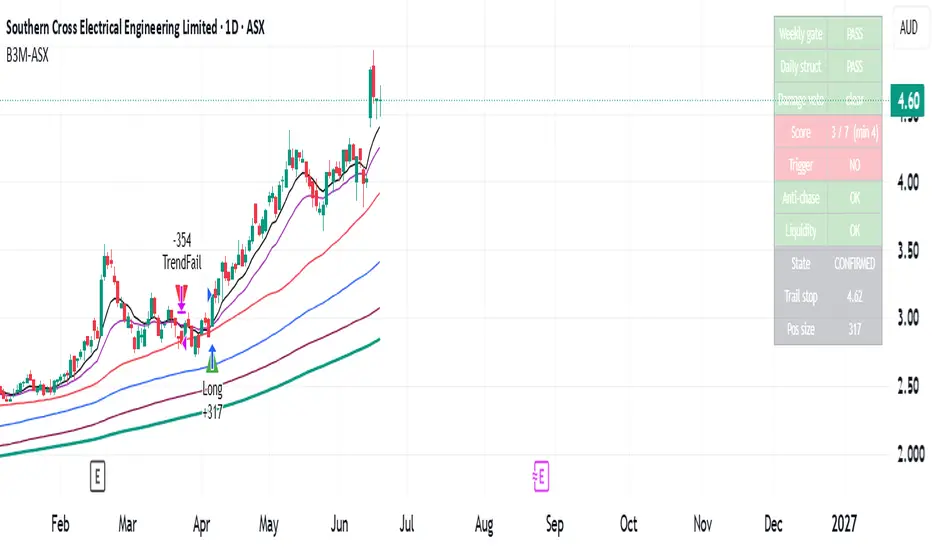
Bucket 3 Momentum
A backtestable daily-chart momentum strategy for ASX equities, built on a four-layer confirmation model: a trade fires only when the weekly trend grants permission, daily structure is intact, a price trigger confirms demand, and risk/extension checks pass.
The weekly layer is the gatekeeper — price above a rising 30-week SMA with healthy weekly RSI — so it won't buy dips in stocks that have quietly left a Stage-2 uptrend. The daily layer confirms the structure (price above the 50/150 DMAs, 50DMA flat-to-rising) with a damage veto for collapsing RSI, fresh 20-day lows, or bearish DMI. Entry triggers on a 5-day breakout with a strong close, but only once a tunable setup score is met (RSI curl + signal cross, fast-MACD turn, DMI recovery, improving RS vs XJO). An anti-chase filter blocks entries stretched too far above the 20EMA.
Positions are sized by defined risk (default 1.5% per trade), with the initial stop below the pullback swing low, floored at 1 ATR. Three exits execute: initial hard stop, a 1.5×ATR trailing stop that ratchets up only, and a structural trend-failure exit.
Built to be backtest-honest — weekly data uses the completed-bar pattern to avoid repaint/lookahead bias, structural decisions act on bar close, protective stops fill intrabar. An on-chart table shows each layer's status, live score, and current state. Tunable throughout; benchmarked against the XJO, so other universes need the benchmark and liquidity floor adjusted.
For education only — not financial advice. Past backtested performance does not guarantee future results.
A backtestable daily-chart momentum strategy for ASX equities, built on a four-layer confirmation model: a trade fires only when the weekly trend grants permission, daily structure is intact, a price trigger confirms demand, and risk/extension checks pass.
The weekly layer is the gatekeeper — price above a rising 30-week SMA with healthy weekly RSI — so it won't buy dips in stocks that have quietly left a Stage-2 uptrend. The daily layer confirms the structure (price above the 50/150 DMAs, 50DMA flat-to-rising) with a damage veto for collapsing RSI, fresh 20-day lows, or bearish DMI. Entry triggers on a 5-day breakout with a strong close, but only once a tunable setup score is met (RSI curl + signal cross, fast-MACD turn, DMI recovery, improving RS vs XJO). An anti-chase filter blocks entries stretched too far above the 20EMA.
Positions are sized by defined risk (default 1.5% per trade), with the initial stop below the pullback swing low, floored at 1 ATR. Three exits execute: initial hard stop, a 1.5×ATR trailing stop that ratchets up only, and a structural trend-failure exit.
Built to be backtest-honest — weekly data uses the completed-bar pattern to avoid repaint/lookahead bias, structural decisions act on bar close, protective stops fill intrabar. An on-chart table shows each layer's status, live score, and current state. Tunable throughout; benchmarked against the XJO, so other universes need the benchmark and liquidity floor adjusted.
For education only — not financial advice. Past backtested performance does not guarantee future results.
開源腳本
秉持TradingView一貫精神,這個腳本的創作者將其設為開源,以便交易者檢視並驗證其功能。向作者致敬!您可以免費使用此腳本,但請注意,重新發佈代碼需遵守我們的社群規範。

免責聲明
這些資訊和出版物並非旨在提供,也不構成TradingView提供或認可的任何形式的財務、投資、交易或其他類型的建議或推薦。請閱讀使用條款以了解更多資訊。
開源腳本
秉持TradingView一貫精神,這個腳本的創作者將其設為開源,以便交易者檢視並驗證其功能。向作者致敬!您可以免費使用此腳本,但請注意,重新發佈代碼需遵守我們的社群規範。
免責聲明
這些資訊和出版物並非旨在提供,也不構成TradingView提供或認可的任何形式的財務、投資、交易或其他類型的建議或推薦。請閱讀使用條款以了解更多資訊。