

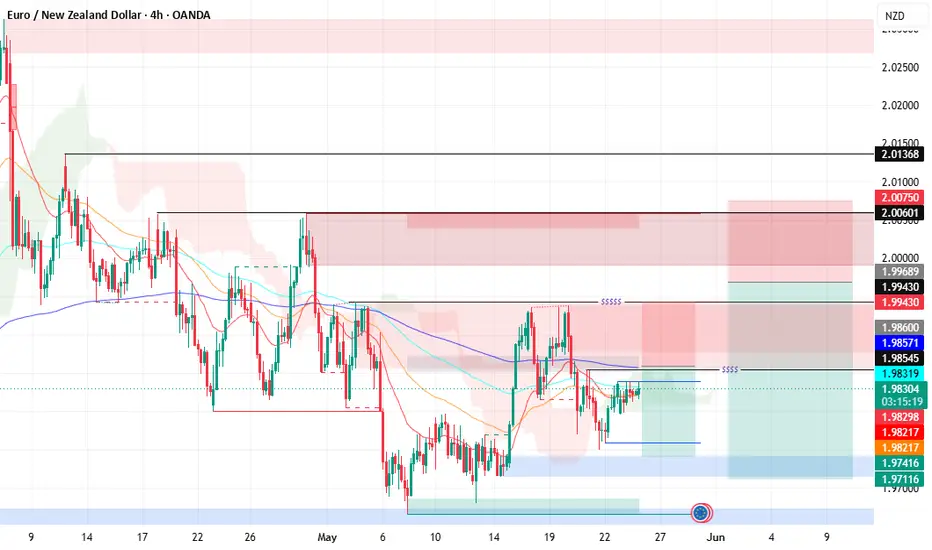
EUR/NZD has rallied ~250 pips from the May spike low at 1.9700 back into a dual-layer supply structure. Two sequenced short setups are active simultaneously.
⚡ SETUP 1 — Small Position (Near-term)
Entry: 1.9843–1.9943 | SL: 1.9990 | TP: 1.9822
R:R: ~2.0R | Captures the near-term $$$$$ cluster rejection
🔻 SETUP 2 — Big Position (Macro)
Entry: 1.9943–2.0050 | SL: 2.0117 | TP1: 1.9741 | TP2: 1.9711
R:R: ~4.2R | Full measured move back to spike origin demand zone
The macro supply zone at 1.9943–2.0050 is the exact origin of May's explosive breakdown. Price retesting it from below — with the $$$$$ liquidity cluster at the lower boundary — creates a high-probability institutional sell zone. Setup 1 exploits the near-term rejection while Setup 2 targets the full retracement to the 1.9711–1.9741 demand zone.
Confluences:
$$$$$ liquidity cluster at 1.9943 = Setup 1 trigger
Macro supply zone at 1.9943–2.0050 = prior breakdown origin
NZD broad strength across watchlist (NZDUSD, NZDCHF all relevant)
Clean measured move — rally from demand, short back to demand
Sequencing: Close Setup 1 at 1.9822 → use bearish confirmation to size into Setup 2 on any push into the full supply zone.
Invalidation: Setup 1 → 4H close above 1.9990. Setup 2 → 4H close above 2.0117.
⚡ SETUP 1 — Small Position (Near-term)
Entry: 1.9843–1.9943 | SL: 1.9990 | TP: 1.9822
R:R: ~2.0R | Captures the near-term $$$$$ cluster rejection
🔻 SETUP 2 — Big Position (Macro)
Entry: 1.9943–2.0050 | SL: 2.0117 | TP1: 1.9741 | TP2: 1.9711
R:R: ~4.2R | Full measured move back to spike origin demand zone
The macro supply zone at 1.9943–2.0050 is the exact origin of May's explosive breakdown. Price retesting it from below — with the $$$$$ liquidity cluster at the lower boundary — creates a high-probability institutional sell zone. Setup 1 exploits the near-term rejection while Setup 2 targets the full retracement to the 1.9711–1.9741 demand zone.
Confluences:
$$$$$ liquidity cluster at 1.9943 = Setup 1 trigger
Macro supply zone at 1.9943–2.0050 = prior breakdown origin
NZD broad strength across watchlist (NZDUSD, NZDCHF all relevant)
Clean measured move — rally from demand, short back to demand
Sequencing: Close Setup 1 at 1.9822 → use bearish confirmation to size into Setup 2 on any push into the full supply zone.
Invalidation: Setup 1 → 4H close above 1.9990. Setup 2 → 4H close above 2.0117.

Bài đăng liên quan
Thông báo miễn trừ trách nhiệm
Thông tin và các ấn phẩm này không nhằm mục đích, và không cấu thành, lời khuyên hoặc khuyến nghị về tài chính, đầu tư, giao dịch hay các loại khác do TradingView cung cấp hoặc xác nhận. Đọc thêm tại Điều khoản Sử dụng.
Bài đăng liên quan
Thông báo miễn trừ trách nhiệm
Thông tin và các ấn phẩm này không nhằm mục đích, và không cấu thành, lời khuyên hoặc khuyến nghị về tài chính, đầu tư, giao dịch hay các loại khác do TradingView cung cấp hoặc xác nhận. Đọc thêm tại Điều khoản Sử dụng.