
Gold has already answered one important question from yesterday.
Buyers did not disappear.
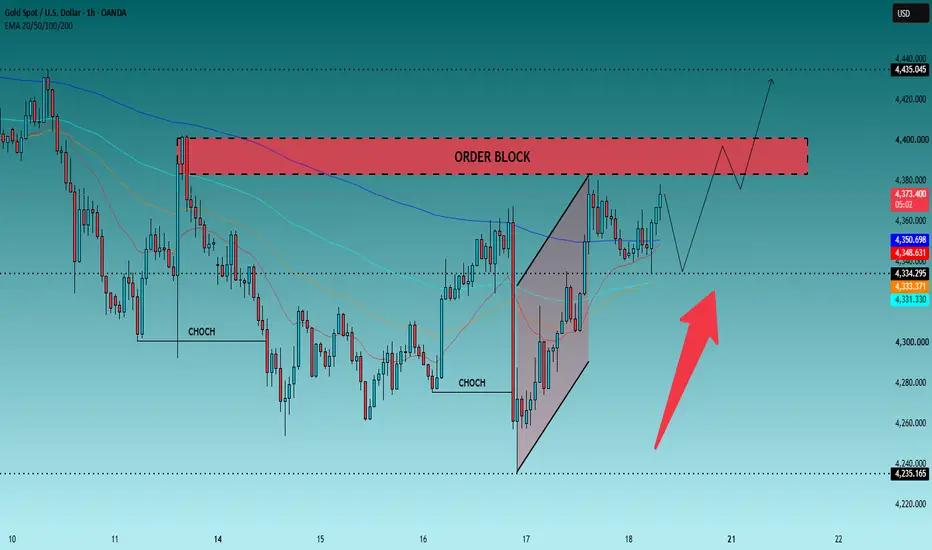
The recovery from the 4,260 area has now pushed price back toward 4,375, and the H1 chart looks considerably healthier than it did during the previous sell-off.
But there is a problem.
Gold has recovered directly into the place where sellers should be waiting.
The red zone around 4,380–4,400 is an H1 Order Block, and price is now standing just underneath it.
So today I am not interested in asking:
“Is Gold bullish or bearish?”
I think there is a better question:
What happens when Gold actually knocks on 4,400?
Because the answer could decide whether this recovery becomes a real continuation — or another expensive trap for late buyers.
Right now, buyers have momentum. They do not have permission.
Look at what has changed since the low near 4,260.
Gold recovered aggressively, broke away from the lower structure and is now trading above the cluster of short-term moving averages around 4,331–4,351.
That is constructive.
It tells me the H1 market is no longer behaving like sellers have complete freedom.
But price is approximately 4,374 as I write this.
That means buying immediately would mean buying almost directly into 4,380–4,400 supply.
I do not like that location.
The market has already travelled.
The easy part of the rebound is behind us.
Now buyers have to prove they can do something more difficult:
turn supply into support.
The trade I want most is not at 4,374
If Gold pushes into 4,380–4,400, breaks through it and gives us an H1 close above 4,400, I would not chase that breakout candle.
I would wait.
I want to see price come back toward the broken zone.
If 4,385–4,400 holds on the retest, the Order Block has failed to do its job.
That is my signal that buyers have earned access to the next section of the chart.
BUY — THE DOOR OPENS
Trigger: H1 close above 4,400 + successful retest
Entry: 4,390–4,400
SL: 4,372
TP1: 4,420
TP2: 4,435
TP3: 4,460
TP4: 4,480
This setup is intentionally late.
I am paying a higher price in exchange for confirmation.
And there is one target that deserves special attention:
4,435.
That level sits near the next major reference on the chart. If Gold reaches it after converting 4,400 into support, the H1 recovery will have done much more than simply bounce from 4,260.
It will have broken through the area sellers were supposed to protect.
But buyers have another route
A breakout is not the only way I would consider buying Gold today.
In fact, I would be interested if price moves in the opposite direction first.
The H1 moving averages are gathering around 4,331–4,351, while the chart also shows an important horizontal reference around 4,334.
That creates a potential reload area.
Imagine Gold gets rejected from the Order Block.
Price falls.
Late buyers panic.
Then Gold reaches approximately 4,335–4,350 and refuses to continue lower.
That would get my attention.
I specifically want to see price trade into this area and then produce an H1 recovery back above 4,350.
If that happens:
BUY — LET THE MARKET COME BACK TO US
Entry: 4,345–4,352 after H1 recovery above 4,350
SL: 4,325
TP1: 4,375
TP2: 4,390
TP3: 4,400
TP4: 4,435
This is very different from blindly placing a buy order at an EMA.
The zone is only the location.
The recovery is the trigger.
That distinction matters, especially for newer traders.
Now give the sellers their turn
The red Order Block is on the chart for a reason.
If sellers still control this area, 4,380–4,400 is where they should show it.
So I will also watch for a false breakout.
Gold can trade above 4,380.
It can even briefly approach 4,400.
That alone does not invalidate the sellers.
What matters is where the H1 candle finishes.
If price trades into 4,385–4,400 but an H1 candle closes back below approximately 4,378, I have evidence that buyers entered the room and were immediately pushed back out.
That gives me a completely different trade.
SELL — THE DOOR SLAMS SHUT
Entry: 4,375–4,382 after rejection is confirmed
SL: 4,405
TP1: 4,350
TP2: 4,334
TP3: 4,310
TP4: 4,280
I would not sell simply because price touches the red rectangle.
I want the rejection first.
Otherwise, I could be selling directly into a breakout.
4,334 is where today's story can turn ugly
There is another scenario that deserves attention.
Suppose Gold rejects 4,400, falls through the EMA cluster and produces an H1 close below 4,330.
At that point, something important has changed.
The moving averages are no longer acting as a platform.
The recent bullish recovery has lost its immediate support.
I would then wait for a rebound toward 4,330–4,340.
If that rebound cannot reclaim the area, I would look lower.
SELL — THE RECOVERY LOSES ITS ENGINE
Entry: 4,330–4,338 after bearish retest
SL: 4,355
TP1: 4,305
TP2: 4,280
TP3: 4,260
TP4: 4,235
Notice that 4,235 is not my first target.
There are several places where buyers could react before Gold ever reaches it.
That is why the position is managed through intermediate targets rather than assuming price will travel straight down.
There is one area where I would do absolutely nothing
Roughly 4,355–4,375.
That may sound strange because this is close to where Gold is trading now.
But that is exactly the point.
From here, price is too close to resistance for me to love a BUY, while sellers have not yet produced the rejection I need for a SELL.
There is nothing wrong with having no trade in the middle.
Sometimes the chart becomes much clearer after travelling another $20.
4,400 can confirm the breakout.
4,380–4,400 can produce the rejection.
4,335–4,350 can offer the pullback.
Those locations give me information.
The middle gives me temptation.
So, who has the advantage?
At this moment, I give buyers a short-term advantage because Gold has recovered from 4,260 and is holding above its H1 EMA cluster.
But buyers are approaching their examination.
The Order Block around 4,380–4,400 is the exam paper.
A rejection sends Gold back toward 4,350 and 4,334.
A loss of 4,330 puts 4,305, 4,280 and 4,260 back into play.
But an H1 breakout above 4,400, followed by a successful retest, changes the conversation completely.
Then I am looking toward 4,420, 4,435 and potentially 4,460–4,480.
So I am not choosing BUY or SELL before Gold reaches the decision area.
I am letting 4,400 choose for me.
If Gold reaches 4,400 today, what happens first: rejection or breakout?
Buyers did not disappear.
The recovery from the 4,260 area has now pushed price back toward 4,375, and the H1 chart looks considerably healthier than it did during the previous sell-off.
But there is a problem.
Gold has recovered directly into the place where sellers should be waiting.
The red zone around 4,380–4,400 is an H1 Order Block, and price is now standing just underneath it.
So today I am not interested in asking:
“Is Gold bullish or bearish?”
I think there is a better question:
What happens when Gold actually knocks on 4,400?
Because the answer could decide whether this recovery becomes a real continuation — or another expensive trap for late buyers.
Right now, buyers have momentum. They do not have permission.
Look at what has changed since the low near 4,260.
Gold recovered aggressively, broke away from the lower structure and is now trading above the cluster of short-term moving averages around 4,331–4,351.
That is constructive.
It tells me the H1 market is no longer behaving like sellers have complete freedom.
But price is approximately 4,374 as I write this.
That means buying immediately would mean buying almost directly into 4,380–4,400 supply.
I do not like that location.
The market has already travelled.
The easy part of the rebound is behind us.
Now buyers have to prove they can do something more difficult:
turn supply into support.
The trade I want most is not at 4,374
If Gold pushes into 4,380–4,400, breaks through it and gives us an H1 close above 4,400, I would not chase that breakout candle.
I would wait.
I want to see price come back toward the broken zone.
If 4,385–4,400 holds on the retest, the Order Block has failed to do its job.
That is my signal that buyers have earned access to the next section of the chart.
BUY — THE DOOR OPENS
Trigger: H1 close above 4,400 + successful retest
Entry: 4,390–4,400
SL: 4,372
TP1: 4,420
TP2: 4,435
TP3: 4,460
TP4: 4,480
This setup is intentionally late.
I am paying a higher price in exchange for confirmation.
And there is one target that deserves special attention:
4,435.
That level sits near the next major reference on the chart. If Gold reaches it after converting 4,400 into support, the H1 recovery will have done much more than simply bounce from 4,260.
It will have broken through the area sellers were supposed to protect.
But buyers have another route
A breakout is not the only way I would consider buying Gold today.
In fact, I would be interested if price moves in the opposite direction first.
The H1 moving averages are gathering around 4,331–4,351, while the chart also shows an important horizontal reference around 4,334.
That creates a potential reload area.
Imagine Gold gets rejected from the Order Block.
Price falls.
Late buyers panic.
Then Gold reaches approximately 4,335–4,350 and refuses to continue lower.
That would get my attention.
I specifically want to see price trade into this area and then produce an H1 recovery back above 4,350.
If that happens:
BUY — LET THE MARKET COME BACK TO US
Entry: 4,345–4,352 after H1 recovery above 4,350
SL: 4,325
TP1: 4,375
TP2: 4,390
TP3: 4,400
TP4: 4,435
This is very different from blindly placing a buy order at an EMA.
The zone is only the location.
The recovery is the trigger.
That distinction matters, especially for newer traders.
Now give the sellers their turn
The red Order Block is on the chart for a reason.
If sellers still control this area, 4,380–4,400 is where they should show it.
So I will also watch for a false breakout.
Gold can trade above 4,380.
It can even briefly approach 4,400.
That alone does not invalidate the sellers.
What matters is where the H1 candle finishes.
If price trades into 4,385–4,400 but an H1 candle closes back below approximately 4,378, I have evidence that buyers entered the room and were immediately pushed back out.
That gives me a completely different trade.
SELL — THE DOOR SLAMS SHUT
Entry: 4,375–4,382 after rejection is confirmed
SL: 4,405
TP1: 4,350
TP2: 4,334
TP3: 4,310
TP4: 4,280
I would not sell simply because price touches the red rectangle.
I want the rejection first.
Otherwise, I could be selling directly into a breakout.
4,334 is where today's story can turn ugly
There is another scenario that deserves attention.
Suppose Gold rejects 4,400, falls through the EMA cluster and produces an H1 close below 4,330.
At that point, something important has changed.
The moving averages are no longer acting as a platform.
The recent bullish recovery has lost its immediate support.
I would then wait for a rebound toward 4,330–4,340.
If that rebound cannot reclaim the area, I would look lower.
SELL — THE RECOVERY LOSES ITS ENGINE
Entry: 4,330–4,338 after bearish retest
SL: 4,355
TP1: 4,305
TP2: 4,280
TP3: 4,260
TP4: 4,235
Notice that 4,235 is not my first target.
There are several places where buyers could react before Gold ever reaches it.
That is why the position is managed through intermediate targets rather than assuming price will travel straight down.
There is one area where I would do absolutely nothing
Roughly 4,355–4,375.
That may sound strange because this is close to where Gold is trading now.
But that is exactly the point.
From here, price is too close to resistance for me to love a BUY, while sellers have not yet produced the rejection I need for a SELL.
There is nothing wrong with having no trade in the middle.
Sometimes the chart becomes much clearer after travelling another $20.
4,400 can confirm the breakout.
4,380–4,400 can produce the rejection.
4,335–4,350 can offer the pullback.
Those locations give me information.
The middle gives me temptation.
So, who has the advantage?
At this moment, I give buyers a short-term advantage because Gold has recovered from 4,260 and is holding above its H1 EMA cluster.
But buyers are approaching their examination.
The Order Block around 4,380–4,400 is the exam paper.
A rejection sends Gold back toward 4,350 and 4,334.
A loss of 4,330 puts 4,305, 4,280 and 4,260 back into play.
But an H1 breakout above 4,400, followed by a successful retest, changes the conversation completely.
Then I am looking toward 4,420, 4,435 and potentially 4,460–4,480.
So I am not choosing BUY or SELL before Gold reaches the decision area.
I am letting 4,400 choose for me.
If Gold reaches 4,400 today, what happens first: rejection or breakout?
Giao dịch đang hoạt động
+240pips

⚜️ Daily 4 - 6 Swing SIGNALS
⚜️ Daily 9 - 15 Scalping SIGNALS
⚜️ SMC - ICT | Document and Real Trade Logic
⚜️ Forex & Crypto & Gold | SIGNALS
Discussion Platform: t.me/+7toh_D6B6ew5MWQ1
⚜️ Daily 9 - 15 Scalping SIGNALS
⚜️ SMC - ICT | Document and Real Trade Logic
⚜️ Forex & Crypto & Gold | SIGNALS
Discussion Platform: t.me/+7toh_D6B6ew5MWQ1
Thông báo miễn trừ trách nhiệm
Thông tin và các ấn phẩm này không nhằm mục đích, và không cấu thành, lời khuyên hoặc khuyến nghị về tài chính, đầu tư, giao dịch hay các loại khác do TradingView cung cấp hoặc xác nhận. Đọc thêm tại Điều khoản Sử dụng.
⚜️ Daily 4 - 6 Swing SIGNALS
⚜️ Daily 9 - 15 Scalping SIGNALS
⚜️ SMC - ICT | Document and Real Trade Logic
⚜️ Forex & Crypto & Gold | SIGNALS
Discussion Platform: t.me/+7toh_D6B6ew5MWQ1
⚜️ Daily 9 - 15 Scalping SIGNALS
⚜️ SMC - ICT | Document and Real Trade Logic
⚜️ Forex & Crypto & Gold | SIGNALS
Discussion Platform: t.me/+7toh_D6B6ew5MWQ1
Thông báo miễn trừ trách nhiệm
Thông tin và các ấn phẩm này không nhằm mục đích, và không cấu thành, lời khuyên hoặc khuyến nghị về tài chính, đầu tư, giao dịch hay các loại khác do TradingView cung cấp hoặc xác nhận. Đọc thêm tại Điều khoản Sử dụng.