OPEN-SOURCE SCRIPT
Edo Mitigation Blocks
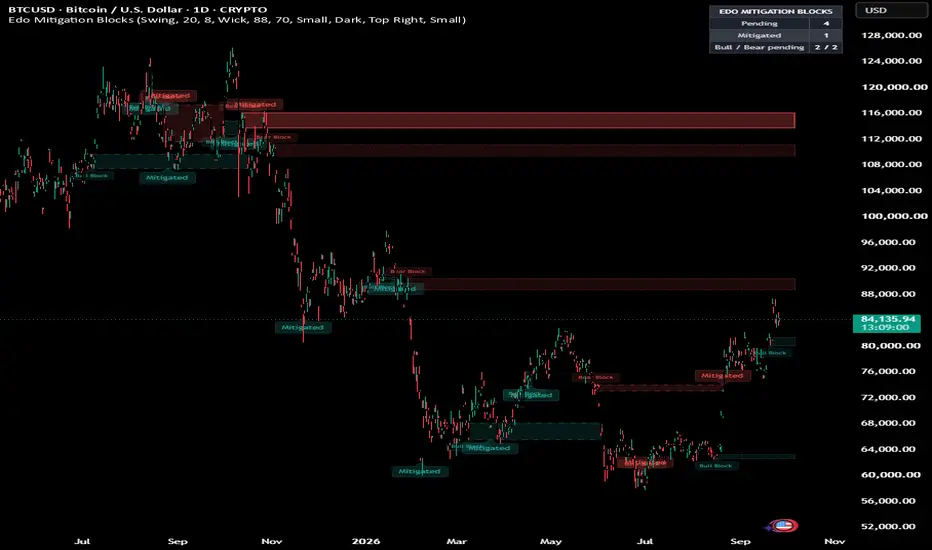
Edo Mitigation Blocks — Marks the Order Blocks That Originate an Impulse and Tracks Their Retest Through Pending, Mitigated and Broken


When a large institutional order moves price, it is rarely filled all at once. Part of it is left over in the origin zone — the order block — and price tends to return later to that zone to complete it. That return is mitigation, and it is one of the most-watched reaction points in structure analysis: the moment the institutional interest that started the move makes itself present again, and where price so often bounces from demand or rejects from supply.
Edo Mitigation Blocks makes that cycle visible. It draws each order block the moment it forms, dimmed, as a zone still pending its retest, and highlights it as mitigated the instant price returns into it. From there it tracks whether the zone holds or is lost, following each block through three states — Pending, Mitigated and Broken — all validated per the chosen trigger so the indicator does not repaint. The zone, its mitigation and its break are decided inside the indicator itself, on the chart's own series, with nothing else required.
ORDER BLOCK AND MITIGATION
An order block is the last opposite candle before an impulse that breaks structure: the last bearish candle before a bullish break marks the demand zone, the last bullish candle before a bearish break marks the supply zone. The indicator draws it immediately as a pending block, extended to the right. Mitigation is price returning into that zone to fill the orders that were left over: a bullish block is mitigated when price drops back into demand, a bearish block when price rises back into supply. That retest is the indicator's central event.
BULL AND BEAR BLOCKS
A Bull Block is a demand zone, drawn in teal below the impulse that started from it; a Bear Block is a supply zone, drawn in red above its impulse. Each block is a box over the range of the origin candle, labelled Bull Block or Bear Block, dimmed while pending and highlighted with a "Mitigated" label once price returns to it. The teal/red color code separates demand from supply at a glance.
PENDING, MITIGATED AND BROKEN
Each block lives in one of three states, evaluated on every closed candle. Pending: freshly formed, dimmed, with a dotted border, extending to the right and awaiting its retest. Mitigated: price has returned to the zone per the trigger — the box is highlighted, the border turns solid and thicker, and a "Mitigated" label is added. Broken: after being mitigated, price closes through the opposite side of the zone — a Bull Block below its base, a Bear Block above its top — the border turns dashed and the box stops extending. A broken block has lost its relevance; only the most recent blocks per side are kept, up to Max Blocks per side (8 by default).
STRUCTURE PROFILE AND MITIGATION TRIGGER
The Structure Profile sets the swing sensitivity that defines a break: Scalper (5 bars each side) for short-term blocks on low timeframes, Swing (10 bars, the default) for the balanced 4H and daily read, and Long Term (21 bars) for the major blocks on weekly and higher horizons. The Mitigation trigger decides what counts as a return: in Wick mode a wick into the zone is enough — more sensitive, flagging the retest sooner; in Close mode a candle must close inside the zone — stricter, confirming only with a close. The Impulse Lookback (20 by default) sets how many bars back the indicator searches for the origin candle.
INFORMATION PANEL
A compact panel under the indicator header shows the number of pending blocks, the number of mitigated ones and the breakdown of pending blocks per side (Bull / Bear). The pending-per-side row is the most operational — more Bull pending means demand zones awaiting a retest below, more Bear pending supply zones above. The panel sits in any of the four chart corners (Top Right by default), comes in three sizes (Tiny / Small / Normal) and two themes (Dark / Light), and can be hidden entirely. To keep the calculation light, it is drawn only on the last bar.
NO REPAINTING
Blocks are built on confirmed pivots and mitigations and breaks are validated per the chosen trigger, so a zone never appears or disappears without cause. There are no higher-timeframe functions: all logic runs on the current chart timeframe. For a multi-timeframe read, apply it on several charts at once.
CONFIGURATION
The inputs are grouped by block. Structure sets the profile, the impulse lookback, the maximum blocks per side and the mitigation trigger. Style exposes the bullish and bearish colors, the pending and mitigated opacities, the label size and the Dark/Light theme. Panel controls panel visibility, position and size. The defaults are calibrated to work without adjustment on stocks, crypto, forex, indices and futures, on any timeframe — the inputs most users touch are the Structure Profile and the Mitigation trigger.
ALERTS
Three predefined alerts cover the block's life: Bullish Block mitigated and Bearish Block mitigated fire when price returns to a demand or supply zone and mitigates it — the reaction alerts; Block broken fires when an already-mitigated block is lost. All alerts fire per the chosen trigger, consistent with the indicator's anti-repaint validation.
HOW TO READ IT
Use a pending block as a target: a Bull Block below is a demand zone price can drop to seek, a Bear Block above a supply target, and the panel's pending row flags where they are. Watch the mitigation — when price returns and mitigates a block, the reaction confirms whether the zone keeps its strength, and a clean bounce from demand or rejection from supply validates it. Read the break too — a mitigated block closed through has been consumed, and recognizing it avoids leaning on a zone that no longer reacts. Trade blocks in confluence with the broader structure, and combine with active order block analysis and breaker blocks, the blocks that fail and invert.
OPEN SOURCE
Edo Mitigation Blocks is published as a free open source indicator. The full Pine Script is publicly accessible on TradingView for study, adaptation and integration into any workflow. Part of the Edolab Markets free tools ecosystem, all publicly available on TradingView.
This indicator is a technical analysis tool for educational and informational purposes only. It does not generate automatic buy or sell signals and should not be considered financial advice. Trading financial markets involves significant risk of capital loss. Past performance does not guarantee future results. Always use proper risk management.
When a large institutional order moves price, it is rarely filled all at once. Part of it is left over in the origin zone — the order block — and price tends to return later to that zone to complete it. That return is mitigation, and it is one of the most-watched reaction points in structure analysis: the moment the institutional interest that started the move makes itself present again, and where price so often bounces from demand or rejects from supply.
Edo Mitigation Blocks makes that cycle visible. It draws each order block the moment it forms, dimmed, as a zone still pending its retest, and highlights it as mitigated the instant price returns into it. From there it tracks whether the zone holds or is lost, following each block through three states — Pending, Mitigated and Broken — all validated per the chosen trigger so the indicator does not repaint. The zone, its mitigation and its break are decided inside the indicator itself, on the chart's own series, with nothing else required.
ORDER BLOCK AND MITIGATION
An order block is the last opposite candle before an impulse that breaks structure: the last bearish candle before a bullish break marks the demand zone, the last bullish candle before a bearish break marks the supply zone. The indicator draws it immediately as a pending block, extended to the right. Mitigation is price returning into that zone to fill the orders that were left over: a bullish block is mitigated when price drops back into demand, a bearish block when price rises back into supply. That retest is the indicator's central event.
BULL AND BEAR BLOCKS
A Bull Block is a demand zone, drawn in teal below the impulse that started from it; a Bear Block is a supply zone, drawn in red above its impulse. Each block is a box over the range of the origin candle, labelled Bull Block or Bear Block, dimmed while pending and highlighted with a "Mitigated" label once price returns to it. The teal/red color code separates demand from supply at a glance.
PENDING, MITIGATED AND BROKEN
Each block lives in one of three states, evaluated on every closed candle. Pending: freshly formed, dimmed, with a dotted border, extending to the right and awaiting its retest. Mitigated: price has returned to the zone per the trigger — the box is highlighted, the border turns solid and thicker, and a "Mitigated" label is added. Broken: after being mitigated, price closes through the opposite side of the zone — a Bull Block below its base, a Bear Block above its top — the border turns dashed and the box stops extending. A broken block has lost its relevance; only the most recent blocks per side are kept, up to Max Blocks per side (8 by default).
STRUCTURE PROFILE AND MITIGATION TRIGGER
The Structure Profile sets the swing sensitivity that defines a break: Scalper (5 bars each side) for short-term blocks on low timeframes, Swing (10 bars, the default) for the balanced 4H and daily read, and Long Term (21 bars) for the major blocks on weekly and higher horizons. The Mitigation trigger decides what counts as a return: in Wick mode a wick into the zone is enough — more sensitive, flagging the retest sooner; in Close mode a candle must close inside the zone — stricter, confirming only with a close. The Impulse Lookback (20 by default) sets how many bars back the indicator searches for the origin candle.
INFORMATION PANEL
A compact panel under the indicator header shows the number of pending blocks, the number of mitigated ones and the breakdown of pending blocks per side (Bull / Bear). The pending-per-side row is the most operational — more Bull pending means demand zones awaiting a retest below, more Bear pending supply zones above. The panel sits in any of the four chart corners (Top Right by default), comes in three sizes (Tiny / Small / Normal) and two themes (Dark / Light), and can be hidden entirely. To keep the calculation light, it is drawn only on the last bar.
NO REPAINTING
Blocks are built on confirmed pivots and mitigations and breaks are validated per the chosen trigger, so a zone never appears or disappears without cause. There are no higher-timeframe functions: all logic runs on the current chart timeframe. For a multi-timeframe read, apply it on several charts at once.
CONFIGURATION
The inputs are grouped by block. Structure sets the profile, the impulse lookback, the maximum blocks per side and the mitigation trigger. Style exposes the bullish and bearish colors, the pending and mitigated opacities, the label size and the Dark/Light theme. Panel controls panel visibility, position and size. The defaults are calibrated to work without adjustment on stocks, crypto, forex, indices and futures, on any timeframe — the inputs most users touch are the Structure Profile and the Mitigation trigger.
ALERTS
Three predefined alerts cover the block's life: Bullish Block mitigated and Bearish Block mitigated fire when price returns to a demand or supply zone and mitigates it — the reaction alerts; Block broken fires when an already-mitigated block is lost. All alerts fire per the chosen trigger, consistent with the indicator's anti-repaint validation.
HOW TO READ IT
Use a pending block as a target: a Bull Block below is a demand zone price can drop to seek, a Bear Block above a supply target, and the panel's pending row flags where they are. Watch the mitigation — when price returns and mitigates a block, the reaction confirms whether the zone keeps its strength, and a clean bounce from demand or rejection from supply validates it. Read the break too — a mitigated block closed through has been consumed, and recognizing it avoids leaning on a zone that no longer reacts. Trade blocks in confluence with the broader structure, and combine with active order block analysis and breaker blocks, the blocks that fail and invert.
OPEN SOURCE
Edo Mitigation Blocks is published as a free open source indicator. The full Pine Script is publicly accessible on TradingView for study, adaptation and integration into any workflow. Part of the Edolab Markets free tools ecosystem, all publicly available on TradingView.
This indicator is a technical analysis tool for educational and informational purposes only. It does not generate automatic buy or sell signals and should not be considered financial advice. Trading financial markets involves significant risk of capital loss. Past performance does not guarantee future results. Always use proper risk management.
Mã nguồn mở
Theo đúng tinh thần TradingView, tác giả của tập lệnh này đã công bố nó dưới dạng mã nguồn mở, để các nhà giao dịch có thể xem xét và xác minh chức năng. Chúc mừng tác giả! Mặc dù bạn có thể sử dụng miễn phí, hãy nhớ rằng việc công bố lại mã phải tuân theo Nội quy.

EdoLab Markets – Precision Trading Tools
Get Exclusive Indicators:
edolab.io
All content provided is for informational and educational purposes only. Past performance does not guarantee future results.
Get Exclusive Indicators:
edolab.io
All content provided is for informational and educational purposes only. Past performance does not guarantee future results.
Thông báo miễn trừ trách nhiệm
Thông tin và các ấn phẩm này không nhằm mục đích, và không cấu thành, lời khuyên hoặc khuyến nghị về tài chính, đầu tư, giao dịch hay các loại khác do TradingView cung cấp hoặc xác nhận. Đọc thêm tại Điều khoản Sử dụng.
Mã nguồn mở
Theo đúng tinh thần TradingView, tác giả của tập lệnh này đã công bố nó dưới dạng mã nguồn mở, để các nhà giao dịch có thể xem xét và xác minh chức năng. Chúc mừng tác giả! Mặc dù bạn có thể sử dụng miễn phí, hãy nhớ rằng việc công bố lại mã phải tuân theo Nội quy.
EdoLab Markets – Precision Trading Tools
Get Exclusive Indicators:
edolab.io
All content provided is for informational and educational purposes only. Past performance does not guarantee future results.
Get Exclusive Indicators:
edolab.io
All content provided is for informational and educational purposes only. Past performance does not guarantee future results.
Thông báo miễn trừ trách nhiệm
Thông tin và các ấn phẩm này không nhằm mục đích, và không cấu thành, lời khuyên hoặc khuyến nghị về tài chính, đầu tư, giao dịch hay các loại khác do TradingView cung cấp hoặc xác nhận. Đọc thêm tại Điều khoản Sử dụng.