Bastion Execution Protocol [JOAT]Bastion Execution Protocol
Introduction
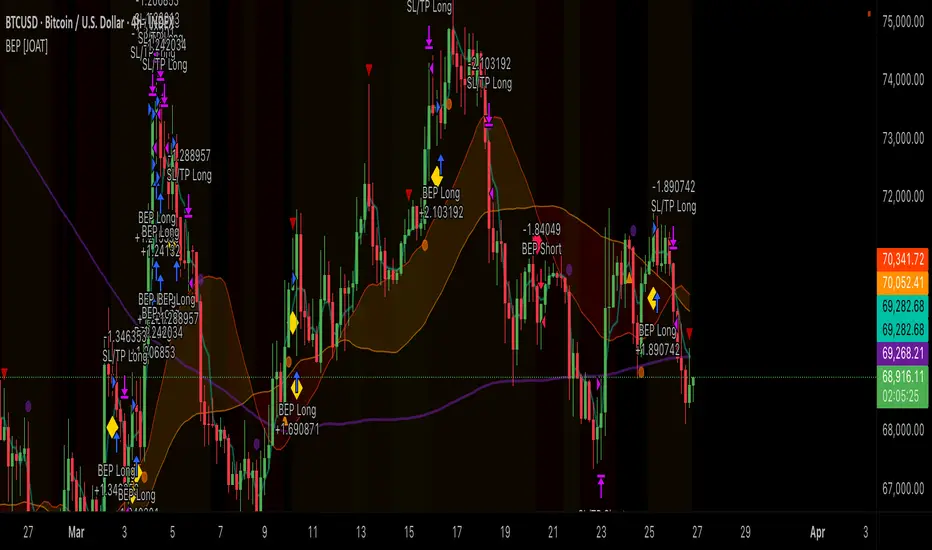
The Bastion Execution Protocol is an open-source automated trading strategy built in Pine Script v6. It combines regime detection, market structure analysis, dual momentum confirmation (RSI + Stochastic Momentum Index), order flow validation (CVD), candle pattern recognition, session filtering, and dynamic risk management into a single institutional-grade execution framework. The strategy is designed to take high-confluence directional trades only when multiple independent factors align — regime, structure, momentum, volume flow, and session — while managing risk through ATR-based stop losses, configurable reward-to-risk ratios, trailing stops, regime-adaptive position sizing, daily trade limits, and end-of-day forced closes.
This is not a "set and forget" black box. It is a transparent, fully configurable framework where every entry condition, risk parameter, and filter can be adjusted. The strategy is published open-source so traders can study the logic, understand why each trade is taken, and adapt the parameters to their instruments and timeframes.
Why This Strategy Exists
Most published strategies on TradingView fall into two categories: overly simple (single indicator crossover) or overly complex (dozens of conditions that overfit to historical data). This strategy occupies the middle ground — it requires meaningful confluence from independent analytical dimensions without over-optimizing to specific historical patterns:
Multi-Factor Entry Gate: Every trade requires agreement from regime detection, market structure, momentum oscillators, and optionally CVD order flow and candle patterns. No single factor can trigger a trade alone.
Regime-Aware Execution: The strategy only trades in trending regimes by default. It avoids squeeze conditions and can be configured to require specific regime states. Position sizing automatically reduces in volatile or uncertain regimes.
Session Intelligence: Trades are filtered by session (London, New York, Kill Zones) and day of week. The strategy avoids low-quality periods and forces position closure at end of day.
Dynamic Risk Management: ATR-based stop losses adapt to current volatility. Trailing stops activate after a configurable profit threshold. Position sizing is calculated from account equity and risk percentage, then adjusted by regime conditions.
Performance Tracking: Real-time HUD displays win rate, profit factor, max drawdown, daily trade count, and current position status.
Strategy Architecture — 9 Modules
The strategy is organized into 9 sequential modules, each responsible for a specific aspect of the trading process:
Module 1: Regime Detection
The regime engine classifies the market into four states using SMA alignment and VWAP slope:
Trend Up: SMA 20 > 50 > 200 (bull alignment) AND positive VWAP slope — clear upward momentum
Trend Down: SMA 20 < 50 < 200 (bear alignment) AND negative VWAP slope — clear downward momentum
Squeeze: Bollinger Band width in the bottom 10th percentile — volatility compression
Range: No SMA alignment and flat VWAP slope — sideways conditions
The VWAP slope is normalized by ATR to make it comparable across instruments with different price scales. The regime state directly controls whether trading is allowed — by default, the strategy requires a trending regime.
Module 2: Market Structure
Swing-based structure tracking identifies the directional bias:
Pivot highs and lows are detected using configurable lookback
When price closes above the last swing high while structure was bearish or neutral, structure flips bullish
When price closes below the last swing low while structure was bullish or neutral, structure flips bearish
Structure must agree with the regime for entries — regime bullish + structure bullish = long allowed
Displacement candle detection identifies aggressive institutional order flow — candles with body >= 70% of range and body >= 1.8x the 20-bar average body. These serve as entry triggers when all other conditions are met.
Module 3: Momentum Confirmation
Dual momentum confirmation requires both RSI and SMI to agree:
RSI: Must be above the bull threshold (default 55) for longs, below the bear threshold (default 45) for shorts
Stochastic Momentum Index: Must be positive for longs, negative for shorts. The SMI measures where price sits relative to the midpoint of its recent range, double-smoothed for noise reduction.
Both must agree — RSI bullish AND SMI bullish = momentum confirmed for longs
Module 3B: CVD Order Flow Confirmation
When enabled, Cumulative Volume Delta must support the trade direction:
Buy volume is estimated from bullish candles (close > open = full volume, otherwise proportional)
Sell volume = total volume minus buy volume
CVD = cumulative sum of (buy volume - sell volume)
CVD must be above its moving average for longs, below for shorts
This ensures that actual volume flow supports the intended trade direction
Module 3C: Candle Pattern Detection
When enabled, the strategy detects institutional candle patterns as entry triggers:
Bullish Engulfing: Current bullish candle fully engulfs the prior bearish candle's body, with volume above average
Bearish Engulfing: Current bearish candle fully engulfs the prior bullish candle's body, with volume above average
Bullish Pin Bar: Lower wick > 2x body, upper wick < 0.5x body — rejection of lower prices
Bearish Pin Bar: Upper wick > 2x body, lower wick < 0.5x body — rejection of higher prices
Patterns serve as alternative entry triggers alongside displacement candles. Either a displacement candle, a pattern, or price above SMA20 + VWAP can trigger entry when all other conditions are met.
Module 4: Session Filter
The session filter controls when trading is allowed:
Four session windows: NY Kill Zone (7-10am), London Kill Zone (2-5am), NY Session (9:30am-4pm), London Session (3am-9:30am)
Each session can be individually enabled/disabled
Day of week filter allows disabling specific days (e.g., avoid Mondays or Fridays)
Configurable timezone (default: America/New_York)
End-of-day forced close at configurable time (default: 3:45pm)
Module 5: Daily Trade Counter
A daily trade counter prevents overtrading:
Resets at the start of each new day
Configurable maximum trades per day (default: 3)
Combined with squeeze avoidance and regime filtering for comprehensive trade gating
Module 6: Entry Signal Generation
Entry signals require ALL of the following to be true simultaneously:
// Long entry requires full confluence:
// 1. Regime = Trend Up
// 2. Structure trend = Bullish (swing break confirmed)
// 3. RSI > bull threshold AND SMI > 0
// 4. CVD above its MA (if enabled)
// 5. Bar is confirmed (barstate.isconfirmed)
// 6. Trade is allowed (daily limit, session, no squeeze)
// 7. Trigger: displacement candle OR pattern OR price > SMA20 + VWAP
This multi-gate approach ensures that trades are only taken when regime, structure, momentum, volume flow, session, and a specific trigger all agree. The probability of a random signal passing all gates is very low, which is by design.
Module 7: Risk Calculations
Risk is calculated dynamically for each trade:
Stop Loss: ATR * configurable multiplier (default 1.5x) below entry for longs, above for shorts
Take Profit: SL distance * reward-to-risk ratio (default 2.0x)
Position Size: (Account Equity * Risk Percentage * Regime Multiplier) / SL Distance
Regime-Adaptive Sizing: When enabled, position size is reduced to 50% during squeeze conditions and 70% during non-trending conditions. Full size is used only in trending regimes.
Module 8: Trade Execution
Entries are executed using strategy.entry() with calculated position size. The strategy tracks active trade parameters (entry price, SL, TP) for trailing stop management.
Module 9: Exit Management
Three exit mechanisms operate simultaneously:
Fixed SL/TP: strategy.exit() with the calculated stop loss and take profit levels
Trailing Stop: When enabled, activates after price moves a configurable multiple of R in profit (default 1.0R). The trail distance is ATR * configurable multiplier (default 1.0x). The trailing stop only moves in the favorable direction and replaces the fixed SL when it is tighter.
End-of-Day Close: All positions are closed at the configured time to avoid overnight risk
Performance Tracking
The strategy tracks and displays real-time performance metrics:
Win Rate: Wins / (Wins + Losses) as a percentage
Profit Factor: Gross Profit / Gross Loss — values above 1.5 indicate a healthy edge
Max Drawdown: Peak-to-trough equity decline as a percentage
Net P&L: Total net profit/loss
Daily Trade Count: Current day's trades vs maximum allowed
Strategy Settings and Backtesting Notes
The strategy is configured with realistic default parameters:
Initial Capital: $100,000
Default Position Size: 2% of equity
Risk Per Trade: 1.5% (configurable)
Commission: Not included by default — users should add commission appropriate to their broker in the strategy settings
Slippage: Not included by default — users should add slippage appropriate to their instrument
calc_on_every_tick: false — the strategy only evaluates on confirmed bar closes to prevent repainting
calc_on_order_fills: true — allows trailing stop updates on fill events
Important: Before evaluating backtest results, users should:
Add realistic commission for their broker (e.g., $5 per trade for stocks, 0.1% for crypto)
Add realistic slippage (e.g., 1-2 ticks for liquid instruments)
Verify that the backtest period includes different market conditions (trending, ranging, volatile)
Check that the number of trades is sufficient for statistical significance (100+ trades recommended)
Understand that past performance does not guarantee future results
Input Parameters
Risk Management:
Risk Per Trade %: Percentage of equity risked per trade (default: 1.5%)
Reward:Risk Ratio: TP distance as multiple of SL distance (default: 2.0)
SL ATR Multiplier: Stop loss distance as ATR multiple (default: 1.5)
ATR Length: Period for ATR calculation (default: 14)
Use Trailing Stop: Enable/disable trailing (default: true)
Trail After X R Profit: Profit threshold to activate trail (default: 1.0R)
Trail ATR Multiplier: Trail distance as ATR multiple (default: 1.0)
Max Trades Per Day: Daily trade limit (default: 3)
Regime-Adaptive Sizing: Reduce size in non-trending conditions (default: true)
Regime Filter:
VWAP Slope Lookback: Period for slope calculation (default: 20)
Slope Threshold: Normalized threshold for trend detection (default: 0.12)
Bollinger Length/Multiplier: BB parameters for squeeze detection (default: 20/2.0)
Avoid Squeeze Entries: Skip entries during squeeze (default: true)
Require Trend Regime: Only trade in trending conditions (default: true)
Structure:
Swing Lookback: Pivot detection length (default: 5)
Displacement Min Body Ratio: Minimum body/range for displacement (default: 0.7)
Displacement Body Multiplier: Minimum body vs average for displacement (default: 1.8)
Momentum:
RSI Length/Thresholds: RSI parameters (default: 14, bull 55, bear 45)
SMI Lookback/Smoothing: SMI parameters (default: 13/25/2)
Session Filter:
Enable Session Filter: Toggle session-based trade gating
Individual session toggles: NY KZ, London KZ, NY, London
Day of week toggles: Monday through Friday
Force Close End of Day: Toggle EOD position closure
Close Hour/Minute: EOD close time (default: 15:45)
Order Flow:
CVD Confirmation: Require delta direction to match entry (default: true)
CVD Lookback: Period for CVD moving average (default: 10)
Candle Patterns:
Use Pattern Confirmation: Enable pattern detection as entry trigger (default: true)
Pattern Volume Multiplier: Minimum volume for pattern confirmation (default: 1.3x)
How to Use This Strategy
Step 1: Configure for Your Instrument
Adjust the ATR multiplier and displacement thresholds for your instrument's volatility. Add realistic commission and slippage in TradingView's strategy settings.
Step 2: Set Your Risk Parameters
Choose a risk percentage that matches your risk tolerance. The default 1.5% with 2:1 R:R is conservative. Adjust the trailing stop parameters based on your preference for locking in profits vs giving trades room.
Step 3: Configure Sessions
Enable the sessions relevant to your instrument. For US equities, NY KZ and NY Session are most relevant. For forex, both London and NY Kill Zones are important. Disable days you prefer not to trade.
Step 4: Run the Backtest
Apply the strategy to your chart and review the backtest results. Check win rate, profit factor, max drawdown, and number of trades. Ensure results are realistic and not the product of overfitting.
Step 5: Forward Test
Before trading live, run the strategy in paper trading mode for at least 2-4 weeks to verify that live performance matches backtest expectations.
Best Practices
Always add commission and slippage before evaluating backtest results
The strategy works best on liquid instruments with reliable volume data
Higher timeframes (15m+) produce fewer but higher-quality trades
The multi-gate entry system means trades are infrequent by design — this is a feature, not a bug
Regime-adaptive sizing is recommended — it automatically reduces exposure in uncertain conditions
The daily trade limit prevents revenge trading and overexposure
End-of-day forced close eliminates overnight gap risk for intraday strategies
Monitor the HUD during live trading for real-time regime, momentum, and session context
If win rate drops below 40% or profit factor drops below 1.0, re-evaluate parameters for current market conditions
Limitations
The strategy uses lagging indicators (SMAs, RSI, SMI) for entry conditions. Entries occur after the trend has started, not at the exact turn.
Regime detection can lag regime changes. The strategy may miss the first portion of a new trend or take a trade just as a trend is ending.
CVD is estimated from candle direction, not true order flow data. This is an approximation.
Backtest results are hypothetical and do not account for real-world execution issues (partial fills, requotes, connectivity).
The strategy is designed for intraday/swing trading. It is not optimized for scalping or long-term position trading.
Session filtering is based on EST timezone. Instruments traded primarily in other timezones may need different session definitions.
The multi-gate entry system can be too restrictive in some market conditions, producing very few trades. This is intentional — the strategy prioritizes quality over quantity.
Past performance in backtesting does not guarantee future results. Market conditions change, and strategies that worked historically may not work in the future.
Technical Implementation
Built with Pine Script v6 using:
calc_on_every_tick=false for non-repainting execution
barstate.isconfirmed gating on all signal generation
9-module architecture with clear separation of concerns
ATR-based dynamic stop loss and take profit calculation
Trailing stop with configurable activation threshold and trail distance
Regime-adaptive position sizing with squeeze and non-trending penalties
Session detection with timezone support and day-of-week filtering
Daily trade counter with automatic reset
End-of-day forced close mechanism
Real-time performance tracking (win rate, profit factor, max drawdown)
Dual momentum confirmation (RSI + SMI)
CVD order flow validation
Candle pattern detection (engulfing, pin bar) with volume confirmation
6 alert conditions covering entries, regime changes, EOD close, patterns, and drawdown
Originality Statement
This strategy is original in its multi-dimensional confluence framework. While individual components (RSI, SMI, SMA alignment, session filtering) are established concepts, this strategy is justified because:
The 9-module architecture creates a clear, auditable decision pipeline where each module's contribution to the final trade decision is transparent
The multi-gate entry system (regime + structure + dual momentum + CVD + session + trigger) requires an unusually high level of confluence, reducing false signals
Regime-adaptive position sizing automatically adjusts exposure based on market conditions, a feature rarely seen in published strategies
The combination of trailing stops with regime-aware sizing creates a dynamic risk framework that adapts to changing conditions
Session filtering with Kill Zone preference and day-of-week controls provides institutional-grade time management
CVD order flow confirmation adds a volume-based validation layer that pure price-based strategies lack
The real-time HUD with performance tracking provides transparency into strategy behavior that most published strategies do not offer
The Volcanic theme provides a cohesive visual identity where every color choice carries meaning (lava = entry, amber = warning, teal = VWAP, crimson = bearish)
Disclaimer
This strategy is provided for educational and informational purposes only. It is not financial advice or a recommendation to buy or sell any financial instrument. Backtested results are hypothetical and do not represent actual trading. Past performance does not guarantee future results. The strategy involves risk of loss, including the potential loss of the entire investment. Commission, slippage, and other real-world execution costs are not included in the default configuration and must be added by the user for realistic evaluation. The author makes no claims about the profitability of this strategy and is not responsible for any losses incurred from its use. Always use proper risk management, trade with capital you can afford to lose, and consider consulting a qualified financial advisor before trading.
-Made with passion by officialjackofalltrades
Chiến lược