

AUD/JPY continues to maintain a bullish market structure
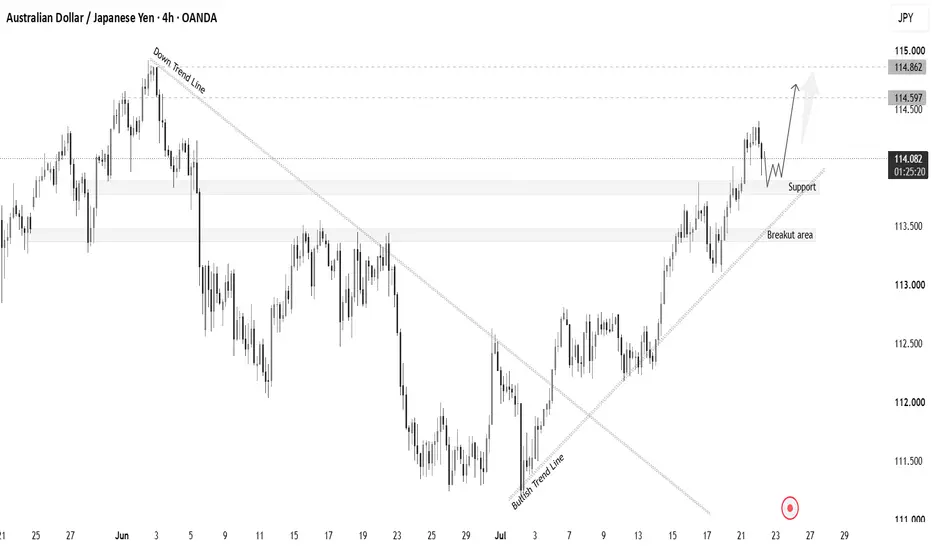
AUD/JPY BUY ANALYSIS | 4H TIMEFRAME
Market View: Bullish Trend – Buying from a Strong Support Zone
AUD/JPY continues to maintain a bullish market structure on the 4-hour timeframe. Price is retracing into a key support area around 113.900, presenting a potential buying opportunity in line with the prevailing uptrend.
Entry Zone:
Buy around 113.900 after bullish confirmation.
Technical Targets:
TP1: 114.500
TP2: 114.800
Technical Analysis:
The pair remains in a healthy uptrend, with higher highs and higher lows indicating sustained buying momentum. The current pullback into a strong support zone offers a favorable risk-to-reward opportunity for trend-following traders. A bullish rejection candle or strong buying pressure from 113.900 would strengthen the case for a continuation toward the projected targets.
Risk Management:
Place your stop-loss below the support zone based on your trading strategy. Wait for price confirmation before entering the trade and always manage your risk with discipline.
«Trade with the trend, respect key support, and let price action confirm the opportunity.»
#AUDJPY #Forex #ForexTrading #BuySetup #TechnicalAnalysis #BullishTrend #SupportZone #PriceAction #TradingSignals #SwingTrading
Market View: Bullish Trend – Buying from a Strong Support Zone
AUD/JPY continues to maintain a bullish market structure on the 4-hour timeframe. Price is retracing into a key support area around 113.900, presenting a potential buying opportunity in line with the prevailing uptrend.
Entry Zone:
Buy around 113.900 after bullish confirmation.
Technical Targets:
TP1: 114.500
TP2: 114.800
Technical Analysis:
The pair remains in a healthy uptrend, with higher highs and higher lows indicating sustained buying momentum. The current pullback into a strong support zone offers a favorable risk-to-reward opportunity for trend-following traders. A bullish rejection candle or strong buying pressure from 113.900 would strengthen the case for a continuation toward the projected targets.
Risk Management:
Place your stop-loss below the support zone based on your trading strategy. Wait for price confirmation before entering the trade and always manage your risk with discipline.
«Trade with the trend, respect key support, and let price action confirm the opportunity.»
#AUDJPY #Forex #ForexTrading #BuySetup #TechnicalAnalysis #BullishTrend #SupportZone #PriceAction #TradingSignals #SwingTrading
Transaction en cours

Free forex gold & crypto signals
t.me/ExpertTrading_Signals
free gold signals
t.me/+F9p2HlCBcosyMDE8
exness broker one.exnessonelink.com/a/g8y6w860c5
t.me/ExpertTrading_Signals
free gold signals
t.me/+F9p2HlCBcosyMDE8
exness broker one.exnessonelink.com/a/g8y6w860c5
Publications connexes
Clause de non-responsabilité
Les informations et publications ne sont pas destinées à être, et ne constituent pas, des conseils ou recommandations financiers, d'investissement, de trading ou autres fournis ou approuvés par TradingView. Pour en savoir plus, consultez les Conditions d'utilisation.
Free forex gold & crypto signals
t.me/ExpertTrading_Signals
free gold signals
t.me/+F9p2HlCBcosyMDE8
exness broker one.exnessonelink.com/a/g8y6w860c5
t.me/ExpertTrading_Signals
free gold signals
t.me/+F9p2HlCBcosyMDE8
exness broker one.exnessonelink.com/a/g8y6w860c5
Publications connexes
Clause de non-responsabilité
Les informations et publications ne sont pas destinées à être, et ne constituent pas, des conseils ou recommandations financiers, d'investissement, de trading ou autres fournis ou approuvés par TradingView. Pour en savoir plus, consultez les Conditions d'utilisation.