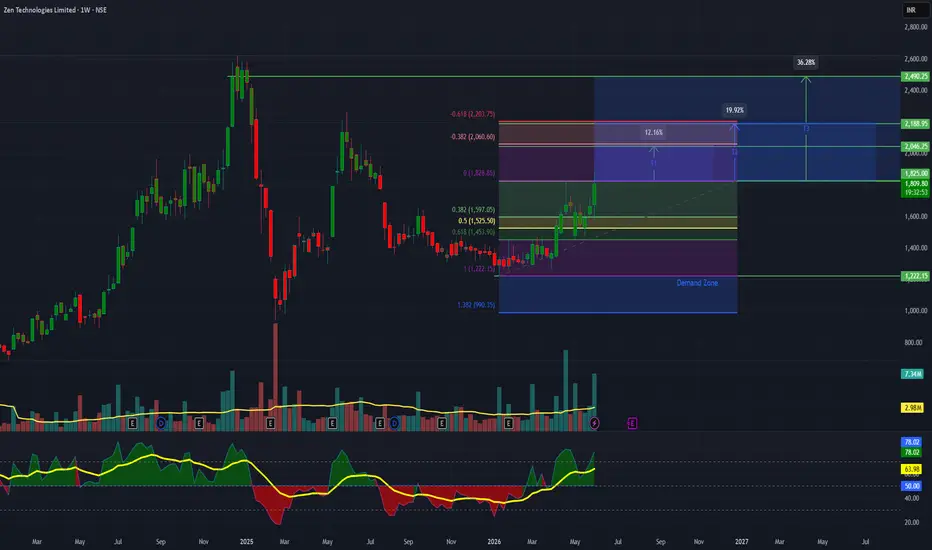
ZEN Technologies Reclaims Key Weekly Levels | Potential 36%ZEN Technologies is showing strong signs of a bullish continuation on the weekly timeframe after defending the ₹1,220 demand zone and reclaiming key Fibonacci retracement levels. Price has established a sequence of higher lows while momentum and volume continue to improve.
The immediate hurdle lies near ₹1,825. A successful breakout above this level could open the path toward ₹2,046, ₹2,189 and eventually ₹2,490. The structure remains constructive as long as the stock holds above the ₹1,525 support region on a weekly closing basis.
This setup offers a favorable risk-reward profile for positional traders looking to participate in a potential medium-term continuation move.
Aggressive Entry
Current levels while price sustains above ₹1,700
Conservative Entry
Weekly close above ₹1,825 with volume confirmation
Demand Zone
₹1,220 – ₹1,450
Current Price
₹1,801
Immediate Resistance
₹1,825
Major Resistance Levels
₹2,046
₹2,189
₹2,490
Targets
🎯 Target 1 (T1)
₹2,046
Potential Gain: +12%
🎯 Target 2 (T2)
₹2,189
Potential Gain: +20%
🎯 Target 3 (T3)
₹2,490
Potential Gain: +36%
Disclaimer
This analysis is for educational and informational purposes only and should not be construed as investment advice. Markets involve risk, and all trading or investing decisions should be based on your own research and risk tolerance. Always use appropriate position sizing and stop-loss management.  Long
Long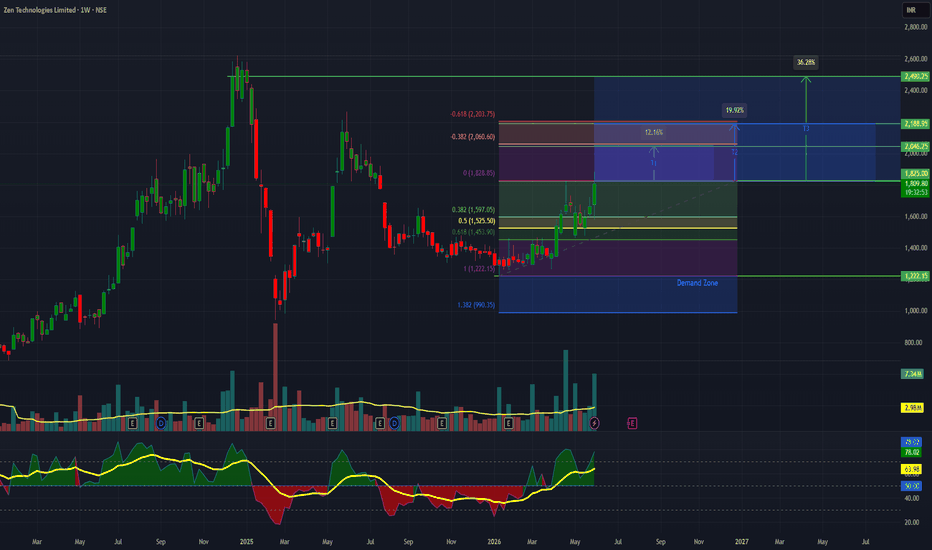
 Short
Short
Long trade
📘 BTCUSDC — POC / VALUE-AREA BUYSIDE READ
Pair: BTCUSDC
Direction: 🟢 Buyside
Date: Wed 19th Aug 2026
Entry Time: 6:00 AM NY Time
Execution TF: 15-minute
Trade Type: Buyside POC reclaim / value-area expansion
Trade Levels
Entry: 64,335.0
Stop: 64,318.9
Risk: 0.025%
Target: 65,023.2
Projected Gain: 1.070%
RR: 42.75R
🧠 POC / Value Bias
🟢 Buyside
BTC is building from a lower value-area base and has started reclaiming the developing profile rather than accepting below it. The long thesis is based on price holding the 64,318–64,335 lower reference zone, reclaiming the developing POC, then rotating through VA High and VWAP toward the higher liquidity around 65,023.
🧭 POC Map
Lower value test
→ defend 64,318.9–64,335.0
→ reclaim developing POC
→ accept above VA High
→ recover Mod VWAP
→ expand into upper distribution
→ 🎯 target 65,023.2
Key mapped references visible on the chart
Developing VA Low: ~64,249
Developing POC: ~64,335
Developing VA High: ~64,376
Mod VWAP: ~64,451
Entry: 64,335.0
Target: 65,023.2
Invalidation: 64,318.9
POC read
The key feature here is that the entry is almost directly on the developing POC around 64,335.
That makes this a classic POC hold/value migration setup.
The chart is already showing price rotating strongly away from the POC cluster, which supports the idea that buyers are defending fair value and forcing price into a higher auction.
64,335 POC
→ 64,376 VA High
→ 64,451 Mod VWAP
→ 64,700–64,900 upper distribution
→ 🎯 65,023.2
Final read
This is a POC-led buyside continuation setup.
The strongest part of the trade is the entry location: price is being bought right around the developing POC, while the stop sits only slightly beneath that working reference. That gives the trade exceptional asymmetry, but also means the setup is extremely sensitive to any acceptance below 64,318.9.
✅ Entry on developing POC
✅ VA High overhead as first confirmation
✅ Mod VWAP acts as next structural checkpoint
✅ Upper liquidity provides the destination
⚖️ Very high asymmetry: 42.75R  Long
Long
Long 
 Short
Short

SOLANA Elliott Wave Analysis: Impulse or Deeper Correction?SOLANA Daily Analysis | Nested 1–2 Structure or a Deeper Correction?
From an aggressive perspective, Solana’s current structure may be developing within a nested 1–2, followed by another 1–2 setup. Under this scenario, after completing Wave (II), the market may have formed two early impulsive phases, potentially preparing the larger structure for the next bullish expansion.
At the moment, a simple Zigzag appears to have developed. Therefore, simply seeing an upward move is not enough to confirm a bullish market. What matters is the emergence of a valid impulsive structure.
If the market begins another impulsive move, the peak of Wave B should be broken. After that, we would expect a corrective structure relative to the new advance. That would be the first meaningful green light for the bullish scenario.
However, the impulsive move must actually have an impulsive character. It could develop as:
A Classic Impulse
A Nested 1–2 Structure
Or a Leading Diagonal
So, the main focus is not simply on whether price rises. The real focus is on the structure price creates during that advance.
Conservative Scenario
The conservative scenario still allows for a deeper corrective development.
Within the current area, different corrective structures may still be acceptable in terms of time, depth, and increasing complexity. Therefore, the market may continue developing a more complex correction before making another decline.
That decline could be similar in character to Wave (II)—a Sharp correction that completes the larger corrective structure before the next major move begins.
Educational Point: The Wave (II) Structure
The most important educational point of this analysis is the structure of Wave (II).
In this section of the chart, a five-wave decline developed with several characteristics of an impulsive structure. The three core Elliott Wave rules were respected:
Wave 3 is not the shortest among Waves 1, 3, and 5.
Wave 4 does not enter the price territory of Wave 1.
In addition to the core rules, there is also a clear sense of alternation between Waves 2 and 4.
This is one of the observations and research findings from our work—Rana and I—after studying similar structures across different markets.
Sometimes the market creates a structure that, based on its internal rules and characteristics, closely resembles an Impulse Pattern, while many Elliott Wave analysts are still expecting a three-wave correction or an even more complex corrective pattern.
But the market is not obligated to move according to analysts’ expectations.
A similar structure developed earlier in this market. At the time, it could have created confusion because many analysts were looking for a corrective interpretation. However, the market eventually surprised them and began a strong advance.
For that reason, I will also include the earlier analysis below so you can compare that structure with the current market behavior.
Conclusion
For now, both scenarios should remain under observation.
The aggressive scenario requires the development of a valid impulsive move and a break above the peak of Wave B. After that, the formation of a corrective structure relative to the new advance would strengthen the bullish case.
On the other hand, until such a structure becomes clear, the conservative scenario remains valid. The correction may continue becoming more complex before the market makes another decline.
Ultimately, it is the structure price develops that will determine which scenario is correct—not simply the short-term direction of price.
Mehdi Abbasi | Mr. Nobody Elliott Wave Principle
Elliott Wave Structure • Rules • Evidence • Scenario Analysis
Solana
Jan 16, 2024
Bullish market in Solana
 Short
Short

XAU/USD 19 August 2026 Intraday AnalysisH4 Analysis:
-> Swing: Bullish.
-> Internal: Bearish.
Bias and analysis to remain the same as analysis dated 30 June 2026.
Price did not print bullish CHoCH to indicate bullish pullback phase initiation. Price instead printed a new low followed by a bullish CHoCH
Price is currently trading within and established internal range, however, I will continue to monitor price with respect to depth of pullback.
Intraday expectation:
Price to trade up to either premium of internal 50% EQ, or H4 demand zone before targeting weak internal low, currently priced at 3,942.100.
Note:
Gold remains volatile as tensions between the US, Israel, and Iran keep safe‑haven demand elevated.
Markets are reacting quickly to every headline, while uncertainty around the Fed’s easing path and shifting U.S. policy under President Trump, especially tariffs continues to fuel choppy price action.
For newer traders, the key is simple, stay flexible and manage risk carefully, as fast spikes and sudden reversals are a normal part of the current XAU/USD environment.
H4 Chart:
M15 Analysis:
-> Swing: Bearish.
-> Internal: Bullish.
Analysis and bias to remain the same as analysis dated 13 August 2026.
Since last analysis price has printed higher, printing a bullish iBOS, however, depth of pullback has been insufficient, therefore, I shall apply discretion and not classify the bullish iBOS. I have however marked this is red for illustration purposes.
Price is currently trading within an established internal range. I shall continue to monitor price with respect to depth of pullback.
Intraday expectation:
Price to trade down to either discount of internal 50% EQ, or M15 supply zone before targeting weak internal high, priced at 4,449.830.
Note:
Gold remains highly reactive on M15 as geopolitical risk continues to drive quick, headline‑led moves.
The tension between the US, Israel, and Iran is keeping safe‑haven demand elevated, with markets still sensitive to any sign of escalation.
At the same time, shifting US tariff policy under President Trump is adding extra uncertainty, fuelling sharp intraday swings and increasing the likelihood of sudden sentiment flips. Liquidity pockets and whipsaws remain common, making disciplined risk management essential.
Gold’s geopolitical premium is still firmly in place, and until tensions ease, short‑term volatility is likely to stay front‑loaded.
M15 Chart:  Long
Long

## DAX 40 | Aggressive vs. Conservative Elliott Wave Scenarios### Aggressive Scenario
From the initial advance beginning on **Friday, March 20, 2020**, with the DAX 40 starting from approximately **7,962.6 EUR**, the market has developed a structure that continues to display the characteristics of an impulsive pattern.
In the aggressive scenario, **Wave IV may already have completed as a Flat correction**. If this interpretation remains valid, the market could now be developing a nested **1–2 structure**, suggesting that the next phase of the bullish impulse may be underway.
For this scenario to gain greater probability, price action should continue to develop with relatively short corrective phases in both **price and time** compared with the degree of the larger structure. Such behavior would support the possibility that the market is entering another acceleration phase within the broader bullish trend.
### Conservative Scenario
The conservative scenario allows for the possibility that **Wave IV has not yet completed**.
Under this interpretation, the market could continue to move sideways or slightly higher and develop a larger Flat correction. In this case, **Wave A** could take the form of a running or expanded Flat, followed by **Wave B** developing as a Zigzag, and finally **Wave C** completing the correction through either a terminal Ending Diagonal or an Impulse structure.
This scenario would allow Wave IV to develop further before the larger bullish structure resumes.
### What Matters Now
The key distinction between these two scenarios is therefore structural rather than directional.
The **aggressive scenario** requires the current correction to have already completed and the market to begin developing impulsive subdivisions to the upside.
The **conservative scenario** requires additional corrective development before Wave IV is considered complete.
In both cases, the relevant **pattern-break levels are clearly identified on the chart**. These levels will help determine which scenario remains structurally valid as price develops.
As always, the market itself will determine which count survives. The purpose of this analysis is not to predict the outcome, but to identify the structural conditions under which each scenario becomes more or less probable.
**Mr. Nobody | Elliott Wave Principle 📊**
Germany 30
Aug 6, 2024
The idea of extending the DAX bull market
 Long
Long
XAUUSD 4H: What Could Happen When Price Revisits This Fresh DBD Symbol: XAUUSD
Timeframe: 240M (4H)
Zone Structure: Drop–Base–Drop (DBD)
Zone Type: Supply Zone
Market Context
Price is currently trading near an identified 4H supply zone . This area is being observed because it originated from a strong imbalance following a Drop–Base–Drop (DBD) structure.
The DBD formation represents a sequence where price declines, temporarily consolidates, and then continues lower with a relatively strong leg-out. From a technical-analysis perspective, this type of structure can highlight an area where a significant imbalance previously developed.
Why This Zone Is Technically Significant
Several characteristics make this area relevant for market-structure observation:
Fresh zone: The area has not been meaningfully revisited since its formation.
Strong leg-out: The departure from the base showed notable downside momentum.
Quality basing structure: Price spent a relatively limited amount of time consolidating before the bearish expansion.
Market structure: The move away from the zone created a visible displacement in price, making the area useful for studying subsequent reactions.
Fresh supply zones are often watched because the first revisit can provide useful information about how price interacts with a previously established imbalance.
What Traders Often Observe on a Revisit
When price returns to a supply zone, several different behaviors are possible.
One scenario is that price could show bearish rejection , with candles displaying reduced buying momentum, rejection wicks, or a shift toward lower-timeframe bearish structure.
Another possibility is that price could move through the zone without significant rejection. This may indicate that the previously observed supply is being absorbed or that the underlying market structure has changed.
A third scenario is that price could initially react from the zone but later return to test the area again. This can create a more complex interaction between liquidity, momentum, and market structure.
There is also a bullish scenario in which price breaks and sustains above the supply area. In that situation, the original bearish interpretation of the zone would become less relevant, and subsequent price action would need to be evaluated in the context of the new structure.
Confirmation Matters
The presence of a supply zone by itself does not establish what price will do next.
Price action confirmation can provide additional information about whether the observed area is actually producing a reaction. Lower-timeframe structure, candle behavior, momentum, and the way price enters and leaves the zone may all be relevant when studying the interaction.
Zone Invalidation
A supply zone can fail.
A sustained move through the zone may invalidate the original technical premise behind the area. This is an important part of studying supply-and-demand analysis: zones are areas of interest, not guarantees of future price behavior.
Risk Management — Educational Context
From a general trading-education perspective, risk management refers to controlling potential downside exposure and understanding what would invalidate a market hypothesis.
Concepts such as predefined invalidation conditions, position sizing, and limiting exposure are commonly discussed as part of disciplined trading. These concepts should be adapted to an individual's own circumstances rather than treated as universal recommendations.
Key Observation
The interesting part of this XAUUSD 4H structure is not simply whether the supply zone holds or fails.
It is how price behaves when it interacts with the zone .
The reaction, rejection, acceptance, or breakout can provide additional information about the evolving market structure.
Educational Disclaimer
This publication is intended solely for educational and informational purposes. It reflects a technical analysis of market structure and should not be interpreted as investment advice, a recommendation, or a solicitation to buy or sell any financial instrument. Always perform your own analysis and manage risk according to your individual circumstances. Short 
Long trade
Pair: BTCUSDC
Direction: 🟢 Buyside
Date: Tue 18th Aug 2026
Entry Time: 3:00 AM NY Time
Execution TF: 5-minute
Trade Type: Buyside POC reclaim / value-area continuation
Trade Levels
Entry: 64,134.3
Stop: 64,033.9
Risk: 0.157%
Target: 64,496.1
Projected Gain: 0.564%
RR: 3.9R
🧠 SNAP Bias
🟢 Buyside
BTC is holding above the lower developing value area after recovering from the earlier downside rotation.
The long thesis is based on price defending the 64,033–64,134 lower reference zone, reclaiming the developing POC, and accepting back above value for continuation toward the upper liquidity structure.
🧭 SNAP Map
Sell-side rotation into lower value
→ test of 64,033.9–64,134.3 support / reference zone
→ rejection from the lower area
→ reclaim above 64,134.3
→ reclaim of developing POC
→ acceptance above developing VA High
→ bullish displacement toward upper liquidity
→ 🎯 target 64,496.1
Key mapped references visible on the chart:
Developing VA Low: ~64,099
Developing POC: ~64,153
Developing VA High: ~64,193
VWAP / Mod VWAP: ~64,195
Target: 64,496.1
Invalidation: 64,033.9
Summary:
BTCUSDC buyside from 64,134.3 is a SNAP POC/value-reclaim continuation setup targeting 64,496.1, with 64,033.9 acting as the structural invalidation and a projected 3.9R payoff. Long