Short
Short
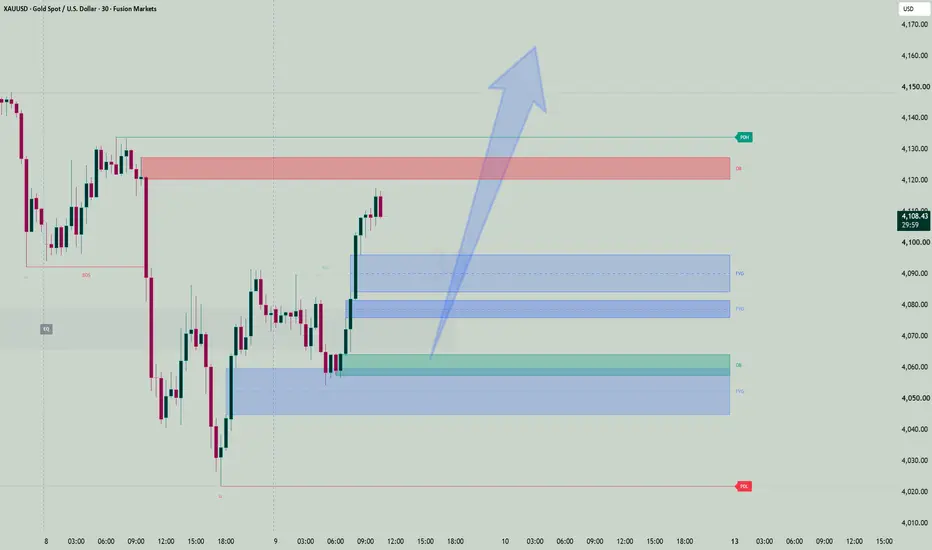
XAUUSD: Bullish Intraday, Waiting for PullbackXAUUSD is showing bullish intraday reaction after price swept the low and created a bullish BOS.
However, H4 bias is still bearish and price is already in premium, so I’m not chasing longs here.
I’m waiting for a pullback into the 4,090–4,080 FVG zone, or deeper into the 4,065–4,055 OB/FVG zone.
If price reacts from there and gives M5 confirmation, the long setup becomes valid.
Price can also move directly higher and sweep PDH without us. If that happens, the plan changes and I will wait to see the reaction from the PDH / OB area instead of chasing the move.
Targets: 4,140/ 4,150 PDH
If price breaks below 4,055, the bullish idea becomes weaker.
XAUUSD pokazuje bullish intraday reakciju nakon što je cena skinula low i napravila bullish BOS.
Ipak, H4 bias je još bearish i cena je već u premiumu, tako da ne jurim long ovde.
Čekam pullback u 4,090–4,080 FVG zonu, ili dublje u 4,065–4,055 OB/FVG zonu.
Ako cena tu odreaguje i da M5 potvrdu, long setup postaje validan.
Cena može i direktno da ode gore i sweepuje PDH bez nas. Ako se to desi, plan se menja i čekam reakciju iz PDH / OB zone, umesto da jurim move.
Targeti: 4,140 / 4,150 iznad PDH
Ako cena probije ispod 4,055, bullish ideja slabi.
Long 
 Long
Long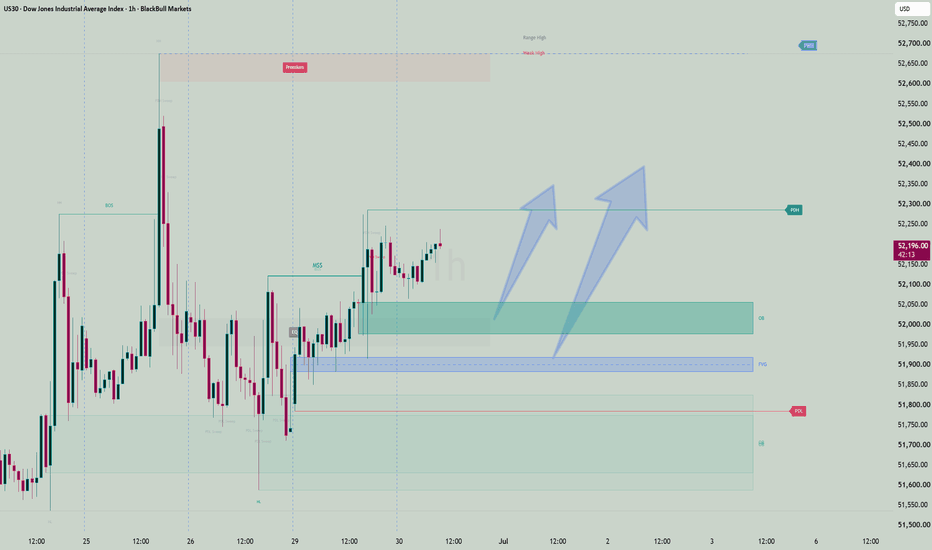
 Long
Long
US30 AnalysisUS30 Analysis
Higher timeframes remain bullish, but the intraday structure is still developing.
After sweeping liquidity below PDL, buyers reacted strongly and printed the first bullish shift on the lower timeframe. However, M15 has not fully aligned with the higher-timeframe trend yet, which is why patience remains important.
The most likely scenario is a move higher into the nearest bearish Order Block and Fair Value Gap to mitigate supply. From there, the market may produce another pullback into a bullish Order Block or Fair Value Gap, creating a higher-probability long setup before continuing toward higher liquidity.
As long as H4 and H1 remain bullish, I continue to favor buying pullbacks rather than chasing price. The focus is on waiting for M15 to complete its bullish confirmation before looking for continuation opportunities.
Key Levels
Bullish HTF bias remains intact.
Watch the nearest bearish OB/FVG for the first reaction.
A pullback into bullish demand could offer the best long opportunity.
Confirmation on M15 is still required before execution.
Patience is a position. Wait for confirmation, then execute with discipline.
Viši vremenski okviri i dalje zadržavaju bullish strukturu, dok M15 još uvek traži konačnu potvrdu za nastavak rasta.
Očekujem da cena prvo testira najbližu bearish zonu likvidnosti, nakon čega je moguć još jedan pullback u bullish Order Block ili Fair Value Gap. Upravo iz te zone tražiću potvrdu za nastavak glavnog trenda.
Strpljenje je deo strategije. Ne jurim cenu – čekam potvrđen setup. Long 
BTCUSD: Dual Selling Zones in Bearish Structure – 61,100 & 61,80Market Outlook:
Bitcoin is firmly in a bearish market structure, consistently forming lower highs and lower lows while repeating the same rejection pattern on higher timeframes. Sellers remain in full control.
Two Best Selling Confluences Right Now: Bearish Order Block (15M) — Around 61,100
Strong institutional supply area where price previously reversed sharply.
Major Supply Zone (15M) — Around 61,800
High-volume resistance zone acting as a ceiling.
Why This Setup is Strong: Overall bearish structure is still intact with no valid bullish reversal yet.
Market is repeating its behavior — rejecting rallies and respecting supply areas.
Clear Break of Structure (BOS) lower and Sell Side Liquidity (SSL) waiting below.
Multiple confluences aligning for continuation.
Trade Plan: Sell Zone 1: 61,100 (Bearish OB)
Sell Zone 2: 61,800 (Supply Zone)
Targets: TP1: 60,800
TP2: 60,000
TP3: 59,300 – 58,800
Stop Loss: Above 61,900 (for both zones)
This is a textbook bearish continuation setup with excellent risk-reward for sellers.
This is not financial advice. Trading involves high risk. Always manage your risk and do your own analysis.
 Short
Short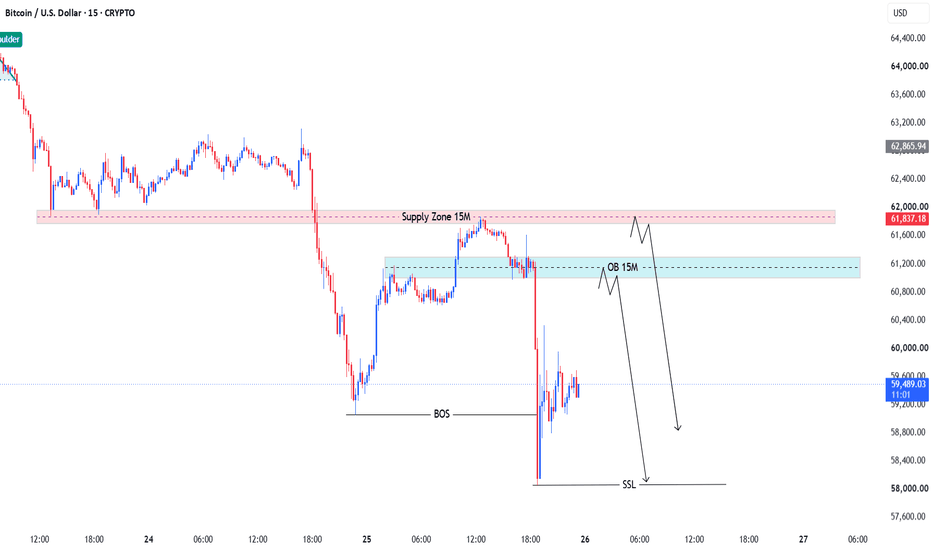
Long 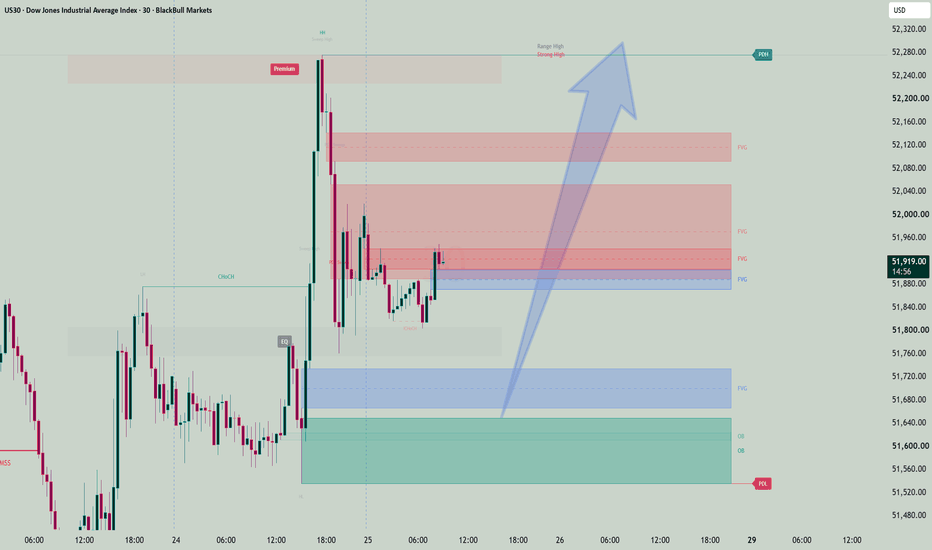
 Long
Long
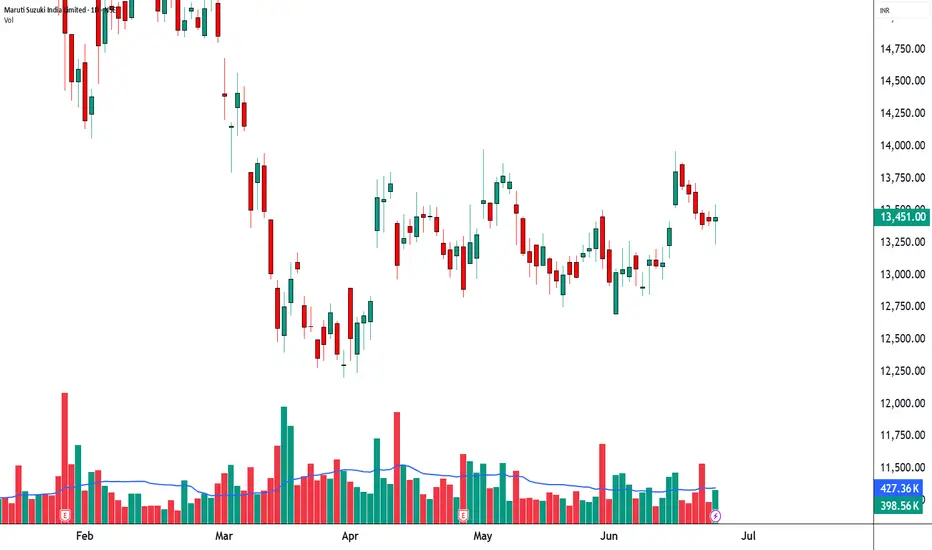
MARUTI SUPPLY & DEMAND LIQUIDITY MAP 5 MTF╔══════════════════════════════════════════════════════════════════════╗
📊 SUPPLY & DEMAND LIQUIDITY MAP | MARUTI SUZUKI (NSE: MARUTI)
╚══════════════════════════════════════════════════════════════════════╝
⏱️ Timeframe: 05-Minute Intraday
📅 Session: 24-JUN-2026
💰 Last Price: 13,430.00 (-0.22%)
📈 Consolidation Phase
──────────────────────────────────────────────────────────────────────
🟪 SUPPLY LIQUIDITY MATRIX
🎯 Major Supply Box
13,509.00 – 13,549.00
↳ Institutional Distribution Ceiling
⚡ Intermediate Supply Box
13,441.00 – 13,478.00
↳ Active Overhead Supply Cluster
──────────────────────────────────────────────────────────────────────
🟩 DEMAND LIQUIDITY MATRIX
🛡️ Immediate Demand Shelf(Tested Zone)
13,398.00 – 13,420.00
↳ Near-Term Liquidity Support
💎 Macro Demand Box 1
13,301.00 – 13,315.00
↳ Institutional Accumulation Zone
🌪️ Macro Demand Box 2
13,240.00 – 13,259.00
↳ Session Demand Extreme
──────────────────────────────────────────────────────────────────────
⚙️ STRUCTURAL CONDITIONS
❖ Current State
Rangebound Liquidity Rotation
❖ Market Character
Price positioned between active supply and demand clusters
🚨 Hard Invalidation Level
13,240.00
A decisive candlestick close beneath this zone invalidates the current demand structure.
──────────────────────────────────────────────────────────────────────
💬 COMMUNITY EXCHANGE
Is MARUTI more likely to encounter rejection inside the Intermediate Supply Box, or are you monitoring for demand absorption near the Immediate Demand Shelf?
──────────────────────────────────────────────────────────────────────
⚠️ DISCLAIMER
This publication is intended solely for educational and informational purposes based on institutional order block methodology and market structure analysis. It does not constitute investment advice, research, recommendation, or solicitation to transact in any security. Market participation involves risk. Please consult a SEBI-registered investment adviser before making financial decisions.
╚══════════════════════════════════════════════════════════════════════╝
XAUUSD Daily Analysis Bullish Market Structure with Liquidity This is the 1D (Daily) chart of XAUUSD, sourced from FOREX.com via TradingView, with the current price trading at 4,344.07, up by +35.41 (+0.82%) on the day.
The chart reflects a clean bullish market structure on the daily timeframe, confirmed by a clear sequence of higher highs (HH) and higher lows (HL). The overall bias remains firmly BULLISH as price continues to trade above key support zones.
Key technical levels and concepts marked on the chart:
· Liquidity Taken: Price has recently swept sell-side liquidity, indicating that stop-losses below previous lows were triggered, often a precursor to continued upside momentum.
· Demand Order Block (Buyers' Zone): FX:XAUUSD 4,050 – 4,200 – a strong accumulation area where institutional buying has previously emerged. This zone now acts as a critical support base.
· Fair Value Gap (FVG): An imbalance area visible near current price levels, which could act as a magnet or provide support/resistance depending on price reaction.
· Bearish Order Block (Sellers' Zone): 4,650 – 4,750 – a near-term resistance area where selling pressure is likely to emerge.
· Supply Order Block (Major Resistance): 5,100 – 5,300 – the ultimate upside hurdle, representing a large supply zone where aggressive selling is expected.
With price holding above the demand order block and bullish structure intact, the path of least resistance remains to the upside. However, the bearish order block at 4,650–4,750 is the first major test for buyers. A clean breakout above that level could open the door toward the 5,100–5,300 supply zone. Conversely, a break below 4,050 would invalidate the bullish structure and shift the bias to neutral or bearish.
Traders should watch for price reactions around these order blocks and FVG for potential high-probability trade setups. Long 
Long 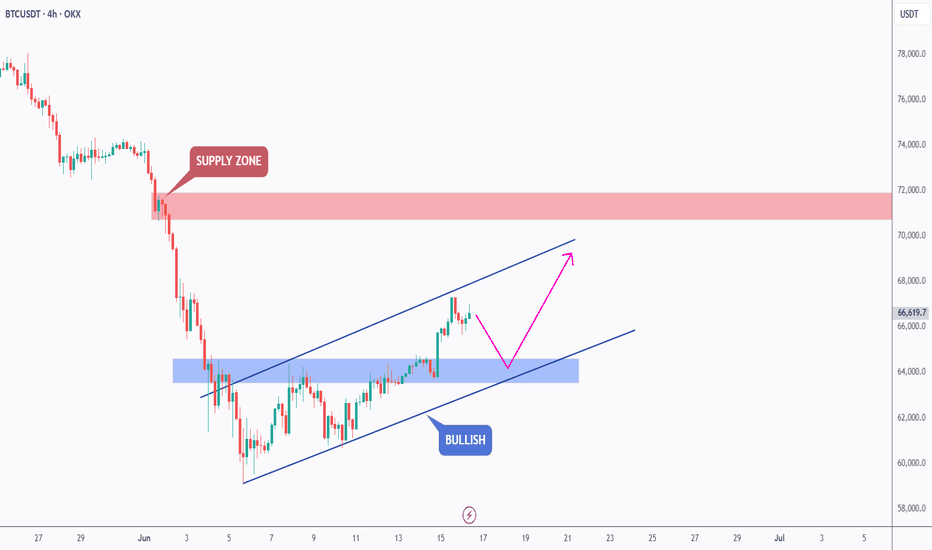
Long 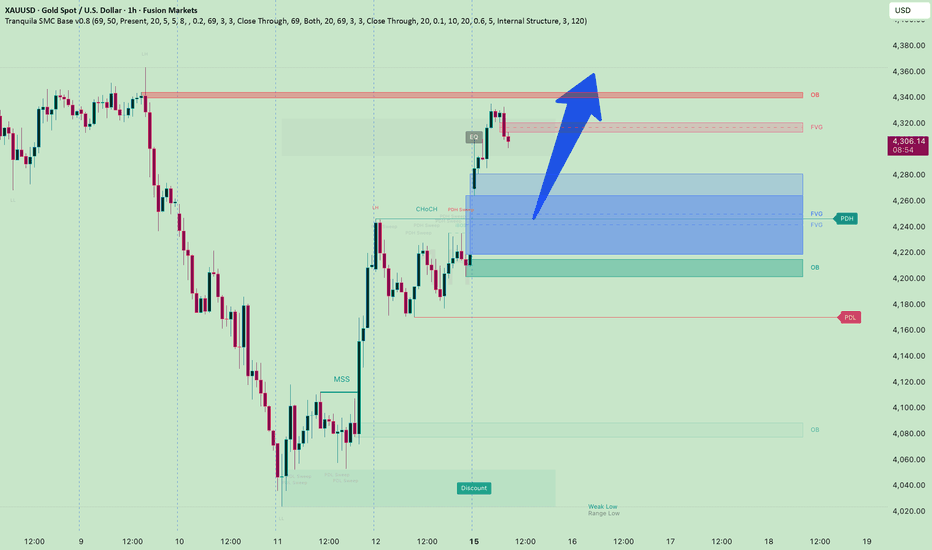
NIFTY | 15-Minute Demand & Supply Zone Analysis📊 NIFTY | 15-Minute Demand & Supply Zone Analysis
Current Price: 23,949.70
━━━━━━━━━━━━━━━━━━━━━━
🟢 Primary Demand Floor:
23,532.90 – 23,577.30
• Freshly established demand zone
• Base formed after strong rally
• Buyers currently defending structure
• Key area to maintain bullish momentum
━━━━━━━━━━━━━━━━━━━━━━
🔴 Intermediary Supply:
24,011.40
• Recent swing high
• Major supply concentration
• Immediate hurdle for buyers
• Psychological 24,000 zone alignment
━━━━━━━━━━━━━━━━━━━━━━
🔴 Major Supply Matrix:
24,000 – 24,011.40
• High-probability reaction zone
• Profit-booking area for short-term traders
• Breakout confirmation required above supply
━━━━━━━━━━━━━━━━━━━━━━
📊 Macro Range
Upper Boundary:
24,011.40
Lower Boundary:
23,070.15
Intermediate Structural Support:
23,162.50
━━━━━━━━━━━━━━━━━━━━━━
📈 Structural Bias: BULLISH
• Strong breakout from consolidation
• Higher highs and higher lows intact
• Demand zones holding firmly
• Momentum remains with buyers
Bias remains constructive while price sustains above the primary demand floor.
━━━━━━━━━━━━━━━━━━━━━━
⚠️ Hard Invalidation
A sustained breakdown below 23,532.90–23,577.30 would weaken the immediate bullish structure and increase the probability of a deeper retracement toward 23,162.50 and potentially 23,070.15.
━━━━━━━━━━━━━━━━━━━━━━
Educational Purpose Only.
This analysis is based solely on price action, market structure, and demand-supply dynamics. It is not investment advice, a recommendation, or a solicitation to buy or sell any security. Please conduct your own research and consult a SEBI-registered investment advisor before making investment decisions. 360ONE Demand and Supply=========================================================================
DEMAND AND SUPPLY ZONE SUMMARY | 360 ONE WAM (15m)
=========================================================================
Current Price : 1,064.00 (-0.12%)
Session Volume : 45.77K (Consolidative Activity)
Primary Demand Floor : 1,036.70 – 1,032.20
Institutional Accumulation Zone
Intermediary Supply : 1,066.80 – 1,071.70
Active Supply / Near-Term Resistance
Major Supply Matrix : 1,089.00 – 1,093.30
Major Overhead Supply Cluster
Macro Range : 1,031.30 – 1,093.30
Structural Bias : Demand-Led Recovery Within Range
Hard Invalidation : Sustained Breakdown Below 1,031.30
=========================================================================
EDUCATIONAL DISCLAIMER
This analysis is provided solely for educational and informational purposes.
The observations presented are based on price action, order flow, liquidity
zones, and market structure visible on the chart at the time of publication.
This is not investment advice, a recommendation, or a solicitation to buy or
sell any security. Markets are subject to risk, and price behaviour can change
without notice. Traders and investors should conduct their own research, apply
appropriate risk management, and consult a SEBI-registered financial advisor
before making any investment or trading decisions.
========================================================================= Education 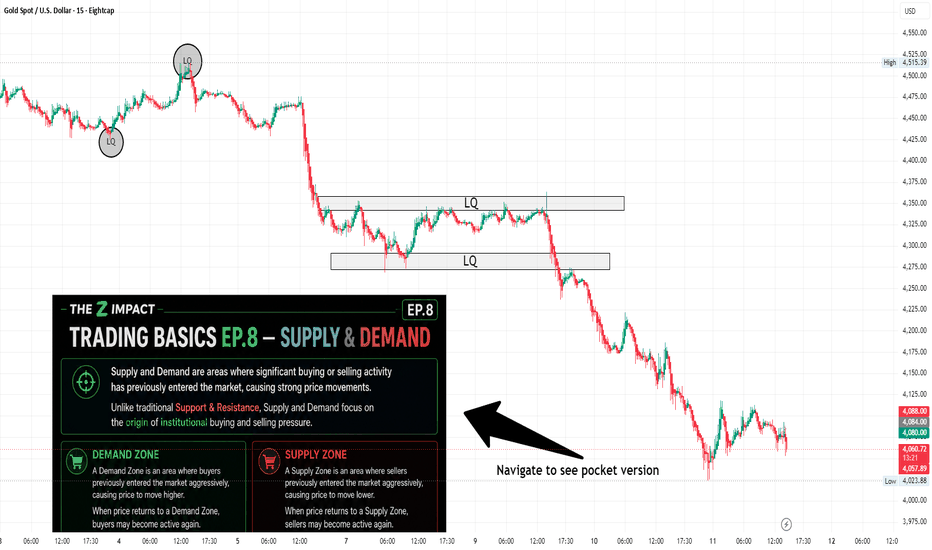
Bank Nifty Analysis – 15 Minute Timeframe Supply Zone📊 Bank Nifty Analysis – 15 Minute Timeframe (Educational Chart Observation)
CMP: 55,108
Current Structure: Reaction from Fresh Supply Zone
Market Mood: Cautious
🔴 Fresh Supply Zone
Reference Supply Area: 55,130 – 55,242
The 15-minute chart highlights a fresh DBD (Drop-Base-Drop) supply zone that recently attracted market participation.
Price moved into this zone during the recent advance but was unable to sustain within the area and subsequently moved lower. The reaction indicates that this zone continues to remain relevant from a market structure perspective.
📈 Chart Observation
The primary observation on the chart is the market's interaction with the fresh supply zone.
After entering the supply area, price spent limited time within the zone before moving away from it. This behaviour suggests that market participants were active around this reference area and that the zone continues to be respected by the market.
As of now, price is trading below the supply zone, keeping market attention focused on future interactions with this area.
🎯 What to Watch
• Observe how price behaves if it revisits the 55,130–55,242 zone.
• Continued rejection within the zone would indicate ongoing market activity around this reference area.
• Sustained acceptance above the zone may indicate a change in market participation.
• The quality of price action inside the supply zone remains more important than any individual candle movement.
⚠️ Lower Timeframe Observation (5 Minute Chart) -
The 5-minute chart shows that price has already moved away from the 15-minute supply zone following the recent reaction.
Additionally, a higher intraday supply area is visible near 55,402–55,514, highlighting the presence of multiple overhead reference zones.
From an educational perspective, traders should avoid assuming that a move away from supply will necessarily continue without interruption. Lower timeframes can often experience consolidation, pauses, or counter-trend moves after sharp directional movement.
📚 Learning Note
Supply zones represent areas where price previously displayed imbalance. Rather than attempting to forecast direction, many traders focus on observing how price behaves when revisiting these areas and whether market participants continue to react around them.
📝 STWP View
The fresh supply zone between 55,130 and 55,242 remains the primary area of interest on the current 15-minute chart. The recent reaction highlights the importance of this zone, while the 5-minute chart serves as a reminder that price can experience temporary pauses or consolidation after moving away from a supply area.
⚠️ Disclaimer: This post is shared strictly for educational and informational purposes. The observations are based on chart structure and price behaviour only and should not be construed as investment advice, trading advice, a recommendation, or a solicitation to buy or sell any financial instrument. Please consult a SEBI-registered investment advisor before making any investment or trading decisions.
– STWP
🚀 Stay Calm. Stay Clean. Trade With Patience. Trade Smart | Learn Zones | Be Self-Reliant 📊
 Short
Short