NIFTY : Trading Levels (Monthly Expiry) 28-Jul-2026𝗧𝗶𝗺𝗲𝗳𝗿𝗮𝗺𝗲: 15 Min | 𝗟𝗮𝘀𝘁 𝗖𝗹𝗼𝘀𝗲: 24,003.65 (+16.50 / +0.07%) | 𝗥𝗮𝗻𝗴𝗲: 23,985.10 - 24,008.10
━━━━━━━━━━━━━━━━━━━━━━━━
🔎 𝗞𝗘𝗬 𝗟𝗘𝗩𝗘𝗟𝗦 𝗧𝗢 𝗪𝗔𝗧𝗖𝗛
🔴 𝗟𝗮𝘀𝘁 𝗜𝗻𝘁𝗿𝗮𝗱𝗮𝘆 𝗥𝗲𝘀𝗶𝘀𝘁𝗮𝗻𝗰𝗲 — 𝟮𝟰,𝟮𝟬𝟰 (𝘔𝘢𝘫𝘰𝘳 𝘙𝘦𝘴𝘪𝘴𝘵𝘢𝘯𝘤𝘦)
🟠 𝗢𝗽𝗲𝗻𝗶𝗻𝗴 𝗭𝗼𝗻𝗲 - 𝗨𝗽𝗽𝗲𝗿 — 𝟮𝟰,𝟬𝟯𝟲 (𝘕𝘰-𝘛𝘳𝘢𝘥𝘦 𝘡𝘰𝘯𝘦 𝘛𝘰𝘱)
⚪ 𝗥𝗲𝗳𝗲𝗿𝗲𝗻𝗰𝗲 𝗣𝗶𝘃𝗼𝘁 — 𝟮𝟰,𝟬𝟬𝟯.𝟲𝟱 (𝘓𝘢𝘴𝘵 𝘊𝘭𝘰𝘴𝘦)
🟠 𝗢𝗽𝗲𝗻𝗶𝗻𝗴 𝗭𝗼𝗻𝗲 - 𝗟𝗼𝘄𝗲𝗿 — 𝟮𝟯,𝟵𝟰𝟵 (𝘕𝘰-𝘛𝘳𝘢𝘥𝘦 𝘡𝘰𝘯𝘦 𝘉𝘰𝘵𝘵𝗼𝗺)
🟢 𝗟𝗮𝘀𝘁 𝗜𝗻𝘁𝗿𝗮𝗱𝗮𝘆 𝗦𝘂𝗽𝗽𝗼𝗿𝘁 — 𝟮𝟯,𝟴𝟳𝟭
🟢 𝗦𝗲𝗰𝗼𝗻𝗱𝗮𝗿𝘆 𝗦𝘂𝗽𝗽𝗼𝗿𝘁 — 𝟮𝟯,𝟴𝟬𝟴
🟢 𝗘𝘅𝘁𝗲𝗻𝗱𝗲𝗱 𝗦𝘂𝗽𝗽𝗼𝗿𝘁 — 𝟮𝟯,𝟲𝟵𝟭 (𝘥𝘢𝘴𝘩𝘦𝘥 / 𝘶𝘯𝘤𝘰𝘯𝘧𝘪𝘳𝘮𝘦𝘥)
📦 𝙊𝙥𝙚𝙣𝙞𝙣𝙜 𝙎𝙪𝙥𝙥𝙤𝙧𝙩 𝙕𝙤𝙣𝙚: 𝟮𝟯,𝟵𝟰𝟵 - 𝟮𝟰,𝟬𝟯𝟲 → marked as a "𝗡𝗼 𝗧𝗿𝗮𝗱𝗲 𝗭𝗼𝗻𝗲" on the chart. Price is currently sitting inside this box.
━━━━━━━━━━━━━━━━━━━━━━━━
🧭 𝗢𝗩𝗘𝗥𝗔𝗟𝗟 𝗧𝗥𝗘𝗡𝗗 𝗩𝗜𝗘𝗪
Nifty has recovered smartly off the recent 23,600-23,700 correction low, closing at 𝟮𝟰,𝟬𝟬𝟯.𝟲𝟱, right in the middle of the 𝟮𝟯,𝟵𝟰𝟵-𝟮𝟰,𝟬𝟯𝟲 𝗢𝗽𝗲𝗻𝗶𝗻𝗴 𝗭𝗼𝗻𝗲. This zone is behaving like a coiling spring — as long as price stays trapped inside it, directional conviction stays low.
📌 𝗕𝗶𝗮𝘀: Neutral 𝘪𝘯𝘴𝘪𝘥𝘦 the box. A sustained break 𝗮𝗯𝗼𝘃𝗲 𝟮𝟰,𝟬𝟯𝟲 opens the path to 𝟮𝟰,𝟮𝟬𝟰 🟢. A sustained break 𝗯𝗲𝗹𝗼𝘄 𝟮𝟯,𝟵𝟰𝟵 exposes 𝟮𝟯,𝟴𝟳𝟭 → 𝟮𝟯,𝟴𝟬𝟴 → 𝟮𝟯,𝟲𝟵𝟭 🔴 (𝘵𝘩𝘦 𝘥𝘦𝘦𝘱𝘦𝘳 𝘭𝘦𝘨 𝘪𝘴 𝘥𝘢𝘴𝘩𝘦𝘥 𝘰𝘯 𝘵𝘩𝘦 𝘤𝘩𝘢𝘳𝘵 — 𝘵𝘳𝘦𝘢𝘵 𝘪𝘵 𝘢𝘴 𝘢 𝘱𝘰𝘴𝘴𝘪𝘣𝘭𝘦 𝘦𝘹𝘵𝘦𝘯𝘴𝘪𝘰𝘯, 𝘯𝘰𝘵 𝘨𝘶𝘢𝘳𝘢𝘯𝘵𝘦𝘦𝘥).
🗓️ 𝗜𝗺𝗽𝗼𝗿𝘁𝗮𝗻𝘁: 𝗧𝗼𝗱𝗮𝘆 𝗶𝘀 𝗡𝗶𝗳𝘁𝘆'𝘀 𝗠𝗼𝗻𝘁𝗵𝗹𝘆 𝗘𝘅𝗽𝗶𝗿𝘆. Expect sharper-than-usual intraday volatility, quick reversals around option-heavy strikes, and possible "pinning" near max-pain zones closer to the close. Respect stop-losses strictly — expiry days punish hesitation on both sides.
━━━━━━━━━━━━━━━━━━━━━━━━
🎨 𝗨𝗡𝗗𝗘𝗥𝗦𝗧𝗔𝗡𝗗𝗜𝗡𝗚 𝗧𝗛𝗘 𝗖𝗛𝗔𝗥𝗧 𝗖𝗢𝗟𝗢𝗨𝗥 𝗖𝗢𝗗𝗘
🟢 𝗚𝗿𝗲𝗲𝗻 𝘇𝗶𝗴-𝘇𝗮𝗴 𝗹𝗶𝗻𝗲 → Bullish / Long bias path
🔴 𝗥𝗲𝗱 𝘇𝗶𝗴-𝘇𝗮𝗴 𝗹𝗶𝗻𝗲 → Bearish / Short bias path
🟠 𝗢𝗿𝗮𝗻𝗴𝗲 𝘇𝗶𝗴-𝘇𝗮𝗴 𝗹𝗶𝗻𝗲 → Sideways / 𝗡𝗼-𝗧𝗿𝗮𝗱𝗲 𝗭𝗼𝗻𝗲 — avoid directional bets here
〰️ 𝗗𝗮𝘀𝗵𝗲𝗱 𝗹𝗶𝗻𝗲 → Probable extension of trend — 𝘮𝘢𝘺 𝘰𝘳 𝘮𝘢𝘺 𝘯𝘰𝘵 𝘱𝘭𝘢𝘺 𝘰𝘶𝘵, treat as a roadmap, not a guarantee
━━━━━━━━━━━━━━━━━━━━━━━━
🌅 𝗦𝗖𝗘𝗡𝗔𝗥𝗜𝗢-𝗪𝗜𝗦𝗘 𝗣𝗟𝗔𝗡 (𝘎𝘢𝘱 𝘰𝘧 100+ 𝘱𝘰𝘪𝘯𝘵𝘴 𝘤𝘰𝘯𝘴𝘪𝘥𝘦𝘳𝘦𝘥 𝘢𝘴 𝘢 "𝘎𝘢𝘱")
𝟭️⃣ 𝗚𝗔𝗣-𝗨𝗣 𝗢𝗣𝗘𝗡𝗜𝗡𝗚 (𝘖𝘱𝘦𝘯 𝘢𝘣𝘰𝘷𝘦 ~24,104)
Holds above 𝟮𝟰,𝟬𝟯𝟲 → follow the 🟢 green path. Long on shallow dips towards 24,036-24,060, targeting 𝟮𝟰,𝟮𝟬𝟰
Slips back inside 𝟮𝟯,𝟵𝟰𝟵-𝟮𝟰,𝟬𝟯𝟲 within 15-30 min → exhaustion gap risk, don't chase, wait for stabilization
⚠️ 𝘖𝘯 𝘦𝘹𝘱𝘪𝘳𝘺 𝘥𝘢𝘺, 𝘨𝘢𝘱-𝘶𝘱 𝘤𝘢𝘭𝘭 𝘱𝘳𝘦𝘮𝘪𝘶𝘮𝘴 𝘨𝘦𝘵 𝘣𝘪𝘥 𝘶𝘱 𝘧𝘢𝘴𝘵 𝘢𝘯𝘥 𝘤𝘢𝘯 𝘤𝘳𝘶𝘴𝘩 𝘫𝘶𝘴𝘵 𝘢𝘴 𝘧𝘢𝘴𝘵 — 𝘢𝘷𝘰𝘪𝘥 𝘣𝘶𝘺𝘪𝘯𝘨 𝘯𝘢𝘬𝘦𝘥 𝘤𝘢𝘭𝘭𝘴 𝘳𝘪𝘨𝘩𝘵 𝘢𝘵 𝘵𝘩𝘦 𝘰𝘱𝘦𝘯
𝟮️⃣ 𝗙𝗟𝗔𝗧 𝗢𝗣𝗘𝗡𝗜𝗡𝗚 (𝘖𝘱𝘦𝘯 𝘸𝘪𝘵𝘩𝘪𝘯 ~23,904 - 24,104)
Inside 𝟮𝟯,𝟵𝟰𝟵-𝟮𝟰,𝟬𝟯𝟲 → 🟠 No-Trade Zone, expect chop. Wait for a clean break with volume
Close above 𝟮𝟰,𝟬𝟯𝟲 → 🟢 target 𝟮𝟰,𝟮𝟬𝟰
Close below 𝟮𝟯,𝟵𝟰𝟵 → 🔴 target 𝟮𝟯,𝟴𝟳𝟭 → 𝟮𝟯,𝟴𝟬𝟴, dashed extension to 𝟮𝟯,𝟲𝟵𝟭 only if momentum truly continues
⚠️ 𝘖𝘯 𝘦𝘹𝘱𝘪𝘳𝘺 𝘸𝘪𝘵𝘩 𝘢 𝘧𝘭𝘢𝘵 𝘰𝘱𝘦𝘯, 𝘱𝘳𝘦𝘮𝘪𝘶𝘮-𝘴𝘦𝘭𝘭𝘪𝘯𝘨 𝘴𝘵𝘳𝘢𝘵𝘦𝘨𝘪𝘦𝘴 (𝘤𝘳𝘦𝘥𝘪𝘵 𝘴𝘱𝘳𝘦𝘢𝘥𝘴, 𝘐𝘳𝘰𝘯 𝘊𝘰𝘯𝘥𝘰𝘳𝘴) 𝘩𝘰𝘭𝘥 𝘢𝘯 𝘦𝘥𝘨𝘦 𝘰𝘷𝘦𝘳 𝘯𝘢𝘬𝘦𝘥 𝘣𝘶𝘺𝘪𝘯𝘨 — 𝘵𝘩𝘦𝘵𝘢 𝘥𝘦𝘤𝘢𝘺 𝘪𝘴 𝘴𝘩𝘢𝘳𝘱𝘦𝘴𝘵 𝘵𝘰𝘥𝘢𝘺
𝟯️⃣ 𝗚𝗔𝗣-𝗗𝗢𝗪𝗡 𝗢𝗣𝗘𝗡𝗜𝗡𝗚 (𝘖𝘱𝘦𝘯 𝘣𝘦𝘭𝘰𝘸 ~23,904)
Below 𝟮𝟯,𝟴𝟳𝟭 → follow 🔴 red path, short pullbacks towards 23,871-23,949, first target 𝟮𝟯,𝟴𝟬𝟴
Move beyond 23,808 towards 𝟮𝟯,𝟲𝟵𝟭 is 𝘥𝘢𝘴𝘩𝘦𝘥 — confirm with sustained trade below 23,808 before extending short targets that far
Quick reclaim above 𝟮𝟯,𝟵𝟰𝟵 → possible trap, wait for a hold before considering long reversal
⚠️ 𝘋𝘰𝘯'𝘵 𝘴𝘩𝘰𝘳𝘵 𝘱𝘶𝘳𝘦𝘭𝘺 𝘰𝘧𝘧 𝘢 𝘸𝘦𝘢𝘬 𝘰𝘱𝘦𝘯𝘪𝘯𝘨 𝘤𝘢𝘯𝘥𝘭𝘦 — 𝘤𝘰𝘯𝘧𝘪𝘳𝘮 𝘸𝘪𝘵𝘩 𝘴𝘶𝘴𝘵𝘢𝘪𝘯𝘦𝘥 𝘵𝘳𝘢𝘥𝘦 𝘣𝘦𝘭𝘰𝘸 𝘴𝘶𝘱𝘱𝘰𝘳𝘵
━━━━━━━━━━━━━━━━━━━━━━━━
⚠️ 𝗥𝗜𝗦𝗞 𝗠𝗔𝗡𝗔𝗚𝗘𝗠𝗘𝗡𝗧 𝗧𝗜𝗣𝗦 𝗙𝗢𝗥 𝗢𝗣𝗧𝗜𝗢𝗡𝗦 𝗧𝗥𝗔𝗗𝗜𝗡𝗚 (𝘌𝘹𝘵𝘳𝘢 𝘊𝘢𝘳𝘦 - 𝘌𝘹𝘱𝘪𝘳𝘺 𝘋𝘢𝘺)
💰 𝗣𝗼𝘀𝗶𝘁𝗶𝗼𝗻 𝘀𝗶𝘇𝗶𝗻𝗴 𝗳𝗶𝗿𝘀𝘁 — risk only a small, predefined % of capital per trade
🛑 𝗦𝘁𝗼𝗽-𝗹𝗼𝘀𝘀 𝗶𝘀 𝗻𝗼𝗻-𝗻𝗲𝗴𝗼𝘁𝗶𝗮𝗯𝗹𝗲 — decide your SL before entering
🎯 𝗕𝗼𝗼𝗸 𝗽𝗮𝗿𝘁𝗶𝗮𝗹 𝗽𝗿𝗼𝗳𝗶𝘁𝘀 at each level instead of holding for the "perfect" exit
⏳ 𝗧𝗵𝗲𝘁𝗮 𝗱𝗲𝗰𝗮𝘆 𝗶𝘀 𝗲𝘅𝘁𝗿𝗲𝗺𝗲 𝘁𝗼𝗱𝗮𝘆 — prefer defined-risk spreads over naked buying
🧲 𝗪𝗮𝘁𝗰𝗵 𝗳𝗼𝗿 "𝗽𝗶𝗻𝗻𝗶𝗻𝗴" — price often gravitates towards heavy OI / max-pain strikes late in the session
🚫 𝗡𝗲𝘃𝗲𝗿 𝗮𝘃𝗲𝗿𝗮𝗴𝗲 𝗹𝗼𝘀𝗶𝗻𝗴 𝗽𝗼𝘀𝗶𝘁𝗶𝗼𝗻𝘀 — a fast way to blow up an account on expiry day
📰 𝗧𝗿𝗮𝗰𝗸 𝗻𝗲𝘄𝘀/𝗲𝘃𝗲𝗻𝘁𝘀 — rollover activity and expiry-specific flows can invalidate levels quickly
🔁 𝗔𝘃𝗼𝗶𝗱 𝗼𝘃𝗲𝗿𝘁𝗿𝗮𝗱𝗶𝗻𝗴 — one clean setup beats five impulsive trades
🧊 𝗦𝘁𝗮𝘆 𝗲𝗺𝗼𝘁𝗶𝗼𝗻𝗮𝗹𝗹𝘆 𝗻𝗲𝘂𝘁𝗿𝗮𝗹 — trade what price confirms, not what you predict
━━━━━━━━━━━━━━━━━━━━━━━━
📝 𝗦𝗨𝗠𝗠𝗔𝗥𝗬 & 𝗖𝗢𝗡𝗖𝗟𝗨𝗦𝗜𝗢𝗡
Nifty closed at 𝟮𝟰,𝟬𝟬𝟯.𝟲𝟱, sitting right inside the 𝟮𝟯,𝟵𝟰𝟵-𝟮𝟰,𝟬𝟯𝟲 𝗡𝗼-𝗧𝗿𝗮𝗱𝗲 𝗭𝗼𝗻𝗲 — a coiled setup ahead of today's monthly expiry.
Gap-up + hold above 24,036 → target 𝟮𝟰,𝟮𝟬𝟰 🟢
Flat open inside 23,949-24,036 → 𝗽𝗮𝘁𝗶𝗲𝗻𝗰𝗲, not prediction 🟠
Gap-down + breakdown of 23,871 → target 𝟮𝟯,𝟴𝟬𝟴, with 𝟮𝟯,𝟲𝟵𝟭 as a dashed, unconfirmed extension 🔴
𝘉𝘦𝘪𝘯𝘨 𝘦𝘹𝘱𝘪𝘳𝘺 𝘥𝘢𝘺, 𝘦𝘹𝘱𝘦𝘤𝘵 𝘴𝘩𝘢𝘳𝘱𝘦𝘳 𝘮𝘰𝘷𝘦𝘴 𝘢𝘯𝘥 𝘲𝘶𝘪𝘤𝘬𝘦𝘳 𝘳𝘦𝘷𝘦𝘳𝘴𝘢𝘭𝘴 𝘵𝘩𝘢𝘯 𝘶𝘴𝘶𝘢𝘭 — 𝘵𝘳𝘢𝘥𝘦 𝘵𝘩𝘦 𝘳𝘦𝘢𝘤𝘵𝘪𝘰𝘯 𝘢𝘵 𝘵𝘩𝘦𝘴𝘦 𝘭𝘦𝘷𝘦𝘭𝘴, 𝘴𝘪𝘻𝘦 𝘱𝘰𝘴𝘪𝘵𝘪𝘰𝘯𝘴 𝘤𝘰𝘯𝘴𝘦𝘳𝘷𝘢𝘵𝘪𝘷𝘦𝘭𝘺, 𝘢𝘯𝘥 𝘭𝘦𝘢𝘯 𝘰𝘯 𝘥𝘦𝘧𝘪𝘯𝘦𝘥-𝘳𝘪𝘴𝘬 𝘴𝘵𝘳𝘢𝘵𝘦𝘨𝘪𝘦𝘴 𝘸𝘩𝘦𝘳𝘦𝘷𝘦𝘳 𝘵𝘩𝘦 𝘮𝘢𝘳𝘬𝘦𝘵 𝘴𝘪𝘵𝘴 𝘪𝘯𝘴𝘪𝘥𝘦 𝘵𝘩𝘦 𝘰𝘳𝘢𝘯𝘨𝘦 𝘻𝘰𝘯𝘦.
━━━━━━━━━━━━━━━━━━━━━━━━
⚠️ 𝗗𝗜𝗦𝗖𝗟𝗔𝗜𝗠𝗘𝗥
𝘐 𝘢𝘮 𝘯𝘰𝘵 𝘢 𝘚𝘌𝘉𝘐 𝘳𝘦𝘨𝘪𝘴𝘵𝘦𝘳𝘦𝘥 𝘢𝘯𝘢𝘭𝘺𝘴𝘵. 𝘛𝘩𝘪𝘴 𝘱𝘰𝘴𝘵 𝘪𝘴 𝘱𝘶𝘳𝘦𝘭𝘺 𝘧𝘰𝘳 𝘦𝘥𝘶𝘤𝘢𝘵𝘪𝘰𝘯𝘢𝘭 𝘢𝘯𝘥 𝘪𝘯𝘧𝘰𝘳𝘮𝘢𝘵𝘪𝘰𝘯𝘢𝘭 𝘱𝘶𝘳𝘱𝘰𝘴𝘦𝘴, 𝘣𝘢𝘴𝘦𝘥 𝘰𝘯 𝘵𝘦𝘤𝘩𝘯𝘪𝘤𝘢𝘭 𝘤𝘩𝘢𝘳𝘵 𝘰𝘣𝘴𝘦𝘳𝘷𝘢𝘵𝘪𝘰𝘯𝘴, 𝘢𝘯𝘥 𝘴𝘩𝘰𝘶𝘭𝘥 𝘯𝘰𝘵 𝘣𝘦 𝘤𝘰𝘯𝘴𝘵𝘳𝘶𝘦𝘥 𝘢𝘴 𝘪𝘯𝘷𝘦𝘴𝘵𝘮𝘦𝘯𝘵/𝘵𝘳𝘢𝘥𝘪𝘯𝘨 𝘢𝘥𝘷𝘪𝘤𝘦 𝘰𝘳 𝘢 𝘣𝘶𝘺/𝘴𝘦𝘭𝘭 𝘳𝘦𝘤𝘰𝘮𝘮𝘦𝘯𝘥𝘢𝘵𝘪𝘰𝘯. 𝘗𝘭𝘦𝘢𝘴𝘦 𝘤𝘰𝘯𝘴𝘶𝘭𝘵 𝘢 𝘳𝘦𝘨𝘪𝘴𝘵𝘦𝘳𝘦𝘥 𝘧𝘪𝘯𝘢𝘯𝘤𝘪𝘢𝘭 𝘢𝘥𝘷𝘪𝘴𝘰𝘳 𝘢𝘯𝘥 𝘥𝘰 𝘺𝘰𝘶𝘳 𝘰𝘸𝘯 𝘥𝘶𝘦 𝘥𝘪𝘭𝘪𝘨𝘦𝘯𝘤𝘦 𝘣𝘦𝘧𝘰𝘳𝘦 𝘮𝘢𝘬𝘪𝘯𝘨 𝘢𝘯𝘺 𝘵𝘳𝘢𝘥𝘪𝘯𝘨 𝘰𝘳 𝘪𝘯𝘷𝘦𝘴𝘵𝘮𝘦𝘯𝘵 𝘥𝘦𝘤𝘪𝘴𝘪𝘰𝘯𝘴. 𝘛𝘳𝘢𝘥𝘪𝘯𝘨 𝘪𝘯 𝘦𝘲𝘶𝘪𝘵𝘺, 𝘧𝘶𝘵𝘶𝘳𝘦𝘴, 𝘢𝘯𝘥 𝘰𝘱𝘵𝘪𝘰𝘯𝘴 — 𝘦𝘴𝘱𝘦𝘤𝘪𝘢𝘭𝘭𝘺 𝘰𝘯 𝘦𝘹𝘱𝘪𝘳𝘺 𝘥𝘢𝘺𝘴 — 𝘪𝘯𝘷𝘰𝘭𝘷𝘦𝘴 𝘴𝘶𝘣𝘴𝘵𝘢𝘯𝘵𝘪𝘢𝘭 𝘳𝘪𝘴𝘬 𝘰𝘧 𝘭𝘰𝘴𝘴.
#Nifty50 #NiftyTrading #StockMarket #OptionsTrading #ExpiryDay #TradingView  Long
Long
The Anatomy of a Move, and Why the Base Always WinsThis post is educational and observational in nature based on historical price action. It is not a forecast or a trading recommendation
A: The Resistance
Marked as point A, this is the resistance zone where price has historically struggled to move higher, with sellers stepping in and rejecting advances.
B: The Rally
Point B marks the rally, the sustained upward move that followed once price cleared the resistance zone.
C: The Peak
Point C marks the peak, the highest point reached during that rally before price began to slow down or reverse.
D: The Consolidation
Point D marks the consolidation pattern that formed after the peak, a phase where price moves sideways in a tighter range as the market pauses and digests the prior move rather than continuing to extend.
E: The Base
Point E marks the base, the area where price settles into a tighter, more stable range at a lower level. This is highlighted as one of the more favorable zones to study breakouts from, since a base reflects accumulated support rather than an extended or exhausted move.
A Note on Breakout Location
A recurring theme in how these zones are studied is the importance of where a breakout originates. Breakouts that occur directly at horizontal resistance levels or at all time highs tend to carry lower probability, since they are breaking out of supply heavy areas with no base of accumulated support beneath them. Breakouts from a base, an area like point E, are generally considered structurally stronger, since they emerge from a zone of stability rather than exhaustion.
 Long
Long
The Point That Held Everything Up : Liquidity This post is educational and research based in nature, using historical price action across the three month and monthly timeframes. It is not a forecast or a trading recommendation.
The Three Month Trendline
On the left side of this post, the three month timeframe shows a trendline marked in yellow. This trendline has been respected multiple times across a long stretch of price history, with price repeatedly reacting to it rather than ignoring it. A trendline that holds this consistently across such a high timeframe carries meaningful structural weight
What Is a Major Liquidity Point
On the right side, the monthly timeframe highlights what can be called a major liquidity point. This term refers to a significant swing low, a point where the market found support and reversed higher. What makes it major rather than a routine higher low is what happened afterward. From this exact point, the market went on to create a consistent sequence of higher highs and higher lows, eventually culminating in a fresh all time high.
A point like this accumulates significance over time. Every higher low that follows in an uptrend is, in some sense, built on the foundation of this original low holding. Traders, position players and investors who entered anywhere along that rally often have this level sitting somewhere in their mental map of the trend, even if they are not consciously tracking it. This is what gives it the label of a liquidity point, since a large amount of positioning and decision making in the market becomes indirectly anchored to whether this level continues to hold.
 Long
Long
What is Confluence in Trading ? This post is educational and observational in nature based on historical price action. It is not a forecast or a trading recommendation.
The Fibonacci Extension Tool
The Fibonacci tool here is drawn from point A to point B, and instead of measuring a retracement between two points, it is used to project levels beyond point B, extending above the high of point A. This is what generates the 127.2% and 161.8% extension levels, both of which sit above the original high and act as forward looking reference points that the market has not yet visited.
The Extension Levels in Action
Once these levels were projected, price approached them and initially treated the zone as resistance, reacting and pulling back on the first attempt. Later, the same zone was revisited and this time held as support.
The Parallel Channel Confluence
At the same time, a parallel channel pattern formed on the chart, and its boundary lines up almost precisely with these Fibonacci extension levels. This overlap between a price based structure like a channel and a mathematically projected level like a Fibonacci extension is known as confluence, where two independent tools point to the same zone.
The Bigger Picture ( Confluence )
This chart illustrates how Fibonacci extensions are not just retracement tools but can also be used to anticipate levels the market has never previously traded at. When those projected levels then align with an independently formed structure like a parallel channel, it becomes a clear example of confluence
 Education
XAUUSD: Rebound Lives Above 4,068 Market Context XAUUSD: Rebound Lives Above 4,068
Market Context
Gold is recovering from the Deep Demand Zone as softer oil prices and a pause in US-Iran attacks ease inflation fears and reduce some pressure on Fed rate expectations.
This gives buyers short-term support, but the market is not fully safe. Upcoming policy decisions from the Fed, BoE, and BoJ can still create sharp volatility across USD and gold.
Key point: gold is recovering, but buyers must hold 4,068 to keep the rebound structure alive.
Technical Structure
Gold is trading around 4,090 after bouncing from the Deep Demand Zone. Buyers are showing strength, and the short-term recovery remains healthy as long as price stays above 4,068.
The nearest key level is 4,068. If price pulls back and holds above this area, gold may continue toward the Sell Reaction Zone around 4,140 - 4,165.
The Buyer Hold Zone sits around 4,000 - 4,020. If 4,068 fails, price may return to this area before any new bullish reaction appears.
Above the market, 4,140 - 4,165 is the main zone to watch for selling reaction. If gold reaches this area and rejects, profit-taking or fresh selling pressure may return.
Key Levels
Current Price: 4,090
Buy Trigger / Retest Zone: 4,068
Buyer Hold Zone: 4,000 - 4,020
Deep Demand Zone: 3,960 - 4,000
Sell Reaction Zone: 4,140 - 4,165
Major Sell Zone: 4,165 - 4,200
Bullish Continuation: Above 4,140
Bearish Risk: Below 4,068
Trading Plan
Buy Scenario
Entry: 4,068 after bullish confirmation
SL: Below 4,020
TP: 4,100 / 4,140 / 4,165
Condition: Price must retest 4,068 and hold with bullish reaction. Buyers need to keep structure above this level and avoid losing momentum after the pullback.
Buy Reload
Entry: 4,000 - 4,020
SL: Below 3,960
TP: 4,068 / 4,100 / 4,140
Condition: Price loses 4,068 but holds the Buyer Hold Zone. This setup needs a clear bullish rejection before any buy idea becomes valid.
Sell Reaction
Entry: 4,140 - 4,165
SL: Above 4,200
TP: 4,100 / 4,068 / 4,020
Condition: Price reaches the Sell Reaction Zone and fails to continue higher. Bearish rejection from this area can trigger a short-term pullback.
Breakdown Sell
Entry: Below 4,068 after confirmed breakdown
SL: Above 4,100
TP: 4,020 / 4,000 / 3,960
Condition: Price loses 4,068, retest fails, and bearish momentum returns. This would weaken the recovery and open the path back to the Buyer Hold Zone.
Overall Bias
Gold is recovering, and buyers still have control while price holds above 4,068.
If 4,068 holds, the next target is 4,140 - 4,165. If that sell zone rejects price, gold may pull back again before deciding the next move.
Best approach: wait for a clean retest at 4,068 or a reaction at 4,140 - 4,165. Do not chase the move in the middle.
Will buyers defend 4,068 and push gold into the sell zone, or will sellers break the rebound structure first?
 Long
Long
 Short
Short
GULSHAN POLYOLS LIMITED (NSE) — WEEKLY ELLIOTT WAVE OUTLOOKMarket Structure
NSE:GULPOLY appears to have completed a complex corrective Wave (2), ending with a textbook 5-wave decline inside a falling channel. Price has now broken above the channel resistance, suggesting that the correction may be complete and the next impulsive cycle could be underway.
Elliott Wave Count
Primary Wave (1) completed near ₹354.15.
Complex ABC corrective Wave (2) unfolded over several years.
Final leg ((c)) completed as a clear 5-wave impulse.
Recent breakout above the descending channel increases the probability that Primary Wave (3) has begun.
Technical Observations
Breakout from long-term falling channel
Higher low formation after Wave (5) bottom
Increasing buying interest near support
Weekly trend attempting to reverse after prolonged correction
Key Levels
Current Price: ₹197.74 as on 27/07/2026
Immediate Resistance: ₹220–225
Major Resistance: ₹260
Long-term Confirmation: Above ₹260
Invalidation: Sustained close below ₹ 140-150
Bullish Scenario
If the breakout sustains, Wave (3) typically becomes the strongest Elliott Wave and can extend significantly beyond Wave (1). A move above ₹220 would strengthen the bullish outlook, while a decisive break above ₹260 would confirm higher-degree trend continuation.
Trading Plan
Aggressive Entry: On current breakout with proper risk management.
Conservative Entry: Wait for a successful retest of the breakout zone.
Risk Management: Keep stop-loss below the recent swing low or below the channel breakout level according to your trading strategy.
Conclusion
The long corrective phase appears to be ending, and Gulshan Polyols may be entering a fresh impulsive uptrend. The channel breakout, completed Elliott Wave structure, and improving price action all favor a bullish outlook, though confirmation above key resistance levels is still required.
Disclaimer
This analysis is for educational and informational purposes only and reflects my personal interpretation of Elliott Wave Theory and technical analysis. Financial markets are inherently uncertain, and wave counts are subject to change as new price action develops.
This publication is not financial, investment, or trading advice, nor is it a recommendation to buy or sell any security. Always conduct your own research, consider your financial situation and risk tolerance, and consult a qualified financial advisor before making any investment decisions.  Short
Short
Short 
Trading Masterclass #1Institutional trading means trading like hedge funds, banks, prop firms, and professional desks. They do not trade based on emotions, random tips, or gambling. They use systems, probabilities, risk control, position sizing, discipline, and psychology.
Retail traders often lose because they focus only on “entry.” Institutions focus on:
Risk Management
Capital Protection
Position Sizing
Probability
Psychology
Consistency
Repeatable Edge
In options trading, if you think like institutions, your results can improve significantly Education

 Education

Education

 Long
Long
 Short
Short
Short 
WHY IS GOLD STUCK BETWEEN $4080 & $4120 BEFORE FOMC?The plan remains exactly the same as the one I shared with everyone in my weekly analysis.
This week, the major event is the FOMC Press Conference on Wednesday. Because it's a high-impact news week, the market has already started creating twists in its price action. On Monday, Gold opened with a gap-up, attempting to attract both buyers and sellers into the market. However, as I mentioned yesterday, last week's high was formed from an institutional selling zone. Because of that, I don't believe Gold is capable of continuing a sustained upside move after this gap-up opening.
Instead, I expect the market to remain range-bound and spend the next couple of sessions sweeping internal liquidity. In simple terms, I expect today's highs and lows to be taken out before the market reverses. This is the behavior I'm expecting at least until tomorrow.
Based on my experience, whenever Gold opens with a significant gap-up, it often remains range-bound for one to two days, especially when a major red-folder event like the FOMC is scheduled on the third day. This allows institutions to hunt liquidity before making the real move.
For now, I don't believe Gold will achieve a genuine breakout above $4120. The market has simply been trapping everyone who entered short positions below $4100 last week, and it may continue doing so. The goal is to force more traders who sold near the top into uncomfortable positions before the actual move begins.
If you look closely at last Wednesday and Thursday's price action, you'll notice a Head and Shoulders pattern forming on the chart. The neckline is located around the $4105-$4115 zone, which is exactly where Gold is currently facing resistance. Since the market is still trading inside a range, I have no doubt that this area could eventually be broken. However, I believe any breakout above this zone will simply be another liquidity sweep rather than the beginning of a genuine bullish trend.
My current plan of action is straightforward. As long as Gold remains above $4080, I will keep a buying bias until Monday's high is taken out. Once that liquidity has been swept, I will begin looking for high-probability selling opportunities from the top.
On the day of the FOMC, I expect Gold to fall back below $4080, and if that happens, we could witness a significant downside move.
Many traders are expecting Gold to continue higher because last week the market consolidated on Monday before rallying strongly on Tuesday. As a result, retail traders are likely to expect the exact same behavior this week, especially after seeing Monday's gap-up opening. This is precisely why I'm focusing more on market psychology than price alone.
Considering both institutional behavior and retail psychology, my overall bias remains bearish. I'm very clear about that. Right now, the market is simply taking its time. All we need is patience and proper execution at the right moment to capture the bigger move.
I hope you found this fresh Monday update valuable.
What are your thoughts on Gold this week? Let me know your view in the comments.
XAUUSD: Bullish Wave 5 may continue from 4,084Gold is still holding a constructive bullish structure after the strong recovery from the lower base. From Kelly’s view, the current chart suggests that XAUUSD may be preparing for another upside leg, with wave 5 potentially developing if the 4,079–4,084 buy zone continues to hold.
The key idea is simple: gold may correct first, but the main intraday structure still favors bullish continuation while price remains above the rising support line.
⟡ Market structure
The chart shows gold completed a strong recovery from the 4,020 area and formed a clean sequence of higher lows. After pushing into the 4,116 resistance area, price started to pull back, which looks like a healthy correction rather than a full bearish reversal.
Current price is around 4,085, directly near the buy zone wave 5 at 4,079–4,084. This is the key reaction area for buyers. If gold holds this zone and prints bullish confirmation, the next upside leg may continue towards 4,116 first, then 4,140–4,150.
The upper area around 4,140–4,150 is marked as the end wave 5 sell zone, while 4,165 remains the larger resistance and upside confirmation level.
➤ Key levels
◌ 4,079–4,084: buy zone wave 5 and key support
◌ 4,085: current price reaction area
◌ 4,116: first resistance and wave 3 high
◌ 4,140–4,150: end wave 5 / sell reaction zone
◌ 4,165: major resistance and bullish extension level
◌ Below 4,050: area where the bullish setup starts to weaken
⌁ Elliott Wave view
From an Elliott Wave perspective, gold appears to be forming a bullish 5-wave structure after the previous correction ended.
Wave 1 created the first upside reaction from the lower zone. Wave 2 pulled back but held above the base. Wave 3 expanded higher and reached the 4,116 area. Wave 4 may now be forming as a controlled correction into 4,079–4,084. If this zone holds, wave 5 may continue towards 4,140–4,150, with a possible extension towards 4,165 if momentum remains strong.
This is why Kelly would not chase price at resistance. The cleaner setup is to wait for price to respect the buy zone, then follow the next bullish confirmation.
▸ Trading scenario
Preferred scenario: wait for gold to hold the 4,079–4,084 buy zone and show bullish confirmation.
Entry zone: 4,079–4,084 if bullish confirmation appears Stop loss: below the confirmed wave 4 low or below 4,050 Take profit 1: 4,116 Take profit 2: 4,140–4,150 Take profit 3: 4,165
Alternative scenario: if gold breaks below 4,079 and loses the rising trendline with strong bearish pressure, the bullish wave 5 setup weakens. In that case, price may retest the lower support around 4,050–4,020 before building a new structure.
⌁ Kelly’s view
For Kelly, the main structure still favors bullish continuation. Gold has built a clear recovery rhythm, and the current pullback may simply be wave 4 preparing the next wave 5 move.
The best plan is patience: wait for the buy zone reaction, then confirm whether buyers are still defending the trend.
Gold is correcting inside a bullish Elliott structure. If 4,079–4,084 holds, wave 5 may continue towards 4,140–4,165.
Share your view below. Long 
 Long
Long
 Long
Long
 Long
Long
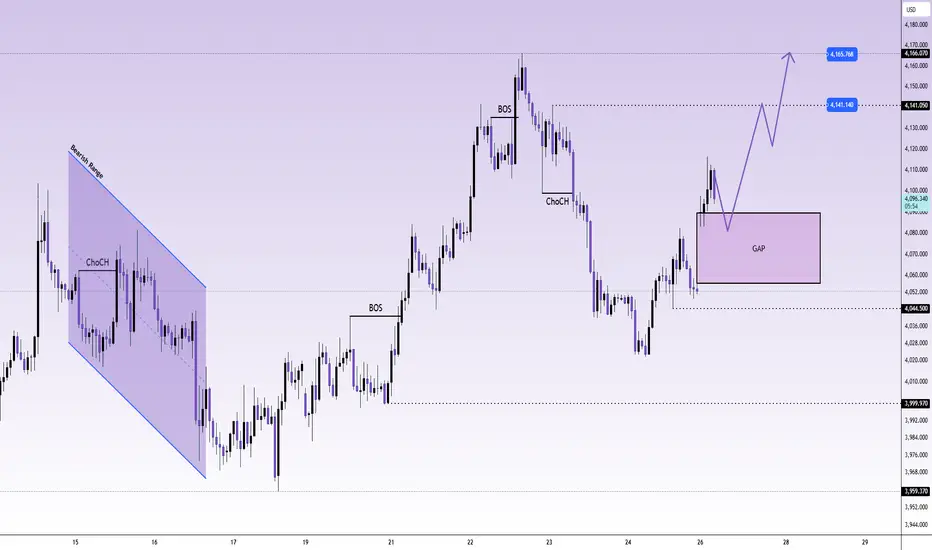
XAUUSD 4044 gap hold — 4165 liquidity next XAUUSD 4044 gap hold — 4165 liquidity next
That gap hold is the whole weekly read now.
Gold spent the week doing exactly what messy markets do. First it trapped sellers around 4,000. Then 4,021 held as value. Then price reclaimed 4,058 - 4,078, pushed into 4,100, and now we’re seeing the next leg trying to build.
This is no longer clean bearish pressure.
Yeah, the bigger chart still has scars from that selloff. But after the BOS, the structure flipped short-term. Price pulled back into the gap zone around 4,055 - 4,090 and didn’t collapse. That matters.
Macro also gives buyers some air. Oil cooling and the pause in US-Iran attacks reduce some inflation and rate-hike pressure. Good for gold. But don’t forget, Fed, BoE and BoJ decisions are still coming. So volatility can slap both sides fast.
Main bias is bullish recovery while gold holds above 4,044.
The zone I’m watching is 4,055 - 4,090. If price keeps defending that gap and builds above 4,100, buyers can go for 4,141 first. Above that, 4,165 is the next liquidity draw.
Not chasing candles though. Pullback, hold, reclaim. That’s the cleaner play.
Trading scenario:
Buy idea only if gold holds the gap zone around 4,055 - 4,090 and reclaims above 4,100 with clean candles.
Entry zone: 4,070 - 4,095 after confirmation
Stop loss: below 4,044
TP1: 4,141
TP2: 4,165
TP3: 4,180
No reclaim above 4,100, no chase. Simple.
If gold closes hard below 4,044, this weekly bullish idea gets messy. Then price can slide back toward 4,000 and the whole recovery becomes another trap.
For now, I’m reading this as gap hold first, 4,141 next, 4,165 if buyers stay sharp.
You think gold fills the gap first or runs straight into 4,165?
Long 
Long