

📊 AUD/JPY Analysis: Bearish Breakdown Loading? 🐻⚠️
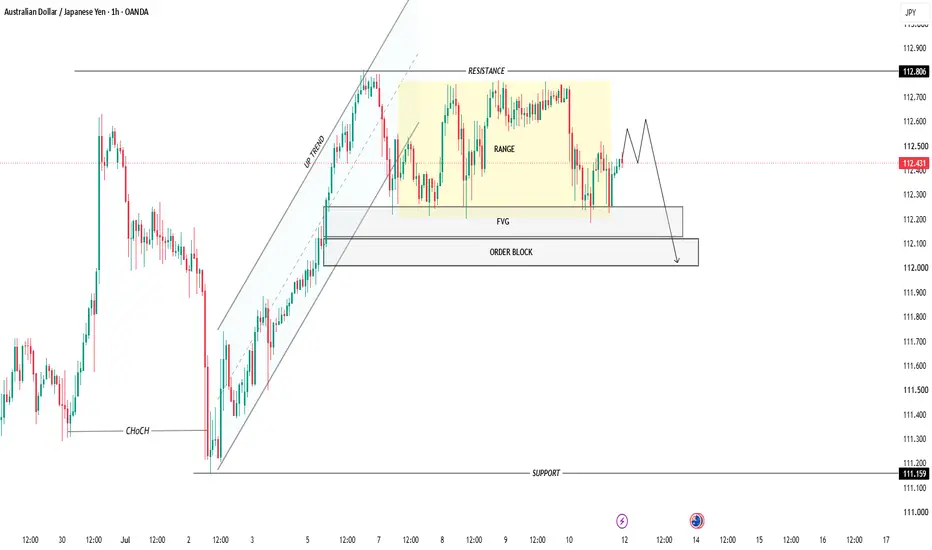
The chart shows AUD/JPY (1H) trading inside a well-defined range after a strong bullish trend. Price has repeatedly failed to break above the 112.80 resistance, indicating that buyers are losing momentum.
🔍 Key Technical Outlook
🟨 Range-bound market below major resistance (112.80).
🚫 Multiple rejections from resistance suggest seller dominance.
📦 Price is hovering above the Fair Value Gap (FVG) and Order Block, which act as key support.
🔄 A minor bullish pullback is possible before the next impulsive move.
📉 A confirmed break below the FVG (≈112.20) would likely trigger a move into the Order Block (≈112.00).
🎯 Trading Bias
🐻 Bias: Bearish
✅ Sell Zone: Near 112.45–112.55 if rejection appears.
🎯 Target 1: 112.20 (FVG)
🎯 Target 2: 112.00 (Order Block)
🛑 Invalidation: A strong breakout and close above 112.80 would invalidate the bearish scenario and favor further upside.
💡 Conclusion: AUD/JPY is showing signs of distribution beneath a strong resistance level. Unless buyers reclaim 112.80, the probability favors a bearish continuation toward the FVG and Order Block support zones. 📉
The chart shows AUD/JPY (1H) trading inside a well-defined range after a strong bullish trend. Price has repeatedly failed to break above the 112.80 resistance, indicating that buyers are losing momentum.
🔍 Key Technical Outlook
🟨 Range-bound market below major resistance (112.80).
🚫 Multiple rejections from resistance suggest seller dominance.
📦 Price is hovering above the Fair Value Gap (FVG) and Order Block, which act as key support.
🔄 A minor bullish pullback is possible before the next impulsive move.
📉 A confirmed break below the FVG (≈112.20) would likely trigger a move into the Order Block (≈112.00).
🎯 Trading Bias
🐻 Bias: Bearish
✅ Sell Zone: Near 112.45–112.55 if rejection appears.
🎯 Target 1: 112.20 (FVG)
🎯 Target 2: 112.00 (Order Block)
🛑 Invalidation: A strong breakout and close above 112.80 would invalidate the bearish scenario and favor further upside.
💡 Conclusion: AUD/JPY is showing signs of distribution beneath a strong resistance level. Unless buyers reclaim 112.80, the probability favors a bearish continuation toward the FVG and Order Block support zones. 📉

✦ MARKET STRATEGY SIGNALS ✦ 📊
Smart Money • Price Action • Precision • good entries
📲 Join Telegram: t.me/marketstrategyentry
Smart Money • Price Action • Precision • good entries
📲 Join Telegram: t.me/marketstrategyentry
관련 발행물
면책사항
해당 정보와 게시물은 금융, 투자, 트레이딩 또는 기타 유형의 조언이나 권장 사항으로 간주되지 않으며, 트레이딩뷰에서 제공하거나 보증하는 것이 아닙니다. 자세한 내용은 이용 약관을 참조하세요.
✦ MARKET STRATEGY SIGNALS ✦ 📊
Smart Money • Price Action • Precision • good entries
📲 Join Telegram: t.me/marketstrategyentry
Smart Money • Price Action • Precision • good entries
📲 Join Telegram: t.me/marketstrategyentry
관련 발행물
면책사항
해당 정보와 게시물은 금융, 투자, 트레이딩 또는 기타 유형의 조언이나 권장 사항으로 간주되지 않으며, 트레이딩뷰에서 제공하거나 보증하는 것이 아닙니다. 자세한 내용은 이용 약관을 참조하세요.