XAGUSD | 1D Market Structure & Key LevelsSilver is showing an important structural transition on the daily timeframe. After respecting a prolonged descending trendline, price has recently moved above this trendline and is now consolidating around the 64.00–66.00 area
This region is currently acting as a key decision zone. The broader picture suggests that the recent recovery has brought price into an important area where confirmation will be necessary.
🔵 Key Retest Zone: 64.00–65.00
📉 Major Trendline: Previously acted as dynamic resi
Gann Box
EURUSD | 1H Market Structure & Key ZonesEURUSD remains within a broader bearish structure, with price continuing to respect the descending trendline after the earlier liquidity sweep from the 1.1710 area.
At the moment, price is trading around 1.1650 and approaching an important support zone near 1.1640–1.1643. This area may act as a key decision point for the next market reaction
🔴 Supply Zone: 1.1702–1.1710
⚫ Support Zone: 1.1640–1.1643
📉 Structure: Bearish while the descending trendline remains respected
A reaction from the supp
XAUUSD | 1H Market Structure & Key ZonesGold is currently trading around the **4,599–4,600 area** after rejecting from the upper supply region. The chart shows a shift in short-term structure, with the marked **CHoCH** highlighting that bullish momentum has weakened and price is now approaching an important decision area.
🔴 **Primary Supply Zone:** 4,640–4,655
🔴 **Higher Supply / BSL Area:** 4,682–4,695
🔵 **Demand Order Block:** 4,557–4,570
🟢 **Strong Demand Zone:** 4,505–4,525
Price is currently positioned between the supply and de
XAGUSD 1H | Retracement into 1H FVG & Demand ZoneXAGUSD is currently showing a short-term pullback after a strong bullish expansion. The broader structure remains important, while price is approaching a key confluence area marked by a **1H Fair Value Gap (FVG)** and a **demand zone**.
### 🔍 Key Areas to Watch
🔹 **Current Price Area:** Price is trading below the recent swing highs after a short-term retracement.
🔹 **Sell-Side Liquidity:** The marked **SSS area** below recent lows may be a key liquidity reference.
🔹 **1H FVG:** The imbalance z
XAUUSD 15M — Liquidity and OB/FVG AnalysisXAUUSD is currently trading around **4626.8** after a strong reaction from the marked **Demand Zone** near the **4580–4587** area. The recent bullish displacement pushed price higher and produced a short-term **CHoCH**, indicating that the immediate bearish momentum has weakened.
### Key Structure Levels
🔹 **Current Structure:** Short-term bullish shift after the reaction from demand.
🔹 **OB / FVG Zone:** **4600–4617**
This area is the main retracement zone on the chart. A pullback into this
XAUUSD 30M — Bearish Structure | SMC + FVG + Price ActionXAUUSD continues to show **bearish market structure** on the 30-minute timeframe after a strong rejection from the higher supply area. The recent sequence of lower highs and lower lows suggests that sellers currently remain in control.
### 🔴 Key Areas to Watch
* **Supply Zone:** 4,680–4,690
* **Bearish Order Block:** 4,620–4,632
* **Fair Value Gap (FVG):** Around 4,602–4,615
* **Main Demand Zone:** 4,573–4,588
* **Lower Demand Zone:** 4,530–4,540
### 📊 Current Price Action
Price has declined
BTCUSD Market Structure & Liquidity Analysis | 1DThis BTCUSD 1D chart presents a detailed market structure and liquidity analysis, highlighting the transition from a prolonged corrective phase into a strong bullish expansion. The chart focuses on price action, Market Structure Shifts (MSS), Breaks of Structure (BOS), liquidity levels, demand zones, resistance areas, and key reaction points.
The earlier price action shows a period of volatility and structural changes, with multiple MSS and BOS formations developing as the market moved through
EURUSD — M30 Market Structure & Key Zones### **Title: EURUSD M30 | Supply Rejection, Support Reaction & Key FVG Zone**
EURUSD is currently trading within a broader range after rejecting from the marked **supply zone around 1.1703–1.1708**. The chart shows a previous **liquidity sweep near the highs**, followed by a bearish shift in structure, suggesting that sellers remain relevant while price stays below the supply area.
### 🔴 **Bearish Scenario**
The **1.1703–1.1708 supply zone** remains the main area to watch. A retracement into
Crude Oil long idea (Demand-Zone)The chart is Light Crude futures (daily): a sharp decline from the spring highs above $100 has consolidated around $80, with an unclosed gap left behind near $71.
The bigger picture is a drop-base-rally formation on the WEEKLY chart — but I time the entry on the DAILY, because that's where the unclosed gap is clearly visible.
My reference points:
Entry: the gap close at ~71.4
Stop: below the swing low at ~65.5
First target: 77.2 (roughly 1R)
Second target: 83.0 (roughly 2R) — the top of
XAUUSD M30 — Bullish Order Block Retest & Liquidity Framework
Price previously swept the sell-side liquidity around the 4605 area and reacted with a strong bullish displacement. This move was followed by a change of character, indicating that short-term order flow shifted to the upside.
The key area I am monitoring is the **M30 bullish order block between approximately 4605 and 4624**. As long as this zone continues to attract a constructive reaction and bullish confirmation, the upside liquidity near the previous highs remains relevant.
🔹 **Bullish sce
What Happens When Price Revisits This Fresh Supply Zone on USOILSymbol: USOIL
Timeframe: Daily
Structure: Supply Zone — Rally-Base-Drop
Current Market Context
Price is currently near an identified supply zone . This area is being observed because it originated from a strong imbalance following a Rally-Base-Drop structure.
The formation consists of a rally, a relatively compact base, and a subsequent bearish leg-out. From a market-structure perspective, this sequence can provide useful context for studying how price behaves when it later revisits
USDJPY 2H: What Happens at This Fresh Supply Zone?Symbol: USDJPY
Timeframe: 120 Minutes
Structure: Supply Zone — Rally-Base-Drop
Current Market Context
Price is currently near an identified supply zone . This area is being observed because it originated from a strong imbalance following a Rally-Base-Drop structure.
The zone represents an area where historical price action showed a relatively compact basing phase followed by a strong bearish leg-out. From a market-structure perspective, this type of formation can be useful for study
ETH/USD (1H) – Bullish Structure Intact, Eyeing Major ResistanceEthereum continues to respect bullish market structure on the 1H, with price holding above the recent demand zone (DZ) near $1,900 after a clean BOS. Price is now testing the $1,919–1,922 zone just below Major Resistance at ~$1,938.
Key level: Major resistance ~$1,938 — a break and hold above opens room toward $1,948+
TP1: ~$1,868
TP2: ~$1,835 (invalidation zone if structure breaks down)
USDCAD: Bullish Reversal from Demand Zone 1.37800USDCAD: Short-Term Bullish Reversal Building From the 1.3755-1.3775 Demand Zone
USDCAD is showing signs of a short-term bullish reversal after a strong decline. Price has reacted from the 1.3755-1.3775 demand zone, where buyers have stepped in and started pushing the pair higher. The recent recovery suggests that the bearish momentum may be losing strength, with price now attempting to build a new bullish structure.
Key Levels:
🔵 Demand Zone: 1.3755 – 1.3775
🎯 Target 1: 1.3850
🎯 Target 2: 1.3
DECODING BTC TOPS & BOTTOMS: THE ANATOMY OF PRICE TRAPS1. Core Philosophy: How Tops & Bottoms Are Formed
The market does not run on textbook technical indicators. The market runs on Liquidity.
Top: Not a safe buying zone, but where the House triggers retail FOMO to DUMP inventory onto late buyers at the highest possible price.
Bottom: Not where the market dies, but where the House creates extreme panic to STEAL cheap bags from panicking sellers.
2. Breaking Down the 4 Trap Phases on the Daily (1D) Chart
Phase 1: Top Buying Trap (Macro High ~124,6
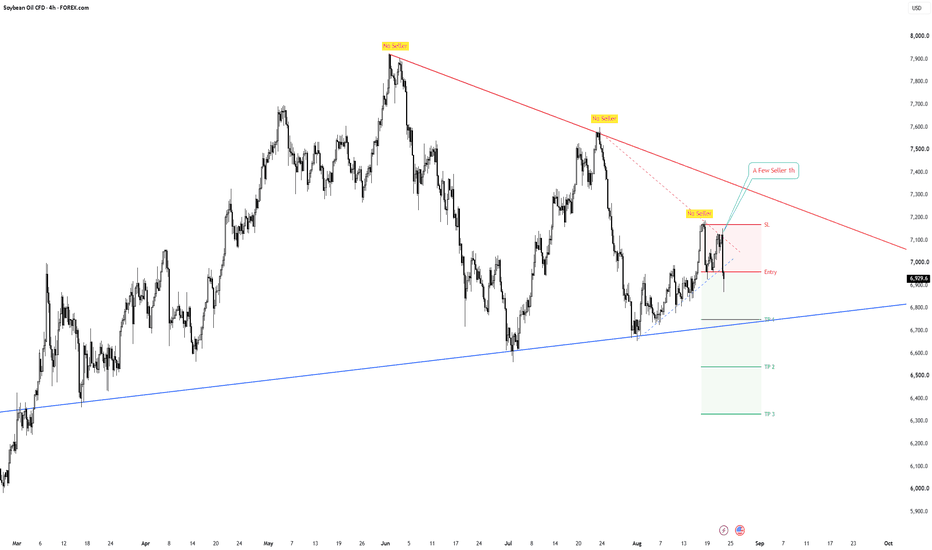
SOYUSD 4H: Lower-High Rejection & Trendline Breakdown (Short Set1. Market Context
On the 4H chart, Soybean Oil (SOYUSD) is forming a clear series of lower highs marked by "No Seller" along the major red descending trendline. Price rejected the latest lower-high peak near 7,180.0 and has broken below local 1H trendline support ("A Few Seller 1h") around 6,950.0.
2. Sentiment & House Trap Analysis
• Where Traders Place Orders: Seeing the bounce off the lower blue trendline, retail traders opened BUY orders around 6,950.0, expecting a breakout above the red tr
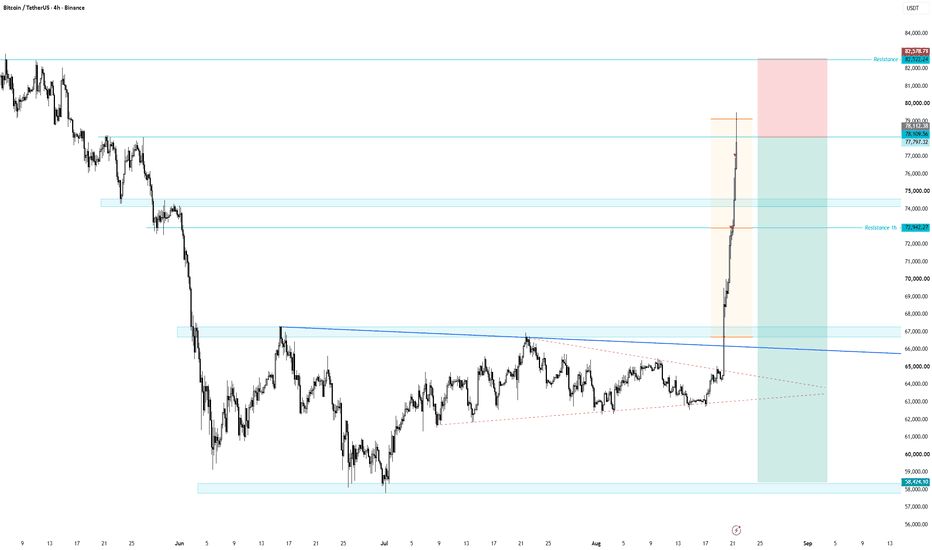
BTCUSDT 4H: Parabolic Spike into Resistance Zone & Macro Short 1. Market Context & Update
BTC executed an explosive parabolic surge straight out of the 67,000.00 consolidation floor, slicing through 72,942.27 and hitting the top of the orange expansion box at 78,112.38. Price is now pressing up toward the macro resistance ceiling at 82,522.24.
2. Sentiment & House Trap Analysis
• Retail Buyers (FOMO Trap): Late retail traders are blindly opening BUY positions above 78,000.00 expecting an immediate moonshot, placing tight Stop Losses below 73,000.00.
• Reta
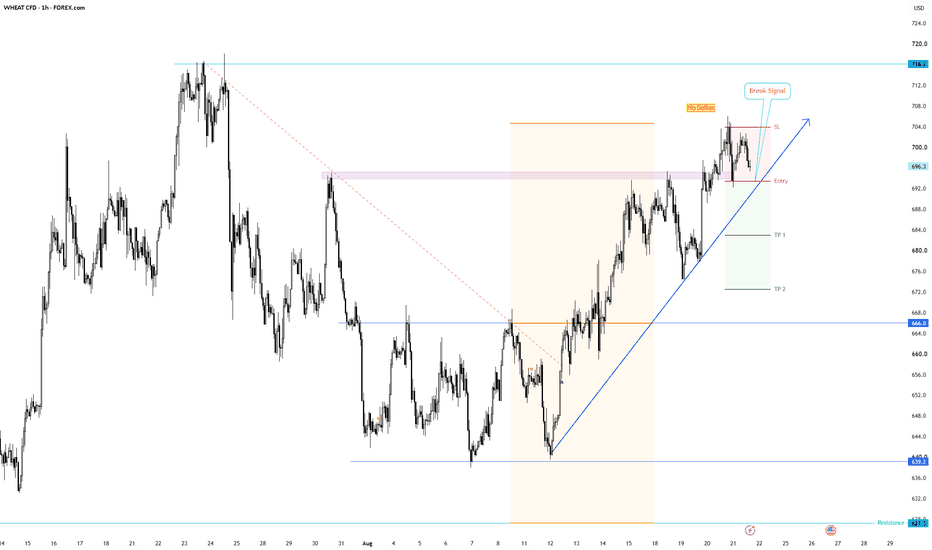
WHEAT 1H: Ascending Trendline Breakdown & Buyer Trap
1. Market Context
On the 1H chart, Wheat executed an extended rally from 639.2 up toward 705.0 along a blue ascending trendline. Price stalled at the 705.0 peak ("No Seller") and is now pressing down against the key purple support zone at 693.0.
2. Trader Behavior & House Trap Analysis
Where Traders Place Orders: Seeing the strong uptrend along the blue trendline, retail traders are opening BUY orders around 693.0 – 696.0, expecting a continuation bounce up toward 716.2.
Trader Stop-Loss & T
SILVER (XAG/USD - 4H Chart) Trade Plan – Liquidity Sweep & Bull
1. Market Structure & Price Trap Analysis
Silver is making a parabolic push toward the major psychological resistance level at 70.00000.
This upward push serves as a classic Bull Trap (Liquidity Sweep) designed to clear out short stop-losses and trap late breakout buyers.
Projected Scenario: Upon tapping 70.00000, buyer exhaustion will trigger a heavy reversal downward along the projected red path.
2. Trade Parameters
Trigger: 4H rejection wick at 70.00000 or a solid 4H candle close below
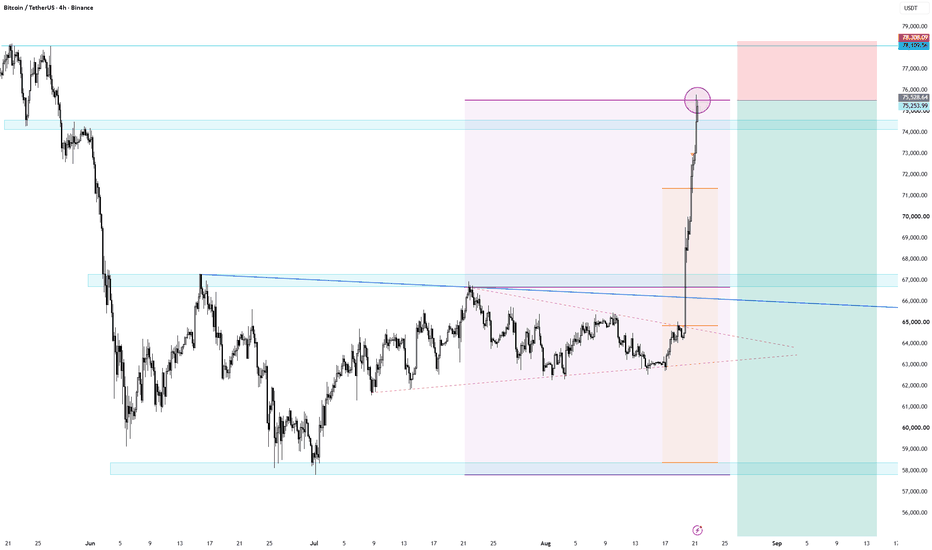
BTC/USDT (4H Chart) Trade Plan – Big Short Setup to 50,000
1. Price Trap & Liquidity Sweep Analysis
The parabolic impulse move from 64,000 straight into 75,500 is a textbook Buy Climax / Liquidity Grab. It was engineered to trigger short stop-losses and trap FOMO breakout buyers at the swing high.
Price has tapped directly into the major resistance zone (74,000 - 75,500 cyan box) and is showing immediate rejection wicks on the 4H timeframe.
2. Big Short Trade Parameters
Trigger: 4H reversal rejection wick at resistance or a solid 4H candle close be
EUR/USD (H1 Chart) Trade Plan – Bull Trap Setup
1. Price Trap Mechanics
The recent surge above the 1.17100 - 1.17200 resistance zone was a classic Bull Trap (Liquidity Sweep). It was engineered to trigger early Sellers' stop losses while trapping late Breakout Buyers at the high.
The subsequent "No Seller" signal confirms Buyer exhaustion. Price is now printing a lower high structure, setting up for a sharp reversal toward the lower channel supports.
2. Trade Parameters
Trigger: H1 candle close strictly below 1.16731 (Break Signal).
Ent
WTICOUSD 1H: Trade Review & Dual-Scenario Game Plan
1. Previous Trade Review (Aug 10 - Aug 20)
Position: Long @ 79.058 | SL: 74.905
Status: TP1 hit at 83.500, currently approaching TP2 at 88.500 (Price @ ~87.363).
Execution: Move SL to Breakeven (79.058) or lock in 70% profits around 87.500 - 88.500. Let the remaining 30% runner play out based on the two scenarios below.
2. Sentiment & House Trap Analysis
The Retail Shorters: Crowding into short positions at the 88.500 - 89.158 resistance ceiling expecting an overbought pullback, placing SL
XAUUSD 4H: What Could Happen When Price Revisits This Fresh DBD Symbol: XAUUSD
Timeframe: 240M (4H)
Zone Structure: Drop–Base–Drop (DBD)
Zone Type: Supply Zone
Market Context
Price is currently trading near an identified 4H supply zone . This area is being observed because it originated from a strong imbalance following a Drop–Base–Drop (DBD) structure.
The DBD formation represents a sequence where price declines, temporarily consolidates, and then continues lower with a relatively strong leg-out. From a technical-analysis perspective, this ty
EURUSD – Bullish Channel Still in ControlEURUSD has been bullish, with price continuing to trade within the rising blue channel.
Most recently, price reached a strong technical intersection between the upper bound of the channel and the supply zone around 1.1600–1.1620, where sellers stepped in and triggered the current rejection.
This pullback is now bringing EURUSD back toward an interesting area.
📌 As price approaches the lower bound of the rising channel, we will be looking for trend-following long setups, as long as the channel