

📊 AUD/JPY Analysis: Bearish Breakdown Loading? 🐻⚠️
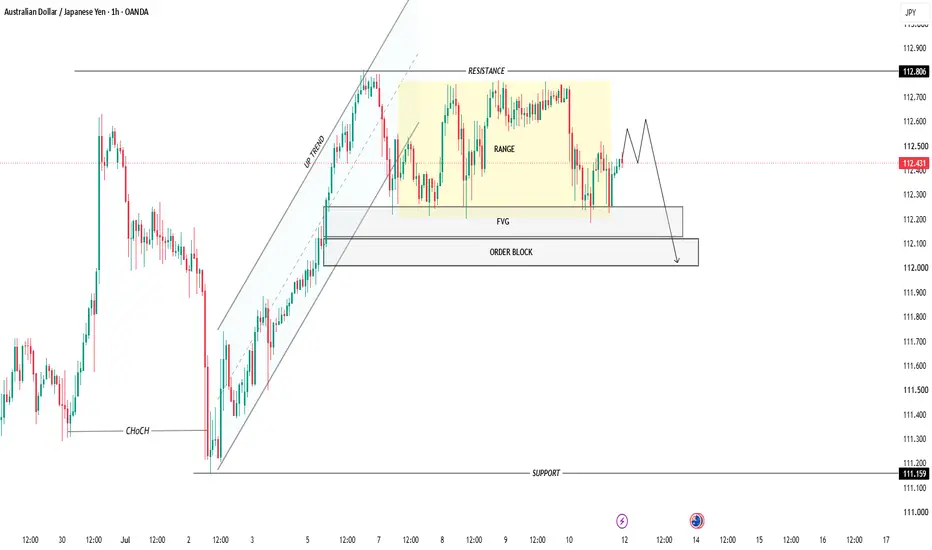
The chart shows AUD/JPY (1H) trading inside a well-defined range after a strong bullish trend. Price has repeatedly failed to break above the 112.80 resistance, indicating that buyers are losing momentum.
🔍 Key Technical Outlook
🟨 Range-bound market below major resistance (112.80).
🚫 Multiple rejections from resistance suggest seller dominance.
📦 Price is hovering above the Fair Value Gap (FVG) and Order Block, which act as key support.
🔄 A minor bullish pullback is possible before the next impulsive move.
📉 A confirmed break below the FVG (≈112.20) would likely trigger a move into the Order Block (≈112.00).
🎯 Trading Bias
🐻 Bias: Bearish
✅ Sell Zone: Near 112.45–112.55 if rejection appears.
🎯 Target 1: 112.20 (FVG)
🎯 Target 2: 112.00 (Order Block)
🛑 Invalidation: A strong breakout and close above 112.80 would invalidate the bearish scenario and favor further upside.
💡 Conclusion: AUD/JPY is showing signs of distribution beneath a strong resistance level. Unless buyers reclaim 112.80, the probability favors a bearish continuation toward the FVG and Order Block support zones. 📉
The chart shows AUD/JPY (1H) trading inside a well-defined range after a strong bullish trend. Price has repeatedly failed to break above the 112.80 resistance, indicating that buyers are losing momentum.
🔍 Key Technical Outlook
🟨 Range-bound market below major resistance (112.80).
🚫 Multiple rejections from resistance suggest seller dominance.
📦 Price is hovering above the Fair Value Gap (FVG) and Order Block, which act as key support.
🔄 A minor bullish pullback is possible before the next impulsive move.
📉 A confirmed break below the FVG (≈112.20) would likely trigger a move into the Order Block (≈112.00).
🎯 Trading Bias
🐻 Bias: Bearish
✅ Sell Zone: Near 112.45–112.55 if rejection appears.
🎯 Target 1: 112.20 (FVG)
🎯 Target 2: 112.00 (Order Block)
🛑 Invalidation: A strong breakout and close above 112.80 would invalidate the bearish scenario and favor further upside.
💡 Conclusion: AUD/JPY is showing signs of distribution beneath a strong resistance level. Unless buyers reclaim 112.80, the probability favors a bearish continuation toward the FVG and Order Block support zones. 📉

✦ MARKET STRATEGY SIGNALS ✦ 📊
Smart Money • Price Action • Precision • good entries
📲 Join Telegram: t.me/marketstrategyentry
Smart Money • Price Action • Precision • good entries
📲 Join Telegram: t.me/marketstrategyentry
Bài đăng liên quan
Thông báo miễn trừ trách nhiệm
Thông tin và các ấn phẩm này không nhằm mục đích, và không cấu thành, lời khuyên hoặc khuyến nghị về tài chính, đầu tư, giao dịch hay các loại khác do TradingView cung cấp hoặc xác nhận. Đọc thêm tại Điều khoản Sử dụng.
✦ MARKET STRATEGY SIGNALS ✦ 📊
Smart Money • Price Action • Precision • good entries
📲 Join Telegram: t.me/marketstrategyentry
Smart Money • Price Action • Precision • good entries
📲 Join Telegram: t.me/marketstrategyentry
Bài đăng liên quan
Thông báo miễn trừ trách nhiệm
Thông tin và các ấn phẩm này không nhằm mục đích, và không cấu thành, lời khuyên hoặc khuyến nghị về tài chính, đầu tư, giao dịch hay các loại khác do TradingView cung cấp hoặc xác nhận. Đọc thêm tại Điều khoản Sử dụng.