XAUUSD — Bullish Retest Toward 4,425XAUUSD — Bullish Retest Toward 4,425
Gold is showing a short-term bullish recovery after completing the previous downside wave near the lower support area. From Kelly’s view, the current chart suggests that XAUUSD may be forming a corrective bullish structure, with price now reacting from the 4,334–4,340 buy retest support zone.
The key idea is simple: if gold holds above this support, the next recovery leg may continue toward the 4,420–4,435 strong resistance area.
⟡ Market structure
Gold recently completed a bearish 5-wave sequence and is now trying to rebuild from the lower zone. Price is trading around 4,351, slightly above the buy retest support.
The current structure looks like a possible ABC recovery. Buyers are trying to defend the 4,334–4,340 area, while the next major upside target remains the strong resistance zone near 4,420–4,435.
However, gold is still trading below the descending trendline, so the bullish setup needs confirmation. A clean move above 4,380–4,400 would strengthen the recovery and open the way toward the upper resistance.
➤ Key levels
◌ Current price area: 4,351
◌ Buy retest support: 4,334–4,340
◌ Key support: 4,300–4,315
◌ First bullish confirmation: above 4,380
◌ Main resistance: 4,420–4,435
◌ Strong breakout confirmation: above 4,435
◌ Bullish invalidation: below 4,300
⌁ Elliott Wave view
The chart suggests that the previous bearish wave may have already completed near the 4,300 area.
After that, gold started to form a short-term bullish recovery:
Wave A may be the first rebound from the low.
Wave B may be the retest into 4,334–4,340.
If this support holds, wave C may push price toward 4,420–4,435.
This is why Kelly is watching the current retest zone carefully. The bullish idea is valid only if buyers continue to defend support and price starts to break above the short-term resistance levels.
▸ Trading scenario
Preferred bullish scenario
Entry: Buy around 4,334–4,340 if price gives bullish confirmation
Stop Loss: Below 4,300
Take Profit 1: 4,380
Take Profit 2: 4,400
Take Profit 3: 4,420–4,435
Alternative entry
If gold breaks above 4,380–4,400 and retests this area as support, buyers may look for continuation toward 4,420–4,435.
◌ Invalidation
The bullish view becomes weaker if gold breaks below 4,300 and fails to recover back above the buy retest support. In that case, the recovery structure may fail and sellers could regain control.
⌁ Kelly’s view
Kelly’s main view is cautiously bullish while gold holds above 4,334–4,340. The market is showing signs of recovery, but price still needs to confirm strength above 4,380–4,400.
If buyers defend the current support, gold may continue toward 4,420–4,435, where the next key decision zone is waiting.
Do you think gold will complete wave C toward resistance, or retest the lower support one more time first? H2 Bullish Recovery From Major Demand
XAUUSD is trading around 4,349 after another volatile session around the lower H2 structure. Price remains inside a broader descending channel, but the current location is close to a major demand cluster where a recovery setup may begin to develop.
The macro backdrop remains challenging for gold. U.S. August CPI rose 0.4% MoM and 3.4% YoY, while core CPI increased 0.3% MoM and 2.4% YoY. Markets now price roughly an 85% probability of a Fed rate hike next week, keeping pressure on non-yielding gold. However, the U.S. 10-year yield eased back toward 4.93% after nearly touching 5%, providing some short-term relief.
Technical View
The broader structure remains below the descending channel resistance, so the recovery is not confirmed yet.
Price is currently holding around the 4,335–4,360 Demand / Reclaim Zone. This area may support a short-term bounce, but the cleaner bullish location remains lower at the 4,275–4,300 Major Demand / Bullish OB.
A liquidity sweep into that major demand followed by a strong reclaim, bullish MSS or higher-low confirmation would support the recovery path shown on the chart.
The first upside obstacle is 4,385–4,405 Resistance / Bearish OB. Acceptance above this area would strengthen the recovery and expose the larger 4,475–4,490 Major Resistance / Supply zone.
Key Zones
Current Price: 4,349.420
Demand / Reclaim Zone: 4,335–4,360
Buy Priority: 4,275–4,300
Resistance / Bearish OB: 4,385–4,405
Major Resistance / Supply: 4,475–4,490
Trading Plan
Buy Priority: 4,275–4,300
Condition: wait for a liquidity sweep into Major Demand followed by bullish rejection, reclaim, MSS or clear higher-low confirmation.
TP1: 4,335–4,360
TP2: 4,385–4,405
TP3: 4,475–4,490
Invalidation: sustained acceptance below 4,275.
Buy/Sell View
The preferred setup is to wait for a deeper pullback into Major Demand rather than chase the current bounce.
Shorts also become less attractive near 4,300 because price would already be entering a major bullish OB. The cleaner decision is to let demand confirm whether buyers can absorb the remaining sell-side pressure.
Important Note
Inflation remains the main macro risk. With CPI and PPI both firm, Fed tightening expectations remain elevated, while oil above $100 continues to reinforce inflation concerns. Any renewed rise in Treasury yields could pressure gold again.
Final View
Gold remains structurally weak, but 4,275–4,300 is the key H2 area where the risk/reward begins to shift toward a recovery setup.
My main scenario is a liquidity sweep into Major Demand followed by bullish confirmation, targeting 4,385–4,405 first and potentially 4,475–4,490 if the recovery strengthens.
Will gold sweep Major Demand before starting the next H2 recovery?  Long
Long
Education 
TRADING SECRET - How To Watch VolumeMost traders watch price first. I prefer to watch what volume is doing while price becomes quiet. One of the most useful patterns in BTCUSDT, Crypto, Gold and other liquid markets is simple: price compresses, volume dries up, then volume suddenly expands when the breakout begins.
1. Quiet Price + Falling Volume = Something Is Changing
When price moves sideways inside a tight range and volume gradually decreases, participation is drying up. Buyers are no longer aggressively chasing price, but sellers are also failing to push it lower. The market is entering a temporary balance.
This does not tell us the breakout direction yet. What it tells us is that energy is being compressed.
2. The Breakout Is Where Volume Matters
The important moment comes when price finally leaves the range. A breakout accompanied by a clear increase in volume is usually more meaningful than one happening on weak participation.
A simple sequence to remember:
Consolidation → Volume Dry-Up → Breakout → Volume Expansion
For a bullish setup, I want price to break resistance while volume expands. That tells me new demand is actually entering the market instead of price simply drifting above the level.
3. Volume Can Help Avoid Fake Breakouts
Imagine BTCUSDT has been trapped below resistance for several hours. Price briefly pushes above the level, but volume remains weak and the next candles immediately fall back into the range.
That is very different from a breakout where volume suddenly increases and price closes strongly above resistance.
Breakout + Weak Volume = Be Careful
Breakout + Strong Volume = Better Confirmation
Volume should confirm what price is trying to do.
4. How I Would Trade It
I do not enter simply because volume becomes low. I first mark the consolidation range and wait.
If price breaks resistance with expanding volume, I can either enter after confirmation or wait for a retest of the breakout level. The Stop Loss should sit where the breakout idea becomes invalid, while the target can be the next major resistance or previous swing high.
The cleaner setup is:
Tight Range + Falling Volume → Strong Breakout + Rising Volume → Retest → Continuation
This keeps me from predicting the move before the market actually shows its hand.
5. One Important Detail
Volume is not identical across every market. On BTCUSDT, exchange volume can be very useful, but crypto liquidity is spread across different exchanges. In spot Forex, traders often work with tick volume rather than centralized exchange volume.
So I never use volume alone. I combine it with market structure, support/resistance and price reaction.
Final Thought
When price becomes quiet, watch participation. When price breaks out, watch whether volume confirms the move.
Many traders react to the breakout candle. Better traders were already watching what happened before the breakout.  Education
XAUUSD: Sellers Reject the Recovery — Is 4,280 the Next Target?After a short-term rebound, XAUUSD is showing renewed weakness as price struggles below the descending trendline and the Ichimoku resistance area. The recovery toward 4,430–4,440 has so far failed to change the broader bearish structure, keeping sellers in control.
In terms of news, gold is under pressure as rising oil prices revive inflation concerns, while strong U.S. employment data has increased expectations that the Federal Reserve could raise rates again. Markets are currently pricing roughly a 60% probability of a Fed rate hike, making upcoming U.S. inflation data especially important. Higher rate expectations remain a headwind for non-yielding gold, even though a softer U.S. dollar is providing some support.
Looking at the H3 chart, the technical structure also supports a bearish scenario:
Price has been repeatedly rejected from the descending trendline.
The 4,425–4,440 area overlaps with trendline resistance and the upper Ichimoku zone.
Price is now trading around 4,393, showing that the latest rebound has already lost momentum.
The 4,360–4,385 zone is the nearest support. A decisive break below this area could accelerate selling pressure toward the lower demand zone.
📉 Main Scenario
Resistance: 4,425–4,440
Support: 4,360–4,385
Target: 4,280–4,300
As long as XAUUSD remains below the descending trendline and fails to reclaim 4,440, I continue to favor the bearish scenario. A breakdown below 4,360 would strengthen the case for another move toward 4,280–4,300. Short 
 Long
Long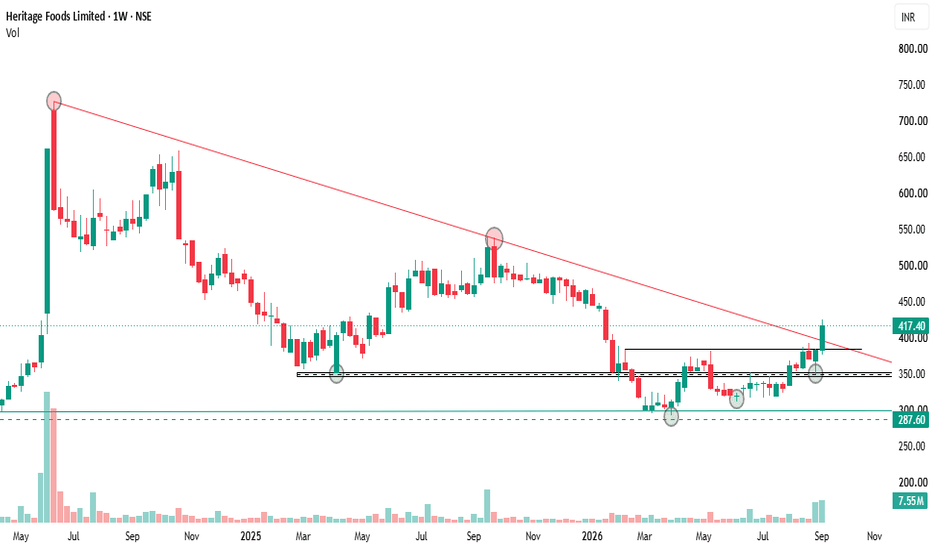
 Short
Short
RAYMOND Technical Snapshot📊 RAYMOND — Technical Snapshot
Raymond is showing strong upward momentum, supported by exceptionally high volume and a sharp price expansion. The stock is trading above its key moving averages, with RSI at 81.89, indicating an extended momentum zone. The chart structure remains strong, while the current move should be studied for price acceptance and consolidation after the sharp expansion.
Reference Level: 1,024.50
Invalidation Level: 771.00
Resistance: 1,073.18 | 1,143.57 | 1,262.63
Support: 883.73 | 764.67 | 694.28
Disclaimer: This content is for educational and informational purposes only. The levels and technical observations are provided solely for studying market behaviour and do not constitute investment advice or a recommendation to buy, sell or hold any security. Readers should not make financial decisions solely on the basis of this content. Investors should conduct their own independent research, evaluate their individual financial circumstances and risk profile, and consult an appropriately SEBI-registered investment professional where required.
STWP and the author make no representation or guarantee regarding future price movements, returns, performance or outcomes.  Long
Long
NIFTY 50 — Reversal Setup Building at Channel Support (15m)Chart Read (15-min timeframe)
Nifty has been sliding inside a well-defined descending channel for several sessions, printing a clean sequence of lower highs and lower lows down from the ~24,400 zone. That's the dominant trend context — so any reversal call here is a "counter-trend bounce until proven otherwise" setup, not a trend change yet.
What's changed in the last few candles:
Price tagged the lower rail of the channel (~23,387–23,400) and is showing a higher low + reaction candles rather than a clean continuation lower — the first sign of seller exhaustion at support.
RSI is turning up from the 40s/50s toward the low 60s, with the faster RSI line crossing back above the signal line — early bullish momentum shift, not yet an overbought/divergence confirmation.
Current price ~23,398–23,435, holding just above the day's low (23,387.20).
Options / Institutional Flow Note
Per current options chain activity, the built-up Put OI base is unwinding while fresh Call OI is being added — i.e., the positioning read has shifted from a put-heavy (bearish/hedging) skew toward call accumulation. That's typically read as institutional/smart-money positioning tilting bullish near this support zone, and it lines up with the price-action reversal signs above.
(Flag for readers: OI shifts can also reflect short-covering or hedge unwinding rather than fresh conviction — worth confirming with volume and the next 1–2 sessions of OI change before treating it as a strong directional signal.)
Levels to Watch
Support / invalidation: 23,380–23,350. A 15m close below this negates the reversal idea and reopens the channel's downside.
Immediate resistance: 23,500, then 23,600–23,650 (prior swing structure).
First real test: ~23,700–23,750 — this is where the channel's mid-line and the last swing high sit; reclaiming it would be the first real technical evidence the downtrend is breaking, not just bouncing.
Bottom Line
This is a potential bullish reversal off channel support, backed by (1) price rejecting the lower trendline, (2) RSI turning up, and (3) options positioning tilting from puts to calls. It is still counter-trend until Nifty closes back above the channel's mid-line (~23,700+). Treat 23,350 as the line in the sand.
________________________________________________________________________________
Not investment advice — shared for educational/technical-analysis discussion only. Please do your own research and manage risk before trading. Long 
The Market Broke The RuleFor years, traders have been taught a simple relationship: rising yields are bad for equities. Higher borrowing costs increase the discount rate applied to future earnings, financial conditions become tighter, and expensive growth assets can come under pressure. The relationship is real, but treating it as a mechanical rule is where the analysis starts to break down.
The recent market reaction provides a useful case study. U.S. Treasury yields moved sharply higher as inflation concerns, rising oil prices and changing expectations around monetary policy pushed the 10-year yield close to the 5% level. Yet equities were still able to rally rather than simply following the textbook relationship. That apparent contradiction is where the more interesting market analysis begins.
The Market Doesn't Trade One Variable in Isolation.
A higher yield can create pressure on equities, but the market is constantly weighing that pressure against everything else happening at the same time. Inflation expectations, economic growth, earnings expectations, oil prices, liquidity, positioning and expectations for central-bank policy can all influence the final reaction.
In this case, the inflation data did not deliver the kind of upside surprise investors had feared. Treasury yields pulled back from their highs, while equities responded positively as some of the immediate policy concerns eased. The important point is not that yields suddenly stopped mattering. It is that the market was responding to the entire change in expectations rather than simply reacting to the direction of one chart.
This Is Why Correlations Are Not Rules.
A relationship between two assets can be statistically meaningful without producing the same reaction every single time. When the dominant driver changes, the relationship can weaken, reverse or temporarily disappear.
If yields rise because growth expectations are improving, the market may interpret that very differently from a rise caused by accelerating inflation or fiscal concerns. The same percentage-point move in yields can therefore carry a completely different message depending on what is driving it.
Context Changes the Meaning of Price.
This is one of the most important distinctions between watching markets and actually analysing them. A trader who only sees “yields up” may immediately expect stocks to fall. A trader looking at the broader picture asks why yields are rising, what the market expected beforehand, what is happening to inflation, how oil is behaving, and whether equity earnings expectations are changing at the same time.
The direction of a variable matters. But the reason behind that direction often matters more.
The Rule Wasn't Really Broken.
The mistake was treating a relationship as a law.
Markets are interconnected, but they are not mechanical. The same input can produce different outcomes when the surrounding conditions change. That is why experienced market analysis focuses less on memorising relationships and more on understanding the forces competing to move price.
The next time you see a familiar correlation appear to fail, don't immediately assume the market is irrational. Start with a better question: what changed in the information the market is pricing?
Sometimes the market isn't breaking the rule.
We're just looking at the wrong rule. Education 
 Long
Long
Cyient DLM Limited# Cyient DLM Limited (NSE) — Weekly Chart Analysis 📊
## 🔍 Chart Overview
- **Timeframe:** 1 Week | ~3 year view (post-IPO)
- **CMP:** ₹904.40 | **Change:** -18.90 (-2.05%) 🔴
- **Key Resistance:** ₹886.65 (now broken!) | **Base Support:** ₹267.50
- **Volume:** 5.11M | Multiple earnings markers visible
- **Note:** Red-outlined = missed/negative earnings ⚠️ | Green-outlined = beat ✅
---
## 📐 The Full Structure — IPO to Now
### 🎯 Phase 1: IPO Listing & Early Peak (2024)
- Listed and quickly ran to **~₹920–950** zone in early 2024
- **₹886.65** = the key resistance from that IPO-era high
- Classic post-IPO euphoria followed by reality check
### 📉 Phase 2: The Long Markdown (Mid 2024 → Early 2026)
- Brutal **18-month decline** from ₹920 → ₹267.50
- Drop of **-71% from peak** — painful for IPO investors 😰
- Multiple red earnings = **fundamental underperformance** driving the fall
- Not just a market correction — business was actually disappointing
### 🔄 Phase 3: The Base (Early 2026)
- **₹267.50** — absolute floor established
- Single pink volume bar = capitulation event 📍
- Green markers start appearing = **earnings turning positive** ✅
### 🚀 Phase 4: The Recovery Rocket (Mar–Sep 2026)
- ₹267 → ₹904 = **+238% in ~6 months** 🚀
- Now **reclaiming the IPO-era highs** at ₹886.65
---
## 🟦 Blue Box Measured Move
- **-622.25 points (-41.17%)** from ~₹1,510 → ₹886 zone
- Wait — ₹1,510 was never traded on this chart = **this box projects a FUTURE move**
- Arrow landing at ₹886 = **current resistance is the blue box floor** 🎯
- Implication: if breakout holds, measured move target = **₹886 + ₹622 = ₹1,508** 🎯
---
## 🔑 The Earnings Story — Most Important Factor Here
| Period | Earnings Signal | Price Impact |
|--------|----------------|-------------|
| 2024–2025 | 🔴 Red — misses | Stock fell -71% |
| Early 2026 | 🟢 Green — beats | Recovery begins |
| Recent | 🟢 Green — beats | Explosive rally |
| Upcoming | 🟣 Purple — pending | **Next catalyst** ⚠️ |
> **The red → green earnings flip IS the fundamental reason for this recovery.** This isn't just a technical bounce — the business is genuinely turning around. That makes the breakout more credible. 💪
---
## 📊 Volume Analysis
| Metric | Reading | Assessment |
|--------|---------|-----------|
| Current | **5.11M** | Above average ✅ |
| Vol MA trend | Slowly rising | Healthy |
| Capitulation bar | Early 2026 pink spike | Classic bottom signal ✅ |
| Breakout volume | Moderate-good | Not explosive but steady |
---
## ⚔️ Breakout Quality Scorecard
| Factor | Reading |
|--------|---------|
| IPO-era resistance broken | ✅ ₹886.65 cleared |
| Earnings turning positive | ✅✅ **Fundamental + Technical** |
| Recovery magnitude | ✅ +238% |
| Volume | ✅ Adequate |
| Base duration | ⚠️ ~2 months only |
| Prior downtrend duration | ⚠️ 18 months — heavy supply overhead |
| Today's price action | ⚠️ -2.05% pullback at resistance |
| Weekly close | ⏳ Today is Friday — closing now |
---
## 🎯 Target Projections
| Target | Level | Basis |
|--------|-------|-------|
| T1 | ₹1,000 | Round number / psychological |
| T2 | ₹1,200 | Mid-range extension |
| T3 | ₹1,510 | Blue box measured move 🎯 |
| ATH | ₹950+ | IPO listing zone retest first |
---
## 🛡️ Trade Setup
| Parameter | Level |
|-----------|-------|
| **Entry** | Retest of ₹886–900 (ideal) |
| **Current entry** | ₹904 with tight risk |
| **Stop Loss** | ₹800 (weekly close below) |
| **T1** | ₹1,000 |
| **T2** | ₹1,200 |
| **T3** | ₹1,510 |
| **Risk:Reward** | ~1:5 to 1:6 |
| **Holding Period** | 6–15 months |
---
## ⚠️ Key Risk Factors
- 📉 **-2.05% today** = sellers active at the breakout zone — resistance being tested
- 🔴 **18 months of downtrend** = massive overhead supply from trapped IPO investors
- 📅 **Upcoming purple earnings** = binary event — could accelerate OR derail
- 🏭 **EMS/Electronics manufacturing** — highly competitive, margin-sensitive sector
- 💧 Volume adequate but not the 6x institutional surge seen in Graphite India
- ⚡ **No ⚡ alert visible** — you may have caught this one on your own scanning 👁️
---
## 🏭 Business Context
Cyient DLM is an **Electronics Manufacturing Services (EMS)** company — part of Cyient group. Key drivers:
- 🛡️ Defence electronics manufacturing (PLI beneficiary)
- ✈️ Aerospace electronics — MRO and OEM
- 🏭 Industrial electronics
- 📱 PCB assembly and box-build manufacturing
The **earnings flip from red to green** suggests defence/aerospace orders are finally converting to revenue — a genuine business recovery, not just market momentum.
---
## 🧠 Shivashankar Take
> *"Cyient DLM is special in today's analysis because it has something the others don't — **a fundamental story matching the technical story.** Red earnings caused the -71% fall. Green earnings are now causing the +238% recovery. When price and fundamentals align, the move tends to be **more sustainable than a pure technical breakout."*** 💡
> *"The -2.05% today at resistance is normal — **supply doesn't disappear overnight.** IPO investors who bought at ₹900 are selling now. But if the next quarterly earnings delivers another beat, that supply gets absorbed fast and ₹1,000 becomes the floor, not the ceiling."* 🎯
> *"**Best entry:** Wait for the retest of ₹886–900. Best confirmation: Next earnings beat. Best reward: The ₹1,510 measured move. Patience here beats urgency."* ⏳
---
**Fundamental turnaround + Technical breakout = The most complete setup in today's watchlist. 🏆**
**But the weekly close today and upcoming earnings will be the real test. 📊**  Long
Long
Kabra ExtrusionTechnik Ltd# Kabra ExtrusionTechnik Ltd (NSE) — Weekly Chart Analysis 📊
## 🔍 Chart Overview
- **Timeframe:** 1 Week | ~4 year view
- **CMP:** ₹723.15 | **Change:** +15.60 (+2.20%) 🟢
- **Key Resistance:** ₹645.55 (broken!) | **Base Support:** ₹176.27
- **Volume:** 2.77M current vs 1.07M average = **~2.6x** 📊
- **⚡ Alert triggered** | Dividends + Earnings markers visible
---
## 📐 The Full Structure
### 📉 Phase 1: Peak & Markdown (Early 2023 → 2026)
- Stock peaked near **₹700–720** in early 2023
- Then a grinding **3-year decline** all the way to ₹176.27
- Drop of roughly **-75% from peak** — severe destruction 😰
- Classic slow bleed with no single crash — accumulated selling
### 🔄 Phase 2: Base Formation (Early 2026)
- **₹176.27** — the absolute structural floor established
- Tight base formed at lows — **accumulation at depressed prices**
- ⚡ Alert placed right at the pivot low — sharp eye! 👁️
### 🚀 Phase 3: The Explosive Recovery (Mid 2026)
- From ₹176 → ₹723 = **+310% in just ~6 months** 🚀🚀
- One of the sharpest V-recoveries in this watchlist
- Now **above the 3-year resistance at ₹645** — breakout confirmed
---
## 🟦 Blue Box Measured Move
- **-466.35 points (-41.86%)** from ~₹1,112 → ₹645 zone
- Arrow landing at **₹645 resistance** = that level was well-identified
- Current price ₹723 is **already 78 points above** the measured move target 🔥
- This means the breakout has **momentum beyond the box** — bullish extension signal
---
## 📊 Volume Analysis
| Metric | Reading | Assessment |
|--------|---------|-----------|
| Current week | **2.77M** | Above average ✅ |
| Vol(20) average | **1.07M** | Baseline |
| Multiple | **~2.6x** | Moderate-good |
| Vol MA trend | Gradually rising | Healthy 📈 |
| Big prior spike | Mid-2025 | May have been accumulation |
- 2.6x volume is **solid but not explosive** — unlike Graphite India's 6x
- However the **sustained volume build** over recent weeks is healthier than a single spike
- Dividend history suggests **quality management** returning cash to shareholders
---
## ⚔️ Breakout Quality Scorecard
| Factor | Reading |
|--------|---------|
| Recovery magnitude | ✅ +310% from base |
| Resistance broken | ✅ ₹645.55 cleared |
| Already above blue box | ✅ Bullish extension |
| Volume | ✅ 2.6x — good |
| Base duration | ⚠️ Only ~3–4 months |
| Prior trend | ⚠️ Was in downtrend since 2023 |
| Weekly close today | ⏳ Friday — critical |
---
## 🎯 Target Projections
| Target | Level | Basis |
|--------|-------|-------|
| T1 | ₹800 | Round number + dotted resistance |
| T2 | ₹900 | Measured move extension |
| T3 | ₹1,000 | Blue box top (prior ATH zone) |
| Measured Move | ₹645 + ₹466 = **₹1,111** | Full round trip 🎯 |
---
## 🛡️ Trade Setup
| Parameter | Level |
|-----------|-------|
| **Entry** | Current ₹723 or retest ₹645–670 |
| **Stop Loss** | ₹580 (weekly close below) |
| **T1** | ₹800 |
| **T2** | ₹900 |
| **T3** | ₹1,000+ |
| **Risk:Reward** | ~1:4 to 1:5 |
| **Holding Period** | 6–12 months |
---
## ⚠️ Key Risk Flags
- ⚡ **+310% in 6 months** — parabolic moves can reverse sharply 🛑
- 📉 **3-year prior downtrend** — overhead supply from trapped buyers everywhere between ₹400–₹700
- 📦 **Short base** (~3–4 months) vs ideal (12+ months) — weaker foundation
- 🏭 **Extrusion machinery** sector — capital goods, linked to plastic/pipe/cable industries
- 💧 **2.77M volume** — relatively thin for a ₹700+ stock, exit liquidity concern
- ⏳ **Weekly close today** — must hold above ₹645 to confirm breakout
---
## 🏭 Business Context
Kabra ExtrusionTechnik makes **plastic extrusion machinery** — used in pipes, cables, films. Key demand drivers:
- 🏗️ Infrastructure pipeline boom (Jal Jeevan Mission, PLI schemes)
- ⚡ EV cable manufacturing expansion
- 🌍 Export opportunity in machinery
---
## 🧠 SimplyShiva Take
> *"Kabra went from ₹176 to ₹723 in 6 months — a **310% rocket ride.** That's extraordinary. But here's the honest read: **parabolic recoveries need to prove themselves at resistance.** The ₹645 breakout is real, volume is supportive, but the base was short and the prior trend was down for 3 years."* 🤔
> *"The ideal entry was at ₹176–250 when the ⚡ alert fired. **At ₹723, you're chasing a 310% move.** The smarter play now is to **wait for a retest of ₹645–670** — if it holds, that's your high-conviction entry with a clear invalidation level below."* 🎯
> *"Don't be the person who buys the 10th floor of a building that started on the ground. **Wait for the elevator to come back to the 6th floor** — then buy with confidence."* 🏗️
---
## 🆚 vs Graphite India (Today's Other Chart)
| Factor | Kabra Extrusion | Graphite India |
|--------|----------------|----------------|
| Recovery | +310% in 6M | Steady climb |
| Volume multiple | 2.6x ⚠️ | **6x** ✅✅ |
| Base quality | Short (3–4M) ⚠️ | Long (3 years) ✅ |
| Entry risk now | Higher | Lower |
| Upside from here | Higher | Moderate |
| **Conviction** | Medium | **High** |
---
**Explosive recovery — but respect the risk at elevated levels. Retest of ₹645 = the real opportunity. 🎯⏳**  Long
Long
Graphite India Limited# Graphite India Limited (NSE) — Weekly Chart Analysis 📊
## 🔍 Chart Overview
- **Timeframe:** 1 Week | ~5 year view
- **CMP:** ₹825.80 | **Change:** +1.00 (+0.12%) 😐
- **Key Resistance:** ₹811.90 (now broken!) | **Base Support:** ₹251.70
- **Volume:** 53.52M current vs 8.83M average 🔥
- **⚡ Alert triggered** at the breakout
---
## 📐 The Full Structure — 5 Years in Review
### 📉 Phase 1: The Big Fall (2021–2023)
- Stock peaked near **₹850+ zone** in 2021
- Collapsed to **₹251.70** by mid-2023 — a **-70% decline**
- Brutal multi-year markdown in graphite electrode space
### 🔄 Phase 2: The Base & Chop (2023–2026)
- Found bottom at ₹251.70 — **held as rock-solid support** ✅
- Spent 3 years in a wide **₹300–₹820 range**
- Multiple attempts at ₹800+ ceiling — all failed
- Classic **multi-year accumulation** in a volatile range
### 🚀 Phase 3: The Breakout Attempt (Sep 2026)
- Price has **surged above ₹811.90** resistance
- CMP ₹825.80 = **new multi-year high territory** 🎯
- The breakout is happening **RIGHT NOW**
---
## 🟦 Blue Box Measured Move
- Captures **-557.70 points (-40.70%)** from ~₹1,370 → ₹811 zone
- Arrow lands exactly at **current resistance** = measured move fulfilled
- ⚠️ This means the **blue box is now complete** — supply zone activated
---
## 💥 Volume Analysis — The Clincher
| Metric | Reading | Significance |
|--------|---------|-------------|
| Current volume | **53.52M** | 🔥 Massive surge |
| Average Vol(20) | **8.83M** | Baseline |
| Multiple | **~6x average** | Institutional conviction |
| Vol MA (blue) | Flat for years, now spiking | Structural shift |
- **6x average volume** on a breakout week = this is NOT retail noise
- This is the **strongest volume signal** seen on this chart in years
- Compare: even the 2024 volume spike was smaller than this
- Smart money is **aggressively repositioning** 💪
---
## ⚔️ Breakout Quality Scorecard
| Factor | Reading |
|--------|---------|
| Base duration | ✅ 3 years |
| Prior resistance tests | ✅ Multiple — well-established level |
| Breakout candle | ✅ Strong green weekly candle |
| Volume confirmation | ✅✅ 6x average — exceptional |
| Blue box completion | ⚠️ Measured move done = supply risk |
| CMP vs resistance | ✅ Above ₹811.90 |
| Weekly close | ⏳ Today is Sep 11 — close imminent! |
---
## 🎯 Target Projections
| Target | Level | Basis |
|--------|-------|-------|
| T1 | ₹900 | Round number / psychological |
| T2 | ₹1,000 | Par level + prior swing |
| T3 | ₹1,200 | Blue box top (measured move up) |
| Extended | ₹1,370 | All-time high retest |
> 📐 **Measured Move Up:** ₹812 + ₹558 (box depth) = **₹1,370** — full round trip! 🎯
---
## 🛡️ Trade Setup
| Parameter | Level |
|-----------|-------|
| **Entry** | Current ₹825 or retest ₹800–812 |
| **Stop Loss** | ₹740 (weekly close below) |
| **T1** | ₹900 |
| **T2** | ₹1,050 |
| **T3** | ₹1,200 |
| **Risk:Reward** | ~1:5 |
| **Holding Period** | 6–15 months |
---
## ⚠️ Risk Factors
- 🟦 **Blue box measured move complete** — overhead supply from trapped sellers at ₹800–850
- 🏭 **Graphite electrodes** are cyclical — steel production, EAF furnace demand drive revenues
- 🌍 **Global steel capex** cycle needs to be bullish for sustained move
- ⚡ The +0.12% today is **very quiet** after a big move — consolidation or fatigue?
- 📊 Check if 53.52M volume is **buying or selling** — breakout needs buyer-driven volume
---
## 🏭 Fundamental Context
Graphite India is in the **graphite electrode** business — a key input for Electric Arc Furnaces (EAF) in steel making. Key drivers:
- 🔋 EV battery graphite demand growing
- 🏗️ Steel production recovery globally
- 📦 Electrode price cycle — currently in recovery phase
---
## 🧠 Shivashankar's Take
> *"Graphite India just did what it couldn't do for **3 years** — break above ₹812 with **6x average volume.** When a stock spends 3 years building a base and then breaks out on institutional-scale volume, you don't overthink it. You respect the signal."* 💪
> *"The blue box is complete — yes. But measured moves completing at resistance doesn't mean reversal — it means the **old resistance becomes the new launchpad.** With 6x volume, the bulls are serious. The ₹1,000 and ₹1,200 targets are now on the table."* 🎯
> *"**Today being Friday** — the weekly close in the next few hours is the verdict. A strong weekly close above ₹812 with this volume = **textbook confirmed breakout.** Watch that close."* ⏰
---
**3-year base. 6x volume. Multi-year resistance broken. Weekly close today seals the deal. 🚀**  Long
Long
BTC/USD 45-Minute Technical Analysis 1. Market Structure
BTC is showing a clear sequence of lower highs and lower lows, declining from approximately $80,400 toward $76,000.
Key levels visible on the chart:
• $78,900–$79,100 — Major previous resistance and supply zone\
• $77,900–$78,000 — Recent bearish MSB area\
• $77,200–$77,400 — Immediate support/reaction zone\
• $76,400–$76,000 — Major downside liquidity and swing-low area
The overall 45-minute structure remains bearish unless price can reclaim the recent resistance zones with strong acceptance.
2. Liquidity Sweep
The most important event on the chart is the sharp upside spike near the 11th.
BTC moved aggressively from approximately $76.8K–$77.2K toward $79.6K–$79.8K, but the breakout was quickly rejected.
This resembles a liquidity sweep where price takes buy-side liquidity above previous highs before reversing.
The important detail is that BTC failed to maintain acceptance above the highs. The aggressive rejection suggests that sellers were waiting at higher prices.
3. Short Setup
The cleaner opportunity is not necessarily to short the current price around $77.62K.
A more professional approach would be to wait for a retracement toward the $77.8K–$78K region.
If price returns to this zone and shows bearish confirmation such as:
• Rejection wick\
• Bearish engulfing candle\
• Lower high\
• Failed breakout\
• Lower-timeframe bearish MSB
then the short setup becomes considerably stronger.
4. Important Resistance Zone
The main zone to watch is approximately $77,850–$78,050.
This area is important because it combines the previous structure break with the psychological $78K level.
If BTC reaches this zone and gets rejected, it could provide a favorable risk-to-reward short opportunity.
However, if BTC reclaims $78K and holds above it, the bearish setup starts losing strength.
5. Downside Targets
TP1: \~$77,200
First nearby objective and potential area for partial profit.
TP2: \~$76,800
This is the primary target shown by the projected path on the chart.
TP3: \~$76,400
A deeper continuation target near the recent swing structure.
TP4: \~$76,000
Major liquidity and previous swing-low region. A break toward this area would indicate stronger bearish continuation.
6. Bearish Invalidation
The short thesis becomes weaker if BTC successfully reclaims $78K and establishes acceptance above it.
A stronger invalidation would be sustained trading above approximately $78.4K–$78.8K.
If BTC moves back toward $79.2K–$79.6K, the current bearish continuation idea would need to be completely reassessed.
7. Overall Market Narrative
The chart shows an interesting liquidity sequence.
BTC was declining toward the $76K region, then suddenly produced a powerful upside move that swept liquidity around $79.6K.
This type of move can trap both sides of the market.
Short sellers above the highs can be stopped out during the spike, while late buyers may enter because of the strong bullish displacement.
When price then reverses sharply, those late longs can become forced sellers, potentially adding momentum to the downside.
That is why the $77.8K–$78K region is particularly important.
Professional Trade Plan
Bias: Bearish below \~$78K
Preferred entry: \~$77.8K–$78.05K after bearish confirmation
TP1: \~$77.2K
TP2: \~$76.8K
TP3: \~$76.4K
Extended target: \~$76.0K
Invalidation: Strong acceptance above \~$78.4K–$78.8K
Risk: High, because the chart is showing extreme volatility
Final View
The current structure favors bearish continuation, but chasing the move at $77.62K is less attractive than waiting for a retracement.
The ideal scenario is:
Liquidity sweep → sharp rejection → retracement into $77.8K–$78K → bearish confirmation → lower high → continuation toward $76.8K and potentially $76.4K–$76K.
If BTC instead holds above $78K and begins forming higher highs, the bearish thesis should be abandoned and the market reassessed. Short 
The Expiry Day Trade Most Traders Understand Too Late!Hello everyone, i hope you all will be doing good in your life and trading as well, let's discuss about Expiry day Game because it looks exciting.
The market starts moving fast, option premiums start reacting quickly and suddenly every small move feels like a trading opportunity.
This is exactly where many traders get trapped.
They see a strong candle, enter the option and think they have enough time for the move to continue.
But on expiry day, time is not your friend.
A trade that looks perfect on the chart can still turn into a bad trade if the option premium doesn't move quickly enough.
That's the part many traders understand too late.
━━━━━━━━━━━━━━━━━━━━━━━━━━━━━━━━━━
THE EXPIRY DAY GAME IS DIFFERENT
On a normal trading day, you can be slightly early and still have some time for your trade to work.
Expiry day is different.
The option premium is fighting against time decay while you are waiting for the market to move.
So imagine NIFTY moves slightly in your direction, but not fast enough.
You are right about the direction...
Yet your option doesn't give you the return you expected.
And sometimes, NIFTY barely moves for a few minutes and the option premium starts losing value very quickly.
Being right on direction is not always enough on expiry.
━━━━━━━━━━━━━━━━━━━━━━━━━━━━━━━━━━
THIS IS WHERE FOMO BECOMES DANGEROUS
You see NIFTY moving quickly.
One candle becomes two.
The option premium suddenly jumps.
Now the fear starts:
"Miss ho gaya... abhi entry nahi li to move chala jayega."
So the trader enters after the big move has already happened.
And this is usually where the risk becomes much bigger.
The premium is already expanded.
The move is already extended.
And there is very little time left for the trade to prove itself.
Expiry rewards timing much more than excitement.
━━━━━━━━━━━━━━━━━━━━━━━━━━━━━━━━━━
WHAT ACTUALLY MATTERS ON EXPIRY
Speed of the move
It's not enough for NIFTY to move in your direction. The move needs enough momentum for the option premium to react.
Entry timing
Entering after a large premium expansion can completely change the risk-reward of the trade.
Strike selection
The behaviour of an ATM, ITM and far OTM option can be very different, especially when expiry gets closer.
Time remaining
The less time you have, the less room there is for a trade that is moving slowly.
Risk management
A small premium can look cheap, but cheap options can lose value extremely quickly.
This is why expiry trading is not simply about finding direction.
It's about direction + timing + speed.
━━━━━━━━━━━━━━━━━━━━━━━━━━━━━━━━━━
THE TRADE MOST TRADERS MISS
The best expiry trade is not always the one that gives the biggest candle.
Sometimes the better trade is the one where the setup appears before the crowd gets excited.
Price breaks an important level.
Momentum confirms it.
The option starts responding.
And the trade is taken with a predefined risk instead of chasing the premium after it has already exploded.
That's a completely different mindset.
Don't chase the premium. Trade the setup.
━━━━━━━━━━━━━━━━━━━━━━━━━━━━━━━━━━
ONE SIMPLE CHECK BEFORE ENTERING
Before taking an expiry trade, ask yourself:
Is NIFTY actually moving, or am I expecting it to move?
Am I entering because my setup is valid, or because the premium is running?
If NIFTY stays sideways for the next 5–10 minutes, can this option still handle the trade?
Where is my invalidation level?
These questions can save you from a lot of unnecessary expiry trades.
━━━━━━━━━━━━━━━━━━━━━━━━━━━━━━━━━━
"On expiry day, being right is not enough. You need to be right at the right time."
━━━━━━━━━━━━━━━━━━━━━━━━━━━━━━━━━━
THE BIGGEST MISTAKE
Many traders think the biggest opportunity on expiry is catching a 50% or 100% option move.
I think the bigger opportunity is learning when not to trade.
If the market is stuck...
Wait.
If the setup has already moved...
Wait.
If you're entering only because everyone around you is making money...
Definitely wait.
Expiry day gives you many opportunities.
But it also gives you many reasons to overtrade.
The ability to sit out is also a trading skill.
━━━━━━━━━━━━━━━━━━━━━━━━━━━━━━━━━━
FINAL THOUGHT
Expiry day can be one of the fastest markets to trade.
But fast doesn't mean easy.
The market can give you the right direction and still punish a late entry.
It can give you a perfect setup and still invalidate it within minutes.
And it can make a cheap option look attractive when the real problem is that there simply isn't enough time left.
So don't enter because the premium is moving.
Don't enter because the candle looks exciting.
Enter because the setup makes sense.
And always remember...
On expiry, the clock is part of the trade.
If you found this useful, let me know your thoughts in the comments.
I'm bringing more practical NIFTY and options trading lessons in this series. If you guys love it, I'll definitely bring the next chapter. Show me your support in the form of boosting it thanks
By— @TraderRahulPal
Education 
 Short
Short
XAU/USD - Buyers Take Control Next WaveOANDA:XAUUSD is reacting again from the 4,280–4,360 support zone, an area that already produced a strong rebound earlier this month. However, price is still trading below the descending trendline and around the Ichimoku structure, so the bullish reversal is not confirmed yet.
If buyers defend this zone and price breaks decisively above the trendline, I favor a recovery toward:
🎯 Target: 4,510
Macro Market: Gold is facing a difficult backdrop after US PPI rose 0.4% in August and annual producer inflation reached 5.4%, lifting the probability of a Fed rate hike to around 70%. The US 10-year yield is also close to 5%, while the Dollar remains firm.
A sustained H2 break below 4,280 would weaken the recovery scenario.
AURICVERSE View: technically, Gold is sitting at an attractive support area, but macro remains a headwind. I want to see support hold + trendline breakout before treating 4,510 as the next upside objective. Long 


