


Bulls are weak but Bears are not Confident: Channel CompressionProbable Scenario Analysis:
⏺ Present Scenario:
The main trend of Gold (XAUUSD) FOREXCOM:XAUUSD is downward. However, the fall is staggering and volatile. The price is unable to break out of the downward-sloping channel. Thus, there is no clear trend despite the lower-lows and lower-highs structure. It is a sign of a running correction inside the channel compression. The price action is broken. Broader sentiment is indecisive to bearish.
🟢 Bullish Scenario
There is no sign of a bullish setup. Doubt every upward move. Strong resistance zone (SRZ) is (4400 - 4350). However, if the price sustains above 4400, then weak bullish targets would be 4425 and 4450. Next, if the price starts to trade above 4450, then strong bullish targets would be - 4475 and 4500. There will be strong resistance at 4500.
🔴 Bearish Scenario
Presently, the bearish setup is active. But bears are not confident. Stay bearish below 4300. Try to find bearish opportunities only unless the trend is genuinely reversed. The probable bearish targets below 4300 would be - 4275 and 4250. A weak support zone (WSZ) is (4275 - 4250). Next, if the price decisively breaks down below 4250, then the probable strong bearish targets would be - 4225, 4200, 4175, and 4150.
🟡 No Trading Zone: (4400 - 4300).
⏺ Range of Consolidation (ROC): (4450 - 4250).
Here, 4350 is the median of the ROC. The median works like a trading session sentiment evaluator. The price trading above the median would offer bullish sentiment, while the price trading below the median would trigger bearish sentiment within the ROC.
● Events:
- 14 Sep (Mon): No events.
- 15 Sep (Tue): ADP Weekly Employment Change (05:45 PM IST, 🔵 Low Impact).
- 16 Sep (Wed): Core Retail Sales m/m (06:00 PM IST, 🟠 Medium Impact). Federal Funds Rate, FOMC Economic Projections, and FOMC Statement (11:30 PM IST, 🔴 High Impact).
- 17 Sep (Thu): Philly Fed Manufacturing Index (06:00 PM IST, 🟠 Medium Impact). Pending Home Sales m/m (07:30 PM IST, 🔵 Low Impact).
- 18 Sep (Fri): Capacity Utilization Rate (06:45 PM IST, 🔵 Low Impact). FOMC Member Bowman Speaks (07:00 PM IST, 🔵 Low Impact). FOMC Member Schmid Speaks (09:15 PM IST, 🔵 Low Impact).
● Intraday, Weekly, and Monthly Bias
Establish bias with respect to the opening price (of the particular session - Intraday, Weekly, and Monthly). If the price sustains above the opening price, then don't think of shorting. Look for bullish trades only. On the contrary, if the price sustains below the opening price, then don't think of going long. Look for bearish trades in that case.
● Disclaimer + End Note
- All the analyses would fail in the case of a major gap up, gap down, or price structure anomaly. Thus, practice PRAGMATISM in the live session.
- Trade only if there is a set-up. Remember, not trading is an extension of the trading activity.
- Mark your points. Trade your points. Price is GOD. Anything can happen in the markets. Thus, trade what you see, not what you believe.
- Always PRACTICE RISK MANAGEMENT. Always PROTECT YOUR CAPITAL. Be RESPONSIBLE.
- Be Strategic. Be Courageous. Be Patient. Be Wise.
- Every day is a new day. Thus, do not carry the baggage of past successes or failures. Leave the gardens of winning and losing. Establish yourself in equanimity. Always think from a new perspective.
- Let the joy of trading drive your effectiveness, not greed or fear. Believe in Possibilities.
Happy Trading! XAUUSD — Breakout Is Done, Can 4,317 Hold?
Gold is trading around 4,337 after a strong M30 recovery from the 4,278 area.
Price has pushed back above the previous short-term structure and is now holding above the breakout zone near 4,317.
The recovery is encouraging, but the market is approaching an important Fed decision.
Rate expectations remain elevated, Treasury yields are still near 5%, and the U.S. dollar remains firm. Gold has still managed to recover, showing that buyers are not completely giving up control.
But a breakout candle alone is not enough.
The retest is the real test.
The simple read
M30 has started to shift away from the previous bearish structure.
Gold first reacted from the 4,278 OB area and then built a strong bullish leg back above 4,317.
That level now changes role.
Instead of resistance, 4,317 becomes the first breakout support buyers need to defend.
The current price near 4,337 is already around the 0.786 Fibonacci area of the latest recovery leg, so I would not chase the move here.
The cleaner setup would be a controlled pullback.
If Gold returns toward 4,317 and buyers defend the zone, the bullish recovery structure remains healthy.
The first upside test is around 4,354.
This is the nearest visible resistance and the first level where short-term sellers may react.
If buyers can break and hold above 4,354, the next important area becomes 4,390–4,400, with 4,396 as the major resistance decision level.
Above that sits the larger 4,425–4,431 upper resistance zone.
That is where the recovery would face a much stronger test.
Key price zones
Current price area: 4,337
Breakout support: around 4,317
Order Block support: around 4,278
Major structure support: 4,253–4,258
First resistance test: around 4,354
Major resistance: around 4,396
Upper resistance: around 4,431
Bullish pressure improves above: 4,354
Recovery structure weakens below: 4,317
Trading plan
Buy reaction scenario
If Gold pulls back toward 4,317:
I will watch whether buyers can defend the breakout structure.
A clean rejection, slowing downside momentum or a strong reclaim from this area can support another bullish leg toward 4,354.
If 4,354 then breaks and holds, attention can shift toward 4,396.
The important point is not to chase price at 4,337.
Wait for the retest.
Sell reaction scenario
If Gold reaches 4,354 but cannot hold above it:
A short-term rejection may rotate price back toward 4,317.
This would not automatically destroy the recovery structure as long as breakout support continues to hold.
The larger seller test remains around 4,396.
Breakout scenario
If Gold clears 4,354 with strong acceptance:
The M30 recovery becomes more convincing.
4,396 becomes the next major target and decision zone.
A clean break above 4,396 could then expose the upper resistance around 4,431.
Breakdown scenario
If 4,317 fails with clear bearish continuation:
The breakout loses quality.
I would then watch the 4,278 OB as the next important buyer reaction area.
Below that, 4,253–4,258 remains the major structure support.
The short-term structure is improving.
But the easy part of the bounce may already be behind us.
4,317 is the level buyers need to protect.
4,354 is the first seller test.
4,396 is the major breakout decision.
4,431 is the upper recovery objective.  Long
Long
XAUUSD: Liquidity Sweep into Supply Zone –Bearish Continuation ?Market Overview
Gold (XAUUSD) on the 1-hour timeframe has completed a corrective pull-back into a strong higher-timeframe bearish structure. Price broke down sharply from an earlier consolidation range, establishing a clear Break of Structure (BOS) to the downside.
Technical Breakdown
Break of Structure (BOS): Price aggressively impulsed downward from the prior consolidation block, shifting medium-term momentum bearish.
Liquidity Sweep & Trendline Resistance: The recent upward retracement swept liquidity above recent short-term highs and tested a descending trendline originating from the previous consolidation high.
Supply Zone Tap: Price expanded directly into the marked Supply Zone (4,330 - 4,360), reacting sharply with selling pressure.
CHoCH (Change of Character): Prior minor higher highs shifted momentum back down, signaling lower-timeframe distribution within the supply block.
Trade Plan
Bias: Bearish / Short
Entry Zone: 4,330 – 4,345 (Supply Zone Re-test)
Stop Loss (SL): 4,365 (Above Supply Zone & Liquidity Highs)
Take Profit (TP): 4,280 (Target Level / Support Low). Short 
Long 
 Long
Long
#NIFTY Intraday Support and Resistance Levels - 17/09/2026Nifty 50 is expected to open flat around the 23,200–23,250 zone. The index is currently near 23,224, sitting between an important support at 23,200 and immediate resistance around 23,250. Recent price action shows consolidation after the sharp decline, making this narrow range crucial for today's directional move.
On the bullish side, Nifty needs to reclaim and sustain above 23,250. A confirmed move above this level can trigger a recovery toward 23,350, 23,400 and 23,450+. The 23,450 area remains an important higher resistance, so stronger upside momentum would require the index to eventually clear this zone.
On the bearish side, 23,200 is the key level to monitor. If Nifty breaks and sustains below 23,200, selling pressure can resume toward 23,100, 23,050 and 23,000. The 23,000–23,000 region is an important support zone where some buying response may emerge.
For today's session, 23,200–23,250 is the main decision zone. Since the market is expected to open inside this narrow range, initial price action could remain choppy. Traders can wait for a sustained move outside this zone rather than chasing moves within it. #BANKNIFTY Intraday PE & CE Levels(17/09/2026)Bank Nifty is expected to open flat around the 56,250–56,300 zone. The index has recovered strongly from the recent lows near 55,800 and is now trading around 56,292, but it remains between important support and resistance levels. This makes the opening zone crucial for determining the intraday direction.
On the bullish side, the 56,050–56,100 zone is an important support area. As long as Bank Nifty sustains above this region, the recovery can continue toward 56,250, 56,350 and 56,450. A clean and sustained breakout above 56,550 would strengthen the bullish structure and can open the way toward 56,750, 56,850 and 56,950+.
On the bearish side, 56,450–56,550 is an important resistance zone. If the index moves into this area but fails to sustain and shows rejection, selling pressure could return toward 56,250, 56,150 and 56,050. A decisive breakdown below 55,950 would weaken the structure further, with downside levels around 55,750, 55,650 and 55,550.
For today's session, 56,050 on the downside and 56,450–56,550 on the upside form the broader decision-making range. Since the opening is expected to be flat and inside this range, traders should avoid chasing the initial move and wait for price confirmation around these key levels. SSL Sweep Before Recovery WaveFundamental Analysis
Gold remains under pressure ahead of the September 16 Fed decision. Markets are pricing roughly a 94% chance of a 25 bp rate hike, while the U.S. 10-year yield has climbed above 5% and oil near $108 is reinforcing inflation concerns. These conditions continue to support the dollar and limit Gold’s recovery for now.
Technical Analysis
On H1, Gold remains in a bearish structure after the latest CHoCH and BOS, with price now near 4,284.
The key area is the 4,252–4,262 SSL. A final liquidity sweep into this zone could complete the bearish wave and create a cleaner base for recovery.
If buyers confirm from SSL, the first upside reaction area is the 4,332–4,346 Fibo Zone + VAL, followed by the 4,366–4,382 POC.
Important Key Levels
4,425–4,438 — OB + Support / Major Resistance
4,366–4,382 — POC
4,332–4,346 — Fibo Zone + VAL
4,252–4,262 — SSL / Main Liquidity
Trading Scenario
Buy priority comes only after a sweep into 4,252–4,262 followed by bullish H1 confirmation.
Target: 4,332–4,346 first, then 4,366–4,382.
Invalidation: H1 acceptance below the SSL zone.
Overall View
The H1 trend is still bearish, so buying early is less attractive. The cleaner setup is to let Gold take lower liquidity first, then watch for a confirmed recovery toward the Fibo Zone and POC.
Will Gold sweep the SSL before starting the next recovery wave? Long 
XAUUSD — Bullish Recovery After the PullbackMarket Pulse
Gold is recovering ahead of the Fed decision as the U.S. dollar, Treasury yields and oil prices ease.
A 25 bp rate hike is largely expected, so the bigger reaction may come from the Fed’s guidance. This could keep Gold volatile around the announcement.
What the Chart Says
XAUUSD is showing a stronger short-term recovery on H1.
Price has climbed from the 4,270 area and is now holding around 4,340, after breaking back above previous short-term structure.
The nearest support sits around 4,330–4,340. If this area holds, buyers may try to continue the recovery.
The next resistance is around 4,345–4,355. A clean move above this zone could open the way toward the stronger 4,395–4,405 resistance area.
A deeper pullback could still reach 4,300–4,320, which remains the stronger demand zone below.
Levels That Matter
4,395–4,405 — Main upside resistance
4,345–4,355 — First resistance
4,330–4,340 — Near-term support
4,300–4,320 — Main demand zone
4,270–4,280 — Recent swing support
My Main Plan
The main plan is bullish.
I prefer waiting for price to hold above 4,330–4,340 or make a controlled pullback toward 4,300–4,320.
If buyers return with clear confirmation, Gold could first challenge 4,345–4,355.
A clean breakout above that area may extend the recovery toward 4,395–4,405.
What I Need to See
I want to see the current recovery keep forming higher lows and price hold above the marked support structure.
A sustained H1 move below 4,300 would weaken the immediate bullish setup.
Final Read
The short-term H1 picture is improving, but Gold is approaching resistance just before the Fed decision.
For now, I prefer waiting for a pullback and bullish confirmation rather than chasing the move higher, with 4,395–4,405 remaining the main recovery target. Long 
XAUUSD — Bullish Retest Ahead of the FedFundamental Analysis
Gold is recovering ahead of today’s Fed decision as the U.S. dollar softens, Treasury yields retreat and oil prices ease. Markets currently price roughly a 92%–93% probability of a 25 bp hike, which would lift the target range to 3.75%–4.00%. With the hike largely priced in, the bigger reaction may come from the Fed’s guidance and outlook for further tightening.
Brent has eased toward $108 as Saudi Arabia offers additional crude via Oman and U.S. inventories rise, temporarily reducing some inflation pressure.
Technical Analysis
On H1, XAUUSD is trading near 4,348 after a strong rebound from the 4,268–4,280 demand area.
Price is now testing the descending resistance trendline and the 4,341–4,353 Fibonacci 0.786–0.618 zone. This area is the key short-term decision point.
If buyers defend the zone and price confirms a breakout/reclaim above the trendline, the next objectives sit near 4,368, followed by 4,378–4,394.
The 4,327 structure low remains the critical bullish invalidation level.
Important Key Levels
4,378–4,394 — Main target zone
4,368 — Intermediate resistance
4,341–4,353 — Main buy zone
4,327 — Key support / invalidation
4,295–4,315 — Deeper demand
Trading Scenario
Main Buy Setup
Entry: 4,341–4,353
Stop Loss: 4,324
Take Profit 1: 4,368
Take Profit 2: 4,378
Take Profit 3: 4,390–4,394
Buy Condition
Wait for the 4,341–4,353 zone to hold with bullish confirmation. A liquidity sweep, bullish engulfing candle, strong H1 reclaim, or confirmed break above the descending trendline would strengthen the setup.
A sustained H1 break below 4,327 invalidates the immediate bullish scenario.
Overall View
The short-term H1 structure is shifting toward recovery, but price is still confronting the major descending trendline. The preferred plan is to buy only after confirmation around 4,341–4,353, targeting 4,368 and 4,378–4,394.
With the Fed hike largely priced in, forward guidance may matter more than the rate decision itself for the next major Gold move.
Will Gold hold 4,341–4,353 and break the trendline before the Fed decision? Long 
SSL Sweep Before RecoveryFundamental Analysis
Gold remains under pressure ahead of the Fed meeting on September 15–16. Markets are pricing roughly an 89% probability of a 25 bp rate hike, while the U.S. dollar has reached a one-week high and the 10-year Treasury yield is near 5%. Brent above $107 is also keeping inflation concerns elevated. Middle East tensions still provide some safe-haven support, but the macro environment remains difficult for Gold in the short term.
Technical Analysis
On H1, Gold remains in a bearish structure after repeated CHoCH signals and lower lows.
Price is now trading near 4,296, close to the previous low around 4,277. The next important area is the 4,245–4,260 SSL, where a final liquidity sweep could complete the current bearish wave.
If buyers react strongly there, Gold may recover toward the 4,340–4,360 Fibo Zone, followed by the 4,400–4,420 POC.
Important Key Levels
4,490–4,510 — OB + Support / Major Resistance
4,400–4,420 — POC
4,340–4,360 — Fibo Zone
4,245–4,260 — SSL / Main Liquidity
Trading Scenario
Buy priority comes only after a sweep into 4,245–4,260 followed by bullish H1 confirmation.
Target: 4,340–4,360 first, then 4,400–4,420.
Invalidation: H1 acceptance below the SSL zone.
Overall View
The H1 structure remains bearish, so buying early is less attractive. The cleaner setup is to wait for lower liquidity to be taken before looking for a recovery wave.
Will Gold sweep the SSL first before recovering toward 4,400? Long 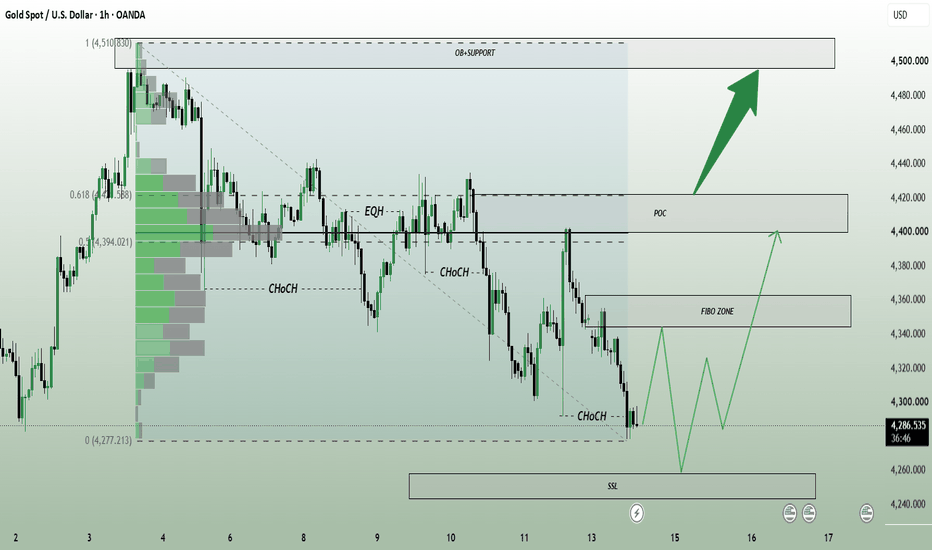
Is Gold Just Rebounding Before the Next Move Lower?Hello traders, if we put short-term noise aside and look at XAUUSD in a disciplined and objective way, the current picture is sending a fairly clear message: the bearish trend has not been broken yet.
Looking at the broader backdrop, pressure on gold remains as hotter-than-expected U.S. inflation has increased expectations of a Fed rate hike, while U.S. Treasury yields continue to stay elevated. This keeps the interest-rate environment unfavorable for a non-yielding asset like gold. In other words, the current rebound still lacks the fundamental catalyst needed to signal the beginning of a new uptrend.
Moving to the H4 chart, the bearish structure remains quite clear:
Price continues to trade below the descending trendline, with a consistent sequence of lower highs.
The area around 4,365 is not random: the descending trendline and the Ichimoku zone converge here, creating an important defensive area for sellers.
Recent recovery attempts have lacked follow-through, suggesting that buyers have yet to regain meaningful control.
What stands out is this: every time gold approaches the resistance area above, selling pressure returns relatively quickly. When a market repeatedly fails to break resistance despite several recovery attempts, it often signals that sellers are still controlling the structure.
📌 Highest-probability scenario:
As long as XAUUSD remains below 4,365 and the descending trendline stays intact, I expect the current rebound to face renewed selling pressure, with my main target around 4,225. Only a decisive and sustained breakout above the bearish structure would make me reassess this scenario. Short 
H1 Bearish Retest Toward Previous SupportXAUUSD is trading around 4,291 after another bearish leg pushed price back into the 4,275–4,295 Current Demand Zone. H1 structure remains bearish beneath the descending trendline, but price is now sitting near support, so chasing fresh shorts at current levels is less attractive.
The macro backdrop remains heavy for gold ahead of today’s Fed decision. Markets are pricing roughly a 90% probability of a 25 bp rate hike, while the U.S. dollar remains firm and Treasury yields recently reached their highest levels since 2007. Oil has eased slightly today but remains above $100, keeping inflation concerns elevated. The FOMC statement is due at 2:00 p.m. ET, followed by Chair Kevin Warsh’s press conference at 2:30 p.m. ET.
Technical View
The H1 structure continues to print lower highs and bearish structural breaks.
Price is currently reacting from the 4,275–4,295 demand zone, so a corrective rebound may develop before the next bearish leg.
The first important recovery area is around 4,335–4,360, but the cleaner sell location sits higher at the 4,375–4,390 Order Block, where the descending resistance structure also aligns.
If sellers defend this zone, the next downside objective is the 4,254 previous support.
Above that, 4,425–4,450 Supply remains the stronger resistance area, while 4,500–4,515 Major Supply is the higher-timeframe ceiling.
Key Zones
Current Price: 4,291.440
Current Demand: 4,275–4,295
Sell Priority / Order Block: 4,375–4,390
Supply Zone: 4,425–4,450
Major Supply: 4,500–4,515
Downside Target / Previous Support: 4,254.130
Trading Plan
Sell Priority: 4,375–4,390
Condition: wait for an H1 recovery into the Order Block followed by bearish rejection, failed acceptance or lower-high confirmation.
TP1: 4,300–4,285
TP2: 4,254
Invalidation: sustained H1 acceptance above the Order Block and descending resistance structure would weaken the immediate bearish setup.
Sell View
The preferred approach is not to chase shorts around 4,290 because price is already sitting inside demand.
A corrective recovery toward 4,375–4,390 would provide a cleaner location to evaluate seller response. With the Fed decision approaching, a liquidity sweep above nearby resistance remains possible before direction becomes clearer.
Final View
Gold remains bearish on H1, while the macro environment continues to favor higher rates, a firm dollar and elevated yields.
The main scenario is a rebound from current demand into 4,375–4,390, followed by renewed bearish continuation toward 4,254.
Will the Fed trigger the H1 retest into the bearish Order Block before gold attacks previous support? Short 
 Long
Long
 Long
Long
 Education

 Education

Long 


