 Long
Long
XAUUSD — Weekly Wave 5 Lower Toward 4,060
From Kelly’s view, gold enters next week inside a broader bearish corrective structure. Price is currently trading around 4,378, after recovering from the 4,240–4,250 area, but the rebound is still developing beneath a descending channel and an important sell zone around 4,390–4,410.
The key idea is simple: the current recovery may represent a corrective Wave (4), while the main weekly scenario remains a continuation lower into Wave (5) if sellers defend the upper resistance zone.
⟡ Market structure
Gold remains inside a descending structure after the major peak near 4,680. Recent rebounds have continued to form below important resistance, while the descending channel is still controlling the broader direction.
The current recovery from around 4,240 has pushed price back toward the 4,390–4,410 sell zone, where Fibonacci resistance and the projected Wave (4) completion area overlap.
For next week, 4,334 is the first important support. A clean break below this level could confirm renewed bearish momentum and expose the 4,240–4,255 area.
If that support also fails, the larger Wave (5) projection points toward the 4,045–4,075 zone.
➤ Key levels
◌ Current price area: 4,375–4,385
◌ Main sell zone: 4,390–4,410
◌ Strong resistance: 4,410–4,430
◌ Strong support: 4,334
◌ Secondary support: 4,240–4,255
◌ First target: 4,334
◌ Second target: 4,240–4,255
◌ Main target: 4,045–4,075
◌ Invalidation: Above 4,430
⌁ Elliott Wave view
Wave (1): The first bearish leg pushed price lower from the previous recovery high.
Wave (2): Gold produced a corrective rebound before sellers regained control.
Wave (3): The stronger bearish impulse extended toward the 4,240 area.
Wave (4): The current rebound may be completing near 4,390–4,410, where the descending channel and Fibonacci resistance overlap.
Wave (5): If sellers reject this zone, the final bearish leg could develop toward 4,240 first, followed by the larger 4,045–4,075 target area.
▸ Trading scenario
Preferred bearish scenario
Entry: 4,390–4,410 after bearish confirmation
Stop Loss: Above 4,430
Take Profit 1: 4,334
Take Profit 2: 4,240–4,255
Take Profit 3: 4,045–4,075
The cleaner plan is to wait for rejection from the sell zone rather than chase price lower around current levels. A bearish reaction near 4,390–4,410, followed by a break below 4,334, would strengthen the Wave (5) scenario.
Alternative scenario:
If gold breaks above 4,410–4,430 and holds above the descending structure, the bearish Wave (5) setup may be delayed and price could extend toward the next higher resistance before sellers regain control.
◌ Invalidation
The main bearish scenario would weaken if price gains sustained acceptance above 4,410, and a confirmed break above 4,430 would invalidate the preferred Wave (5) structure for next week.
⌁ Kelly’s view
Kelly’s main view remains bearish for next week while gold stays below 4,390–4,430.
The current rebound may still have room to test the sell zone, but the broader structure favors another bearish leg if sellers defend resistance. 4,334 is the first confirmation level, while 4,240–4,255 remains the next major support before the larger 4,045–4,075 Wave (5) target comes into focus.
Do you think gold will reject the 4,390–4,410 sell zone first, or break 4,334 directly next week?  Short
Short
NIFTY : Narrow Range | Trading Plan | 21-Sep-2026NIFTY 50 INTRADAY TRADING PLAN — 21 SEP 2026
Prev. Close: 23,341.75 | Timeframe: 15 Min
━━━━━━━━━━━━━━━━━━
KEY LEVELS
🔴 Last Intraday Resistance: 23,574–23,633
🟠 Opening Resistance: 23,436
🟡 Opening Support: 23,319
🟢 Last Intraday Support: 23,173
🔵 Consolidation Zone: 23,042–23,081
Decision Zone: 23,319–23,436
━━━━━━━━━━━━━━━━━━
📈 GAP UP — 100+ POINTS
If NIFTY opens around/above 23,442 :
➡️ Don't chase the opening candle.
➡️ Sustained acceptance above 23,436 can open the path toward 23,574–23,633 .
➡️ If price rejects 23,436 and falls back below it, avoid aggressive longs and wait for fresh confirmation.
Key idea: Gap Up ≠ automatic buy. Wait for acceptance.
━━━━━━━━━━━━━━━━━━
➡️ FLAT OPENING
If NIFTY opens around 23,319–23,436 :
🟢 Above 23,436 + 15-min confirmation → upside focus 23,574–23,633.
🔴 Below 23,319 + confirmation → downside focus 23,173.
⚠️ Inside 23,319–23,436 → avoid overtrading; wait for a clear breakout/breakdown.
━━━━━━━━━━━━━━━━━━
📉 GAP DOWN — 100+ POINTS
A 100-point gap-down reference is around 23,242 .
➡️ Don't chase the first red candle.
➡️ Sustained breakdown below 23,173 can bring 23,042–23,081 into focus.
➡️ If price quickly reclaims 23,173 and then 23,319, watch for a recovery setup instead of blindly holding shorts.
Key idea: Gap Down ≠ automatic sell.
━━━━━━━━━━━━━━━━━━
⏱️ FIRST 15–30 MINUTES
Let the opening volatility settle.
Wait → Confirm → Execute → Manage Risk
A level should ideally be supported by candle closing, retest and price-action confirmation rather than a simple touch.
━━━━━━━━━━━━━━━━━━
⚠️ OPTIONS RISK MANAGEMENT
• Define SL before entry.
• Keep position size small and controlled.
• Don't chase expanded option premiums.
• Respect the NIFTY spot level, not just option premium movement.
• Avoid revenge trading after a loss.
• Set a maximum daily loss limit.
• Remember: option buyers face time decay and volatility risk.
━━━━━━━━━━━━━━━━━━
SUMMARY
Above 23,436 → Watch for 23,574–23,633.
23,319–23,436 → Decision/No-Trade Zone; wait for confirmation.
Below 23,319 → Watch 23,173 → 23,042–23,081.
The gap tells us where the market opens; price action tells us what to do next.
━━━━━━━━━━━━━━━━━━
DISCLAIMER
This trading plan is for educational and informational purposes only.
I am not a SEBI Registered Analyst.
This is not investment advice or a recommendation to buy or sell any security or derivative. F&O and options trading involve substantial risk and can result in significant losses. Please conduct your own research and consult a SEBI-registered professional before making financial decisions.  Long
Long
 Education


W.D. Gann Theory: Time Trading StrategyW.D. Gann’s approach was built around one simple idea: price and time should be studied together. Instead of asking only “Where could price react?”, Gann also asked “When could that reaction become important?”
1. Price Level
Start with a meaningful level: previous high or low, major support/resistance, or an important breakout area. A level by itself is not a trade, but it gives you a place to watch.
2. Time Window
Gann focused heavily on market cycles and timing. In practical trading, this can mean watching whether price reaches an important level during a period where volatility or structure is already changing.
The key idea is simple:
Price Level + Time Window = Higher-Quality Area to Watch
3. Wait for the Reaction
This is where many traders make the mistake. Gann theory should not mean predicting a reversal just because price and time line up.
I still want confirmation: rejection candles, a structure break, momentum shift, or a clean reclaim of the level.
A practical sequence is:
Key Level → Time Window → Price Reaction → Confirmation → Trade
How This Can Improve Trading
The benefit is not “knowing the future.” It is becoming more selective.
Instead of entering every support or resistance level, you wait for price, timing and confirmation to align. That can help reduce random trades, improve entry location and make invalidation clearer.
4. AURICVERSE Takeaway
Gann Theory becomes useful when it helps you stop treating every level the same.
''Price tells you where.
Time tells you when to pay attention.
Confirmation tells you whether to trade.'' Education 
 Long
Long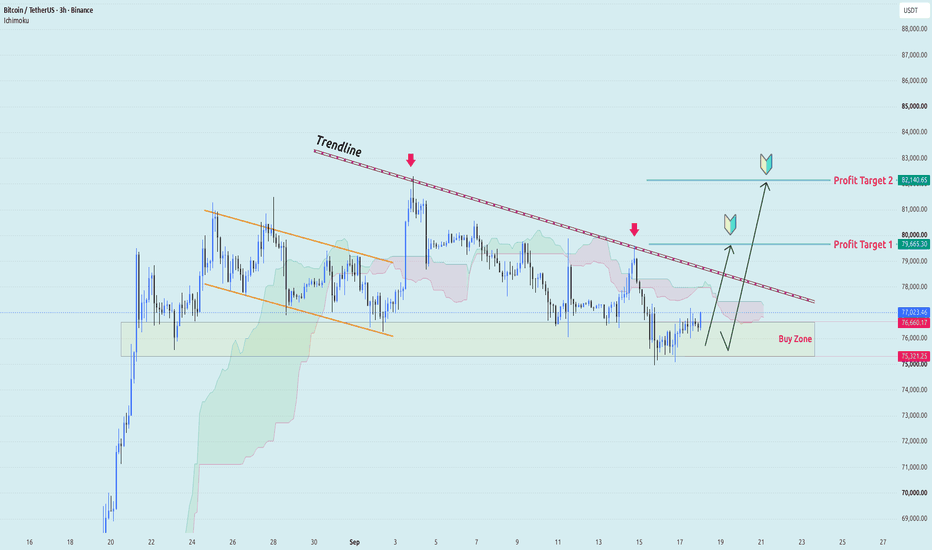
BTCUSDT: Breaking Out Wave Price ChannelBTCUSDT is trading around 77,830 USDT following a positive reaction from the 75,000–76,500 zone. The price has reclaimed the EMA34 (near 77,300) and is holding above the EMA89 (near 75,940), signaling a gradual return of buying pressure on the H8 timeframe.
The 78,500–79,500 zone represents a critical test, as it converges with the upper boundary of the descending channel. If BTC breaks out and sustains its position above this area, I lean towards a scenario where the price extends to 81,000–82,000 before targeting the key level around 84,400 USDT.
Macroeconomic factors today also provide mild support for a recovery scenario. Brent crude has fallen by approximately 2% and the 10-year Treasury yield has retreated to around 4.94%, while Asian stock markets have rallied strongly; these factors are helping to improve risk-on sentiment following a period of volatility driven by monetary policy concerns and Middle East tensions.
The bullish scenario would weaken if BTC falls back below the 75,000–75,500 level and closes the H8 candle below this "Buy Zone."
Will BTC break the descending channel to pave the way to 84.4K? Long 
 Education

Long 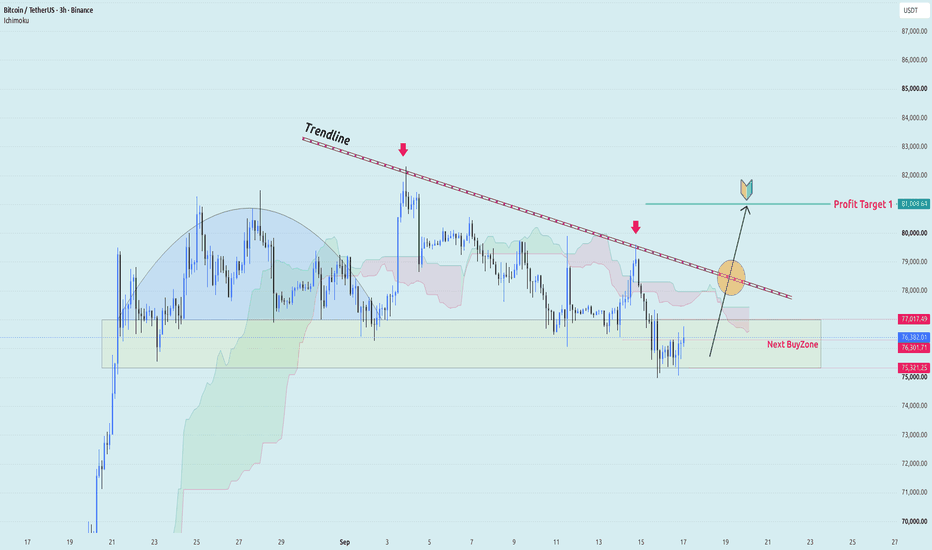
XAU/USD - Breaks Trendline, Buyer Eye 4,530OANDA:XAUUSD is showing its first meaningful change in structure after pushing above the long descending trendline. Price is still holding inside the 4,290–4,360 buy zone, so the next confirmation is simple: buyers need to keep this area from turning back into resistance.
If the breakout holds and Gold builds above 4,360, I’m watching:
🎯 Target: 4,530
Macro Market: The backdrop has improved for Gold. Oil prices are easing and the US 10-year Treasury yield has pulled back to around 4.94%, reducing some of the pressure on non-yielding assets. Gold has already benefited from lower yields and a softer Dollar.
A sustained H2 move back below 4,290 would weaken the breakout setup.
AURICVERSE View: this is more interesting than another simple bounce from support. The trendline is finally being challenged from above. If buyers can turn 4,290–4,360 into a base, 4,530 becomes the next level in focus. Long 
 Long
Long
Bitcoin may fall to 58000 againCOINBASE:BTCUSD
Namaskaram Everyone
Why is very important, why i am giving you a sell here.
so here is my reasons.
# As per neowave Market finished a major bullish trend at the top 1,26,296.
Retraced 61 percent from there.
# Now we are seeing a price jump from this 61 percent which is 60,000 price area.
But market is only given a price wise fall here , still there is some space for consolidation a time wise correction
# Major resistance area is 98,000 , no doubt about it. But if this is going to be an diagonal than price must retrace from current area in form of ((D)) and ((E)) leg.
# if this happen than we have a great risk to reward ration of 10 times and if we do compounding than more.
# Now why price must behave this way, honestly price can behave any number of ways but this way we a good risk reward ratio so we are givng a trade suggestion here.
I dont post regulary updates about instrument, but i have found a new approch to neowave and its easy to code and update. so if you are interested in Neowave Trades , keep following us.
and if you have any query related to anything , you can leave comment here.
Thank You.
Thank You. Short 
Gift Nifty Wave Structure Day time Frame📊 GIFT Nifty Elliott Wave Structural Details
Minor Degree Wave A: Formed and completed in Red Colour.Minor Degree
Wave B Completion Structure:
Wave B develops internally as a Minuette Degree abc structure in Black Colour.
The internal wave c of this black structure forms an Ending Diagonal (Wedge).
The termination of this internal wave c officially completes the entire Minor Degree Wave B.
The Motive Impulse Breakout: A powerful impulse wave breaks out of the Ending Diagonal Wedge, which is labeled as the first sub-wave of the next trend:
Wave C Anticipation?
Minuette Degree Wave ((i)).The Blue Correction Phase: This Minuette Wave ((i)) then undergoes a counter-trend correction, developing as an abc Minuette Degree correction in Blue Colour.
The completion of this blue correction marks the end of Minuette Degree Wave ((ii)).
The Next Impulsive Blast: With the blue corrective phase ((ii)) successfully printing its bottom, the market structure sets the stage for an explosive, highly vertical sequence through Waves ((iii)), ((iv)), and ((v)).
This macro sequence will ultimately complete the larger Minor Degree Wave C.
⚠️ EDUCATIONAL DISCLAIMER & STRUCTURAL VALIDATION NOTEFor Educational Purposes Only:
This Elliott Wave analysis, structural breakdown (Minor, Minuette, and Sub-Minuette degree counts), and color-coded mapping are compiled strictly for educational and analytical purposes. It does not constitute, under any circumstances, direct financial, investment, or trading advice. Index derivatives (Futures and Options) involve extreme leverage, high volatility, and the risk of total capital loss. Any trading execution based on this structure is carried out at the user's independent discretion. Structural Validation Level Analysis (22,248.8):
In Elliott Wave Theory, rules are absolute. The horizontal price level marked at 22,248.8 serves as the line in the sand for the entire macro bullish projection. While above: As long as the market strictly holds above 22,248.8, the structure remains perfectly intact. The completion of the black ending diagonal (wave c of B) followed by the blue wave ((ii)) correction is mathematically valid, keeping the multi-month target toward the 26,200+ Target Area active.If Breached: If a daily candle closes below 22,248.8, the entire structural count is instantly invalidated. A breach means the underlying market structure has shifted, signaling that the corrective phase is not over and preventing any aggressive long configurations from being executed under this specific setup.  Long
Long
Long 
Trading Secret - Entry Profit Planning''A good trade can become a bad trade simply because of where you enter. The problem is that direction alone does not make a good trade. Entry price matters too.''
1. The Same Idea Can Produce Two Very Different Trades
Imagine your BTC plan says the ideal entry is around 76,726, but price suddenly starts moving and you chase it around 77,236.
The market direction has not changed. Your analysis may still be correct. But your trade has changed.
You are now paying a higher price, your Stop Loss may need more room, and the distance to your target has become smaller. In other words, your risk-to-reward just got worse before the trade even started.
That is why I prefer to define the entry before the move happens.
2. Plan the Price Before Emotion Arrives
Before entering, I want three levels clear:
Entry: Where does the setup actually become attractive?
Invalidation: Where is the idea clearly wrong?
Target: Where is the next logical area to take profit?
Once those levels are defined, I do not need to make decisions while a large green candle is moving.
For example:
Planned Entry → 76,700
Stop → 75,900
Target → 79,500
Now the trade can be evaluated before execution. If price runs away without giving the entry, I simply miss the trade.
Missing a trade is usually cheaper than chasing one.
3. A Better Price Improves More Than Profit
A planned entry can improve the trade in several ways. You may get a tighter logical stop, better risk-to-reward and less emotional pressure after entering.
This is why experienced traders often wait for:
Pullbacks, retests, support reactions or limit-entry zones
instead of buying after an explosive candle.
The goal is not to find the absolute lowest price. The goal is to enter where risk and potential reward make sense together.
4. When I Refuse to Chase
If price has already moved far beyond my planned area, I ask one question:
“Would I still take this trade if I had not seen the previous move?”
If the answer is no, I leave it.
There will always be another BTC breakout, another Gold pullback and another Forex setup.
Good trading is not about participating in every move. It is about participating when the price is good enough for the risk you are taking.
The Simple Rule
My execution process is:
Plan the Entry → Define the Stop → Check Risk/Reward → Execute → Do Not Chase
Sometimes a limit order will never be filled. That is normal.
The purpose of entry planning is not to guarantee a trade. It is to prevent FOMO from turning a good analysis into a poor execution.
A profitable idea still needs a good price. Education 
XAUUSD — Bullish Wave Structure Toward 4,490
From Kelly’s view, gold is rebuilding a bullish structure after breaking away from the previous descending trendline. Price is trading around 4,391, and the recent recovery suggests buyers are trying to establish a new impulsive sequence toward the upper Fibonacci resistance zones.
The key idea is simple: the main trend may stay bullish while price continues to form higher lows, with 4,405–4,415 acting as the first important resistance test before a potential expansion toward 4,459 and the 4,488–4,497 area.
⟡ Market structure
Gold has recovered strongly from the 4,240–4,260 swing-low area and is now trading above the former descending trendline.
The short-term structure has shifted toward higher lows, while the projected Elliott Wave path suggests another bullish impulse may be developing.
The first obstacle is the Fibonacci resistance zone around 4,405–4,415. If buyers can absorb selling pressure here, price could continue toward 4,433 and 4,459.
Above that, the major resistance and projected Wave (5) completion zone sits around 4,488–4,497, close to the 2.618 Fibonacci extension.
➤ Key levels
◌ Current price area: 4,390–4,395
◌ Main bullish retest zone: 4,375–4,390
◌ Strong support: 4,335–4,350
◌ First resistance: 4,405–4,415
◌ Key resistance: 4,433
◌ First target: 4,459
◌ Main target: 4,488–4,497
◌ Invalidation: Below 4,335
⌁ Elliott Wave view
Wave (1): The current recovery may extend toward the 4,405–4,415 resistance area.
Wave (2): A controlled pullback toward approximately 4,375–4,390 could follow if buyers take profit near resistance.
Wave (3): If the pullback holds and bullish confirmation appears, the stronger expansion could target 4,459.
Wave (4): Price may then consolidate or retrace toward the 4,430–4,440 area.
Wave (5): The final bullish leg could extend toward 4,488–4,497, where the major Fibonacci resistance and projected Wave (5) target overlap.
▸ Trading scenario
Preferred bullish scenario
Entry: 4,375–4,390 after bullish confirmation
Stop Loss: Below 4,335
Take Profit 1: 4,410–4,415
Take Profit 2: 4,459
Take Profit 3: 4,488–4,497
The cleaner plan is to wait for buyers to defend the projected Wave (2) retracement area rather than chase price directly into Fibonacci resistance.
Alternative scenario:
If gold breaks and holds above 4,415 without a deeper pullback, a confirmed retest of this zone could support continuation toward 4,433–4,459.
◌ Invalidation
The bullish structure would weaken if price loses the 4,335–4,350 support area and begins trading back below the recent higher-low structure. A sustained break below 4,335 would invalidate the preferred bullish wave sequence.
⌁ Kelly’s view
Kelly’s main view remains bullish while gold continues to defend its higher-low structure above 4,335–4,350.
The immediate test is 4,405–4,415. If buyers can break and hold above this Fibonacci resistance, the next wave may open the way toward 4,459, followed by the larger 4,488–4,497 Wave (5) target.
Do you think gold will complete this bullish wave structure toward 4,490, or retest the key support zone first? Long 
Brent Crude started to roll over - is this a final top?Brent achieved a little over 78.6% retracement of the previous fall from the war peak in oil prices. Recently, I published an ED pattern on Brent that shows a possible top. Brent has the same pattern on the hourly chart, and it has broken down. On the daily chart, this ED is wave 5 of C, which means that this move higher in Oil could technically be coming to an end. The chart below is a daily chart on an arithmetic scale. On this scale, it is also near the top end of a rising channel. At this level, sentiment was 91% bullish, which has now fallen back a bit with prices. Logically, if the wave count is correct, oil prices should slowly keep easing from here for months to come. Similar to what happened after June 2022, when the Russia-Ukraine war was in its 6th month.  Short
Short
YATHARTH — ELLIOTT WAVE IMPULSE SETUPYatharth Hospital and Trauma Care Services Ltd ( NSE:YATHARTH ) — Elliott Wave Impulse Setup
Bias: Bullish
Timeframe: Daily
CMP: ₹1,072.4 (+9.17%)
Wave Structure:
Price is tracing a larger-degree impulse from the origin (O):
Wave (I) topped near ₹680
Wave (II) corrected down to ~₹340, respecting the O–II support trendline
Wave 1 (of III) rallied to ~₹985
Wave 2 pulled back to ~₹540, holding the lower boundary of the rising wedge
Price has now broken above the upper trendline resistance (~₹950–1000), signaling a potential Wave 3 in progress
Key Levels:
Stop Loss: ₹610 (tighter, trailing stop just below recent structure)
Invalidation: ₹538 (below the Wave 2 low — a close below this negates the entire bullish count)
Expected Target Zone: ₹1,600 – ₹2,200 (Wave 3 extension zone)
Thesis:
The breakout above the wedge resistance, backed by strong volume/momentum, supports the idea that Wave 3 — typically the most extended and powerful wave — is now unfolding. The two-tier risk framework (stop loss vs. hard invalidation) lets you manage the trade actively while keeping the broader bullish structure intact unless ₹538 is breached on a closing basis.
Risk Note:
This is a subjective wave count, not a guarantee. If price closes below ₹610, tighten risk management; a close below ₹538 fully invalidates this bullish scenario and the count should be reassessed.
Disclaimer: For educational purposes only, not investment advice. Elliott Wave counts are subjective and can be invalidated. Trade at your own risk — consult a SEBI-registered advisor before investing. XAU/USD - Buyer Reclaim, Next Breakout WaveOANDA:XAUUSD is reacting from the 4,250–4,310 buy zone, but price is still trapped below the long descending trendline and beneath the Ichimoku structure. This keeps the broader pressure bearish, while the current setup remains a conditional recovery trade.
If buyers continue to defend the zone and Gold breaks and holds above the descending trendline, I’m watching:
🎯 Target: 4,500
Macro Market: The Fed has now raised rates and signaled that further tightening remains possible. The decision pushed the US Dollar and Treasury yields higher, creating a clear headwind for non-yielding Gold. This means any bullish recovery still needs strong technical confirmation rather than simply buying support.
A sustained H2 move below 4,250 would weaken the recovery setup.
AURICVERSE View: the buy zone is holding, but buyers still have one major job — break the descending trendline. If they do, 4,500 comes back into focus. Long 
 Long
Long

S&P 500: Fed Speaks, Chart Hits 0.618The Fed just blinked hawkish — and the market moved almost exactly where the chart said it might.
On September 16, the US Fed raised rates by 25 bps — the first hike in three years. The move itself was already priced in (92% odds going in). What actually shook the market was two words from Fed Chair Kevin Warsh: he said policy needs to support a "timelier return" to the 2% inflation goal. Markets read that as "more hikes are coming, and soon" — and that's what sent the Dow down 630+ points and dragged the S&P 500 lower with it.
Here's where it gets interesting for chart readers: the S&P didn't just fall — it fell and stopped almost exactly at the 0.618 Fibonacci retracement (7,505.98) of the entire rally from the May low. 0.618 is called the "Golden Ratio" for a reason — it shows up everywhere in nature, and in markets it's the most-watched retracement level of all. So many traders have orders sitting near it that it often becomes a self-fulfilling floor or ceiling. That's exactly what played out here.
The wave count on the chart
Zooming out, here's the structure I'm tracking:
Wave (I) → (II) : The May–August move up (I) got corrected by an a-b-c "Running Flat." . Two tells confirm this: wave (b) made a slightly higher high than wave (I), and wave (c) barely dipped below wave (a)'s low before buyers stepped back in. A shallow, reluctant wave (c) is a classic sign the bigger trend is still up — running flats usually show up right before a strong wave 3.
Wave (1) → (2) : After (II) bottomed near 7,313.92, price rallied to 7,816.70 (wave 1), then pulled back — and that pullback is exactly the move the Fed news triggered, landing right on the 0.618 line at 7,505.98.
Why this level matters
7,313.92 (the wave II low) is the line in the sand. As long as price holds above it, this bullish count stays valid. A daily close below it would mean this labeling needs a rethink.
If the count holds
Using the wave (II)-low-to-wave (2)-low as the base of a trend channel, and projecting a simple 1x extension of wave (1) from the wave (2) low, the first target zone lines up around 8,010. Third waves often run further than 1x — so if this move has real strength, a stretch target near 8,300 (1.618x) isn't out of the question either. These are reference zones to watch, not predictions of exact outcomes — wave 3 needs to actually break above 7,816.70 with strong, clean structure before this becomes more than a scenario.
Bottom line
Macro (hawkish Fed) and technicals (Golden Ratio holding, running flat completing) lined up perfectly this week. The structure stays bullish above 7,313.92. Above 7,816.70 with strength would be the next confirmation to watch for.
Disclaimer:
I am not a SEBI registered research analyst. This post is shared only for education and learning purposes, based on my personal reading of the chart. It is not a buy or sell recommendation. Please do your own research or speak to a registered advisor before taking any trading decision.  Long
Long


